Safely integrating and running Office 365
One-Stop Shopping
Office 365 is becoming increasingly important to companies. One reason is that Exchange Server 2013 now works in hybrid environments in combination with Office 365 without any problems. Administrators can therefore use local Exchange servers and gradually migrate users into the cloud. The cloud solution's security is also important in this context, however, and a few points need to be considered regarding this matter.
Corporations that run Office 365 and Exchange Server 2013 in parallel or want to migrate to Office 365 can use all the same tools from Exchange Server 2013. Microsoft enormously improved the Hybrid Configuration Wizard in Exchange Server 2013 with Service Pack 1 and upgraded the subsequent cumulative updates to CU7. You can connect your local Active Directory (AD) forest to Office 365 using a wizard. It used to be possible only to connect one AD forest and thus just one Exchange organization to each Office 365 client.
However, since SP1 for Exchange 2013, you can join multiple AD forests, each with their own Exchange organizations, in a single Office 365 subscription. Companies can therefore also group distributed Exchange organizations in a common organization. This alone increases security because connectors are no longer needed and fewer administrative accounts and interfaces are required. The backup process is also simpler, and it's easier to keep track of things.
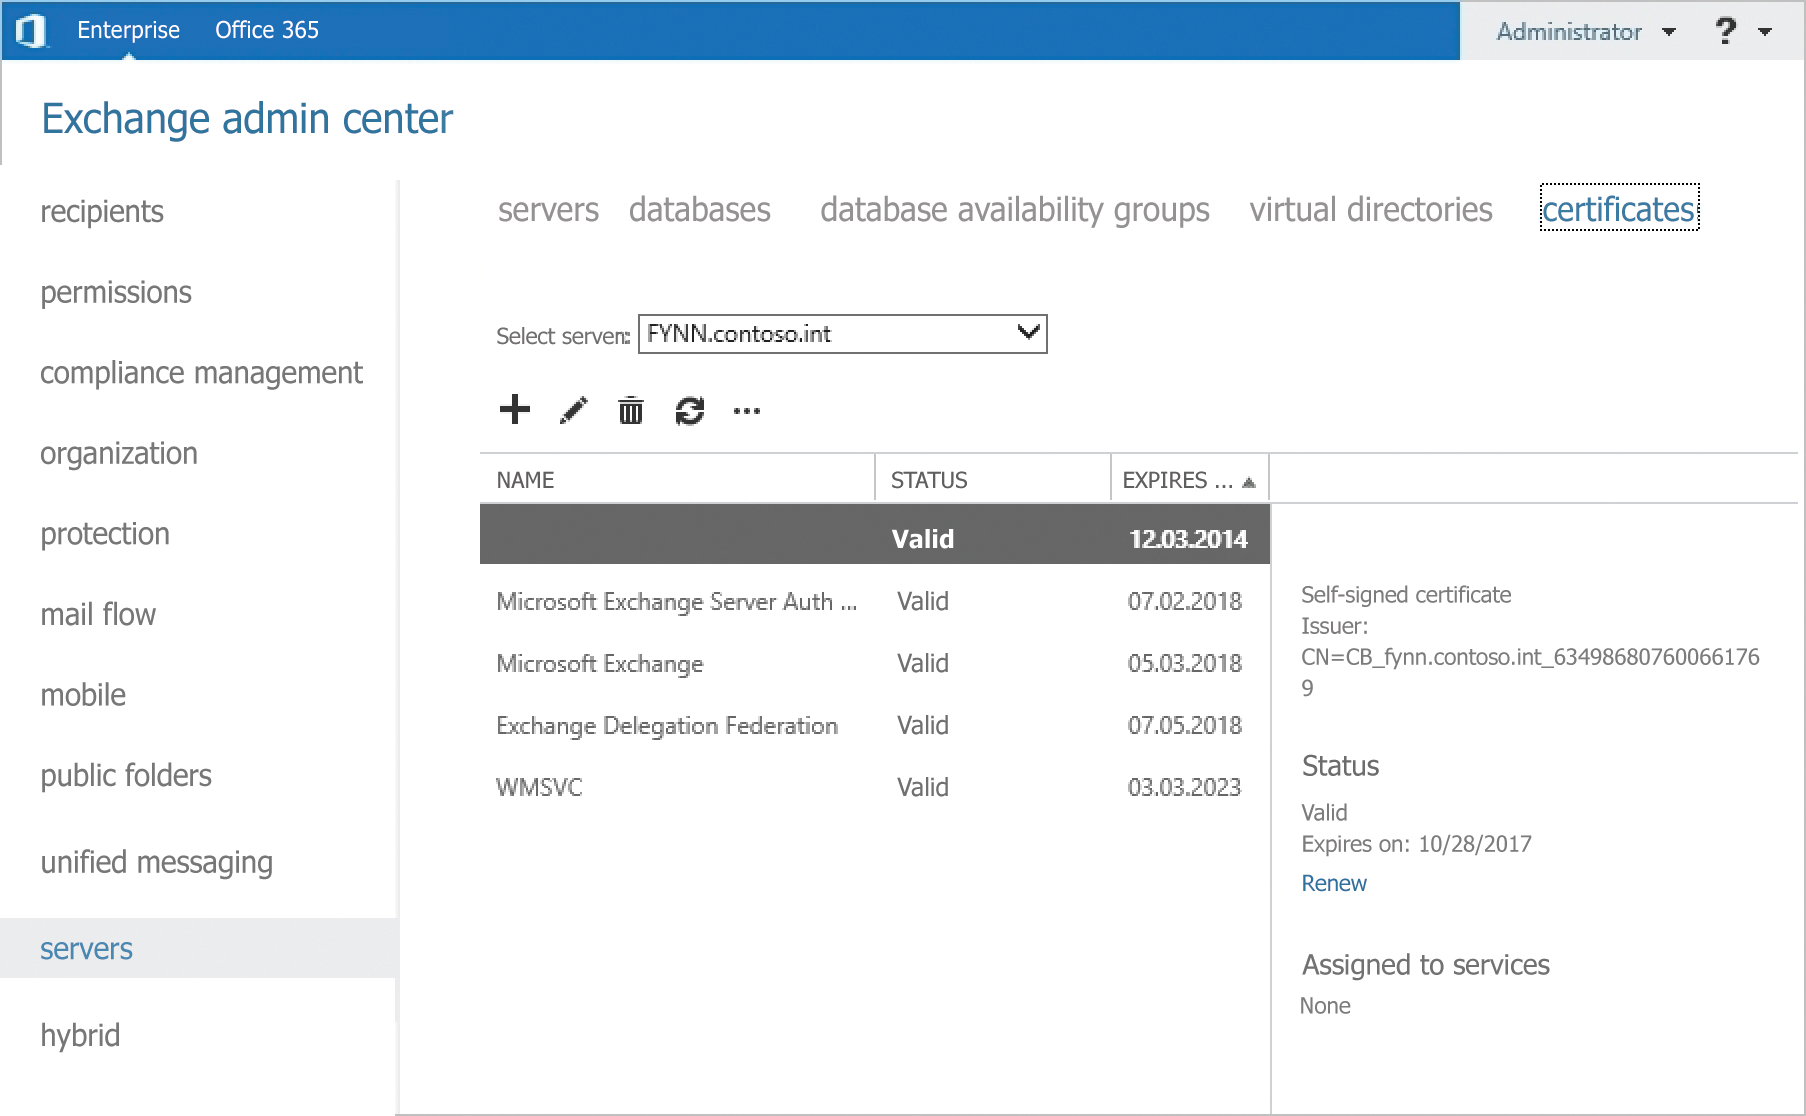
Microsoft also provides instructions for hybrid deployment on TechNet [1], which can help you plan the transition. The certificates in the various AD environments are an important aspect in hybrid deployments as well as in the security field. You need to use a separate certificate from a trusted certification authority in each forest: You can't work with one common certificate for all forests (Figure 1).

The hybrid deployments require synchronization with the local Active Directory. For this, you can use Microsoft Forefront Identity Manager (FIM) 2012 R2 or, even better, Microsoft Azure Active Directory Connector [2]. The data must be synchronized before you configure the hybrid deployment. You should also set up a single sign-on between Office 365 and the forests based on this synchronization.
Unlocking Intrusion Detection and Firewalls
You should also check the firewall logs when moving mailboxes from local Exchange environments to Office 365. Any problems or deleted packages should appear in the firewalls' logs. Technologies in the intrusion detection and prevention area like to interfere with the network traffic between Exchange and Office 365. This is especially true for businesses that use Microsoft Forefront Threat Management Gateway (TMG).
You should generally enter the IP addresses [3] for the Office 365 servers in your exception lists and trusted subnets for the firewalls. Load balancers often cause problems in this context because connections to Office 365 via the firewall can be lost when IP addresses change. You should define corresponding fixed routes in this area, too.
Keeping an Eye on Email Security
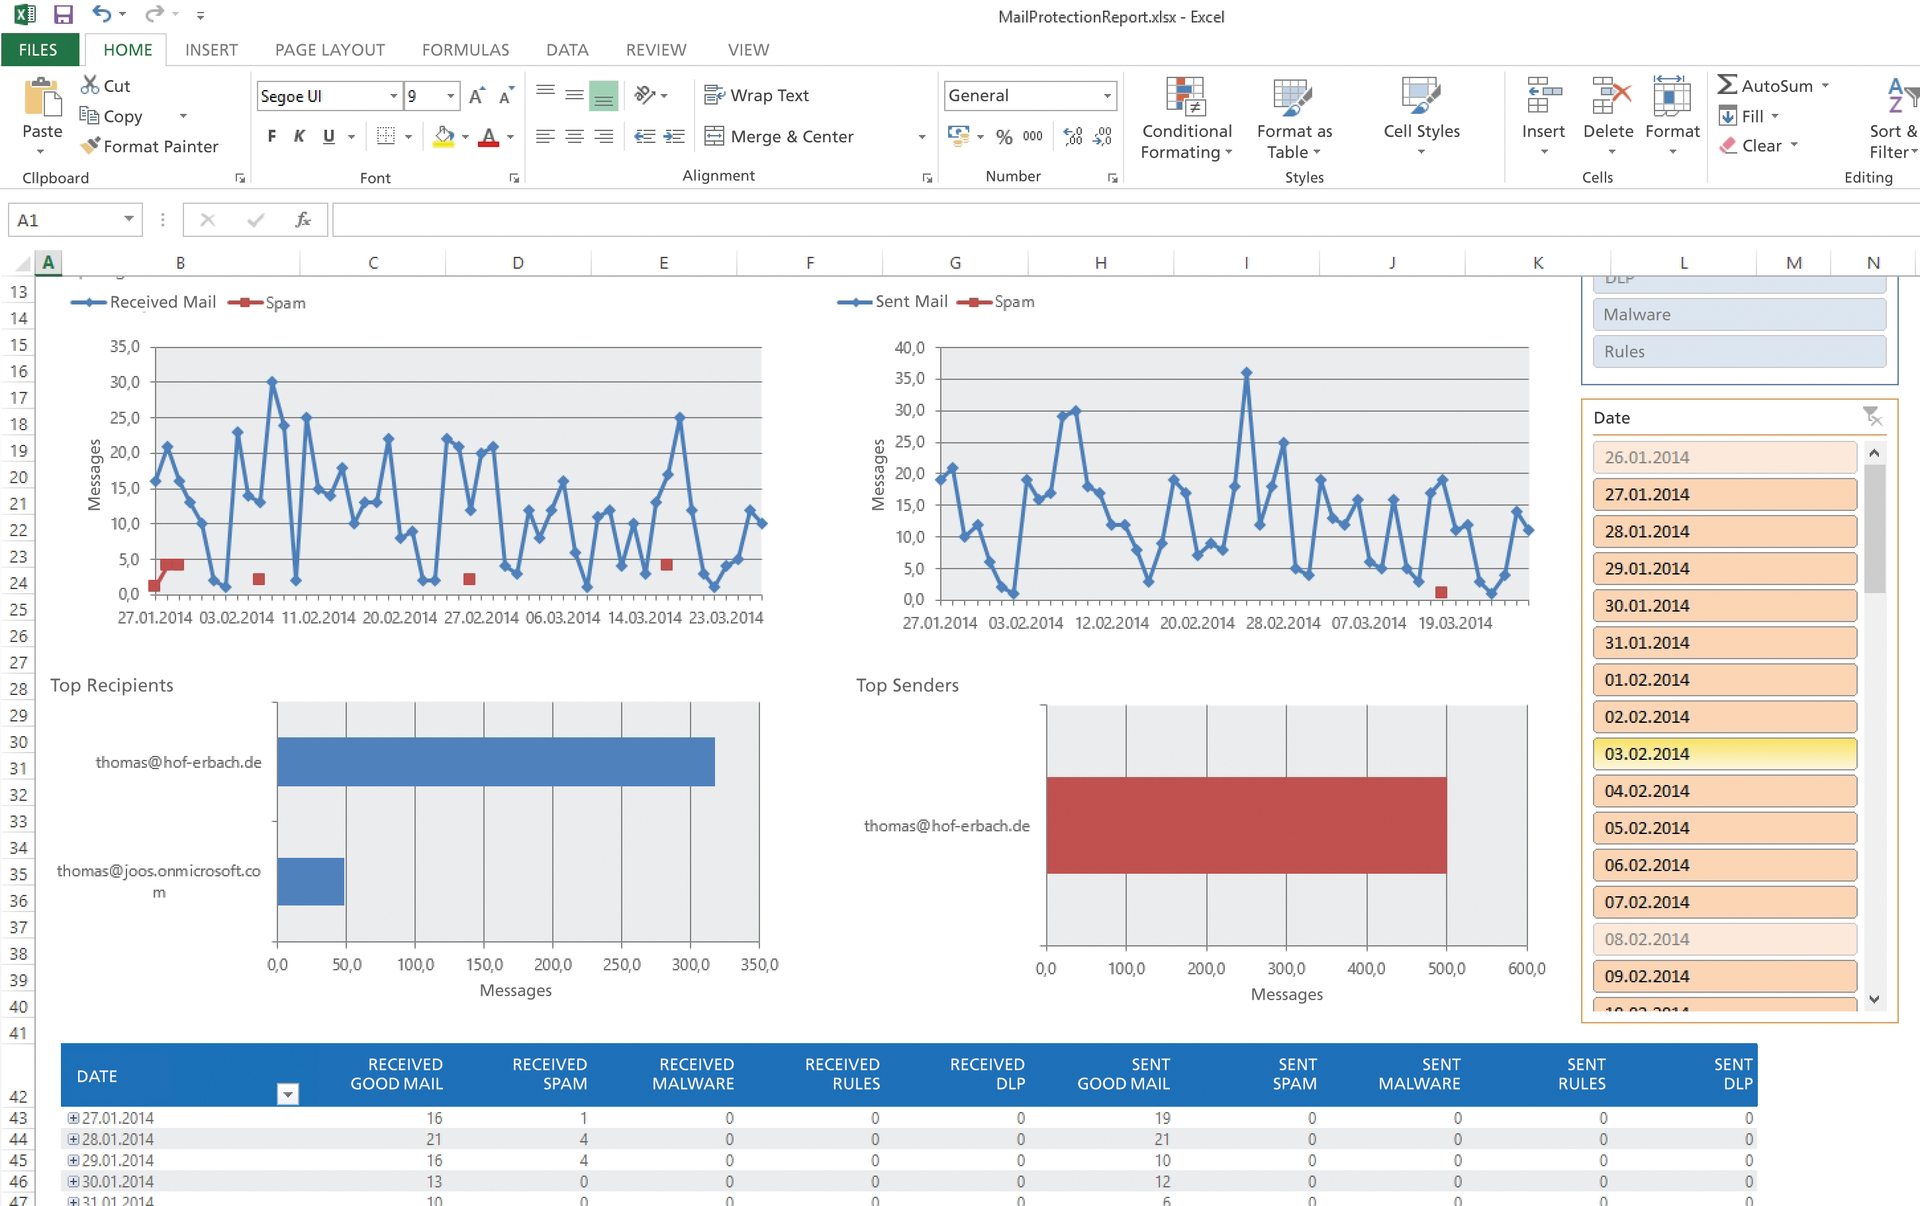
Once you've moved the first users to Office 365, you should make sure to keep an eye on the security of the email environment here, as well. Microsoft provides Mail Protection Reports for Office 365 [4] for this purpose. These reports can be used to prepare reports from Office 365 completely in Excel. You'll need Excel 2013 and .NET Framework 4.5 on your computer to perform an analysis using this tool. After logging on to Office 365, the tool will download the necessary data from the Internet and display comprehensive reports. You can also run separate queries in the table based on days or mailboxes. You have the option to analyze virus attacks and show the most common recipients and senders. Spam messages that were received or sent can also be evaluated in the same way as mailbox rules, Data Loss Prevention (DLP) actions and events, and much more.
Once you've installed the extension on a computer, launch the special Excel table either using the new icon on the desktop or via the C:\ProgramData\Microsoft\MailProtectionReports directory (Figure 2). Then, log in to Office 365 and select the period for which you want to create a report. Mail Protection Reports for Office 365 then loads the necessary data from your Office 365 subscription and displays an evaluation.

You will see the number of email messages sent and received in your company in the top section. In the bottom section, you will see the most common recipients and senders of email. You can, of course, also look at data with the exact date. You can view current data or create new queries at any time using the Query and Update buttons in the top section. If you have the data you want in the table, you can store the intermediate results.
Right-click Spam to get an overview of spam email and frequent recipients. Additionally, you can also filter email according to DLP rules or virus mail. You just need to click on the appropriate buttons. You'll find different tabs containing this information in the bottom section. The report is part of any comprehensive security analysis in Office 365.
Encrypting Messages
Microsoft has also included functions for encrypting email in Office 365. The encryption works not only within your Office 365 subscription, but also for external companies. Message encryption is included for free in the E3 and E4 license editions of Office 365. Azure Active Directory Rights Management is also part of these editions. This cloud technology contains the functions for Office 365 encryption.
Companies that use the smaller E1 and E2 editions can license the functions for about $2 per user. The corresponding options are in the Office 365 portal. Office 365 automatically encrypts email that meets the criteria based on transport rules:
- Click Administrator in the web interface and select Exchange.
- Click mail flow and then rules.
- Create a new rule using the plus sign. Select Create new rule.
- Give the rule a name.
- Select the criteria under which Office 365 should encrypt email in Apply this rule if.
- Click More options.
- Select the Modify the message security | Apply Office 365 Mail Encryption option under Do the following.
Using OneDrive for Business with Encryption
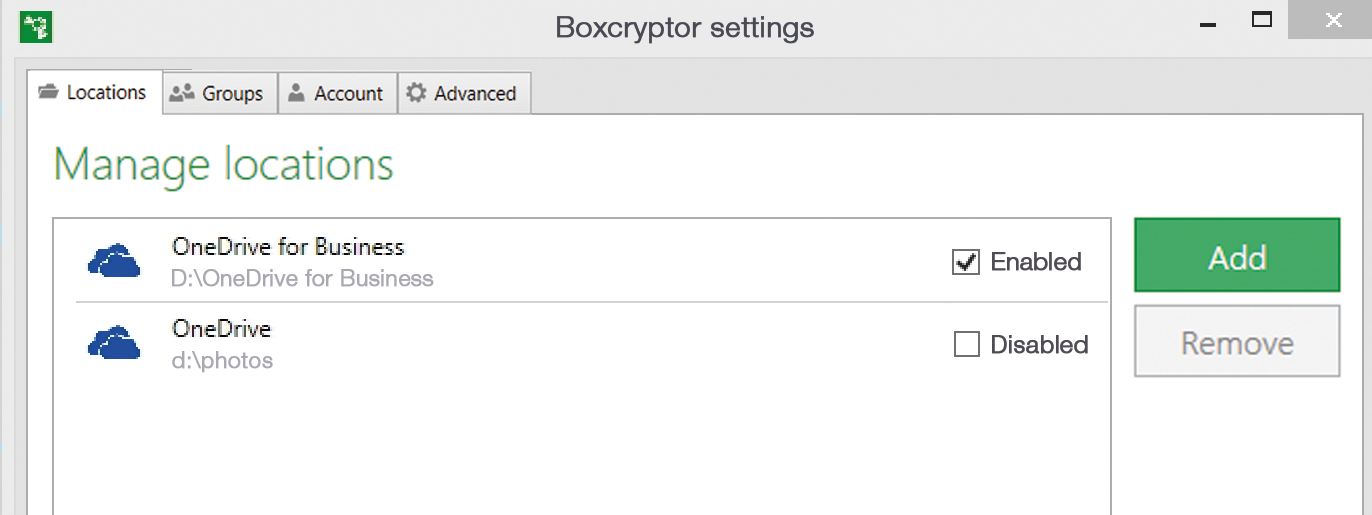
Microsoft provides subscribers to Office 365 unlimited cloud storage via OneDrive for Business, but it is not possible to encrypt the data in the cloud storage using the available resources. Only a few tools in this area can help with encrypting data. For example, you can use the Boxcryptor tool [5] to encrypt data using AES-256 and RSA. The data is encrypted with a password and a keyfile. If the file is lost, users won't be able to access their encrypted files. The file is stored locally and should be backed up.
A new drive is available in Explorer after logging on. Boxcryptor encrypts all data copied here. Settings can be activated and adjusted via the Boxcryptor icon context menu in the tray area of the taskbar next to the clock. The different cloud storage is connected here and activated for Boxcryptor. Data can be encrypted in the Boxcryptor drive via the context menu of encrypted files. This is useful is users want to share files via OneDrive (Figure 3).

Multifactor Authentication in Office 365
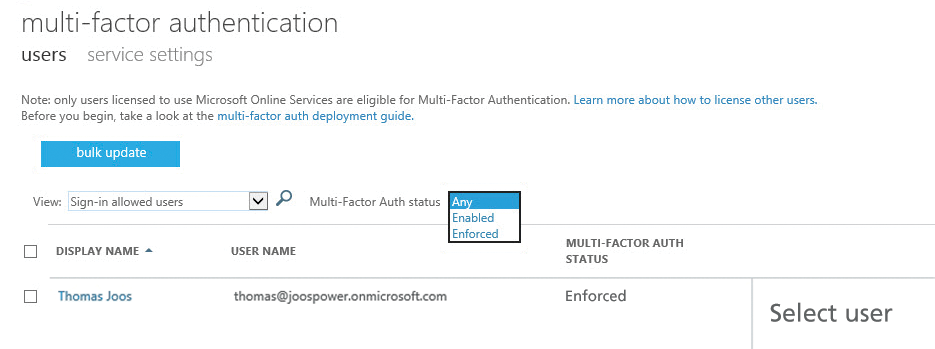
As well as email encryption, security also plays an essential role when logging on to Office 365 web services. Companies can protect particularly security critical user accounts from hacker attacks and incorrect logins by using multifactor authentication (MFA) in Office 365 (Figure 4). To begin, click Active Users in the users and groups section in the Office 365 Admin Center. Here, you'll see all the created users on the right-hand side. The Set Multi-factor authentication requirements option is in the top section. As soon as the user logs on to the Office 365 portal the next time, he or she will receive a message saying that multifactor authentication has been activated and needs to be set up.

As part of the setup, users can decide what kind of multifactor authentication they want to use. In a new window, you have the option to choose between mobile phone, telephone, and a mobile app. Users can also define whether they want to be called for the login or receive a text message containing a login code. The most convenient login is certainly the phone call because they only need to press the # key.
When using a mobile app, Office 365 automatically sends an authentication request to the smart phone app after the password has been entered. If you open this request, you just need to confirm the login. Even using the correct username and password wouldn't be enough for an attacker without this confirmation. Users can make changes in the user settings of their account and, for example, customize their phone number and other settings of the multifactor authentication.
Companies that use Microsoft Azure in parallel with Office 365 can expand their MFA function using Azure Active Directory Premium. This includes options to customize the appearance of the login page, reset passwords, or make this function available to users.
Office 365 PowerShell and Exchange
When Office 365 and Exchange are used in parallel, it may be useful to utilize the commands from the Exchange Management Shell in PowerShell with the Office 365 cmdlets. To do this, first save the Office 365 login data in a variable:
$cred = Get-Credential
Next, create a new PowerShell session that establishes a connection to Office 365 and Exchange Management Shell:
$Session = New-PSSession -ConfigurationName Microsoft.Exchange -ConnectionUri https://ps.outlook.com/powershell -Credential $cred -Authentication Basic -AllowRedirection
If you stored this data in the variable too, import it using
import-PSSession $Session
Then, you can manage local Exchange servers in a common PowerShell session and your Office 365 subscription.
Office 365 Policies via PowerShell
Because of the Internet connectivity of Office 365, companies can't control the locations from which users can access Office 365 services; that is, users who have the right to use Office 365 services can do so from anywhere. However, from Active Directory Federation Services 2.0 (ADFS 2.0) onward, companies have the option to create Client Access Policies. You can use these policies to determine from which locations users are allowed to connect. In such a scenario, users authenticate themselves using ADFS rather than the Office 365 web interface. They then forward the login to the cloud.
Microsoft provides the free Client Access Policy Builder [6] so that these policies can be created and implemented as easily as possible. The Client Access Policy Builder automatically creates policies and settings for most scenarios. The Client Access Policy Builder is a PowerShell script with a graphical interface. You can display this interface by double-clicking the PS1 file. However, you can also implement policies without this tool. Microsoft provides the corresponding instructions in TechNet [7].
Put simply, using the script, you just need to define that all external access to Office 365 should be disabled and that the cloud solution should only allow connections from within the company. Additionally, Client Access Policy Builder can also place web-based applications such as Outlook Web App and SharePoint Online on the exceptions list. The policies and IP addresses are configured using the graphical interface mentioned above, which is started from the script. You just need to select the appropriate option for the scenario that you want to use.
If you want to block all remote access to Office 365, you can specify IP address ranges from which users should have access to the blocked services. However, if VPN clients access Office 365 via an Internet connection, they are of course classified as internal clients. All settings can be adjusted afterward and undone again. You can use the PowerShell script for this or make settings manually. You need to copy the Client Access Policy Builder script to your primary ADFS server. If you use Windows Server 2012 R2, you need to make an adjustment for the script to work. To do this, open the script either in the editor or the PowerShell ISE. Search for the following line in the script:
If (($OSVersion.Major -eq 6) -and ($OSVersion.Minor -eq 2))
It is near the top of the script. Replace the -eq parameter with -ge so that Windows Server 2012 R2 is detected. If you don't make this change, an error message will appear in the graphical user interface, and you won't be able to set any rules.
Now start the script via the context menu. If everything is configured correctly, no error message will appear in the bottom section and the Create Rules for Claim Types option is active. You should now be able to work using the tool. The further procedure for disabling functions and IP ranges can be found in the tool's documentation.
Protecting Power BI
Microsoft offers an extension for Office 365 in the form of Power BI for Office 365 [8], which you can use to connect business intelligence applications (Figure 5). The biggest advantage of BI is the quick introduction to business intelligence, because everything companies need to evaluate their data can be operated via the cloud. Users can save the reports in SharePoint Online. The data is exchanged between your network and Power BI via a gateway that connects to a piece of agent software on the company servers.

In the settings of each data source, you can specify whether reports that use the data from this source can be stored in SharePoint Online or can only be stored locally on the network. By default, new data sources are set so that storage in the cloud is allowed. You can also determine in the data sources settings whether they may be searched using Power Query. This function is disabled by default. You can also determine in the settings for the data sources which tables and views should be available from the connected databases. Of course, you can specify for each data source in Power BI who is allowed to use them. You can set the necessary approvals by connecting the data source or at any time in their settings.
Besides setting authorizations for using data sources, it is also possible to delegate the management of Power BI and the integration of other data sources to another user in Office 365. Microsoft provides Role Management for this purpose. You can set global administrators here – that is, admins that have extensive rights in Office 365 Power BI – or group administrators. The group administrators are only allowed to manage the data sources and gateways that are assigned to this group; they're not allowed to adjust any other settings in Power BI.
Additionally, you can define users in the role management | data steward group who can certify queries with Power Query. If you work using DirSync, a tool for data synchronization between Active Directory and Azure Active Directory, you can control user logins via domain accounts. You can find the relevant settings in the Settings/General area. Microsoft explains what to do on a help page about this subject [9].
Conclusions
Office in the cloud is attractive for many companies because it provides them with flexible collaboration that is easy to set up. The integration with the local environment is no longer a problem, but such an extensive platform that is accessible from anywhere should be safeguarded accordingly. By just activating a few settings, you can determine which users are allowed to use which services from which locations, encrypt email, and set up multifactor authentication. Furthermore, you can see statistics about spam and malware, ensuring a good level of security – even if the data is unencrypted with the cloud provider.
