Security analysis with Microsoft Advanced Threat Analytics
Under the Radar
Microsoft Advanced Threat Analytics (ATA) is an extension of the Enterprise Mobility Suite (EMS). The purpose of this on-premises system is to detect suspicious activities on the network that potentially stem from attackers. ATA's focus is attacks on user login data, which explains why the software keeps a close eye on Active Directory (AD) domain controllers. The service is not designed just to protect endpoints such as smartphones or tablets, but also internal networks in Active Directory trees and in Microsoft Azure and Azure Active Directory.
In releasing ATA, Microsoft aims to give enterprises a tool that will protect networks against attacks through a variety of attack vectors. In most companies, users can access the enterprise data with an increasing number of devices and connections. Only a centralized tool like ATA is capable of keeping track of all these devices and detecting attacks quickly.
Setting up the tool is very easy; the network is analyzed immediately after its installation. You install a service that monitors the network and a central acquisition service that prepares the information. The installation can be on dedicated servers or on a server with other roles. Once you install and set up ATA – which should take around 10 minutes – the system starts to analyze the network. If a trojan program or an attacker attempts to read usernames from AD, for example, the tool will detect it and issue an alert in the web interface.
Hidden Attacks on the Network
What kind of attacks does ATA protect you against? According to Microsoft, 76 percent of all attacks on internal networks rely on stolen login credentials. For example, if a user logs on to the file server from their laptop, a large volume of data is transferred. If the user then accesses other services with their credentials, such as SharePoint, CRM, or other solutions, Active Directory creates tickets (hashes) to grant access.
If this information gets into the wrong hands, attackers can use the stolen credentials to access the network. It is possible to sniff a ticket, for example, from an infected computer – after all, Windows stores the data in RAM. This affects not only your own login data but also credentials belonging to other users – especially administrators – who can access the PC for maintenance purposes or to share files.
If an attacker sniffs an administrator's login credentials, the threat from the attack grows significantly. In both cases, attackers can access not only the services that the user regularly uses but also other systems on the network that the user does not normally access. These attacks are invisible – no data is destroyed or PCs bricked – the data is simply stolen. The situation can continue for a period of months without administrators, firewalls, or anti-virus scanners noticing anything. Currently, almost no solutions exist to protect enterprises from this kind of attack.
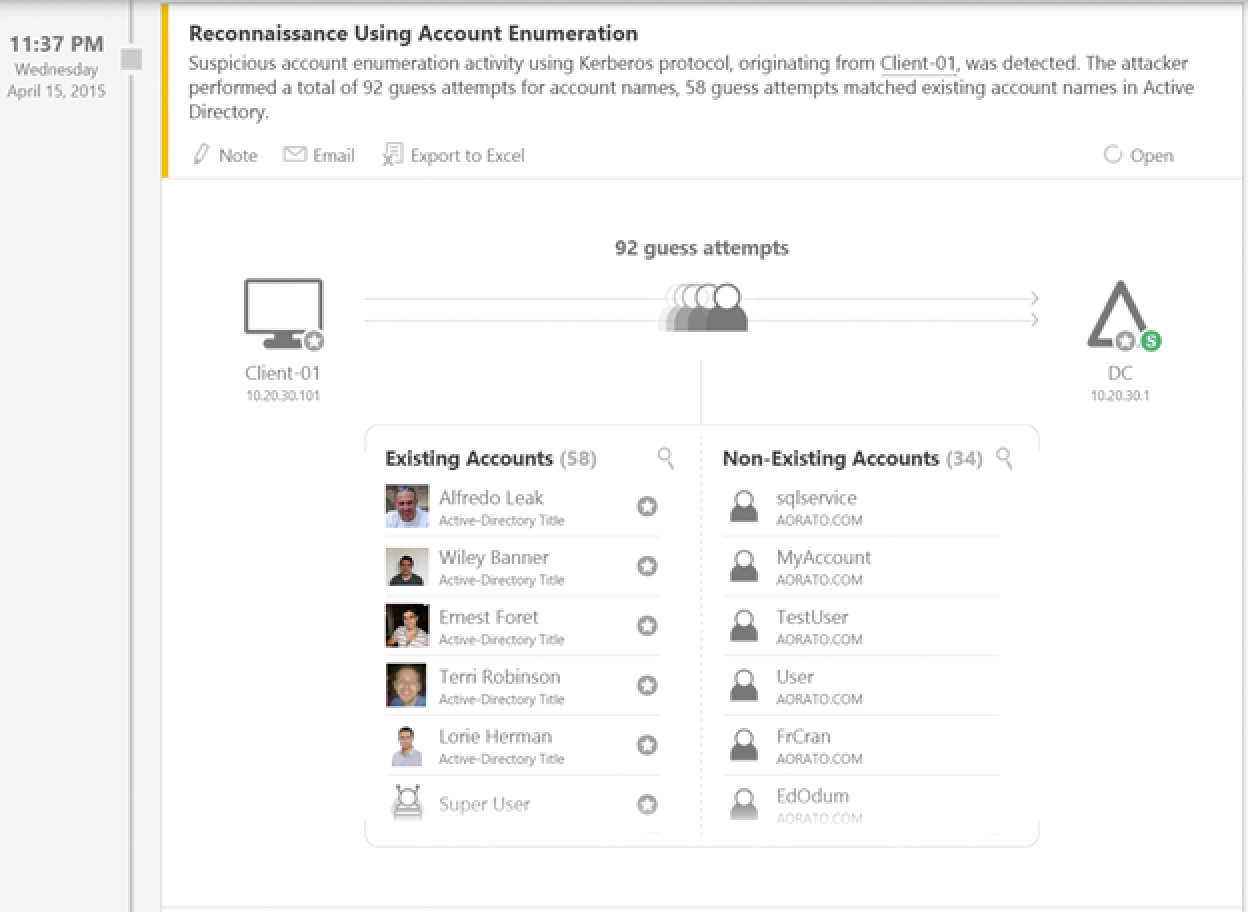
Once attackers have found active accounts, they can also try to brute-force the passwords of these accounts (Figure 1). Again, ATA detects this action immediately and alerts in detail, telling you the client that launched the attack, which domain controller is being used, and which user accounts are affected. Once the attacker has succeeding in stealing a password, he or she can log on to PC systems. Again, ATA detects this – showing all of these activities in an easily understandable way.

Deep Packet Inspection and SIEM
ATA aims not only to prevent attacks on the network but also to mitigate attacks that have already happened – identifying vulnerabilities and informing administrators of compromised networks and stolen user credentials. Protecting the network against attackers is the task of firewalls, antivirus scanners, and other security solutions. It is only when they fail that ATA enters the game; its task is then to detect ongoing break-ins and alert the responsible administrators.
To do so, the tool provides a web interface and offers the option of sending email or managing syslogs once it identifies an attacker. Many administrators use logfiles and network monitoring based on special tools to keep an eye on their networks. These methods, however, are no longer sufficient, and they are very inefficient in terms of analysis.
ATA uses machine learning technologies and real-time analysis of network transactions to detect attackers – even if they launch more complex attacks. Anomalies are detected by means of Deep Packet Inspection (DPI), which collates the network traffic in Active Directory and the data of Security Information and Event Management (SIEM) systems for analysis. These approaches collect information, evaluate the information, and alert as needed. The alerts can in turn be analyzed by ATA. This method also applies to information from syslog servers that is normally too complex for manual analysis. This collaboration is not mandatory, but it is the best possible approach.
In this way, ATA detects suspicious user actions (e.g., unusual login times on the computer) that indicate infected computers. Thanks to advance analysis, ATA also detects pass-the-hash (PtH) attacks mentioned earlier. These attacks do not target passwords directly; rather, they go after the hashes that Active Directory creates after a user has authenticated.
Attackers sniff these hashes and thus receive user or administrative privileges. This kind of attack is difficult to detect and remains unnoticed in most companies without solutions like ATA. This also applies to well-known variants like pass-the-ticket, overpass-the-hash, forged PAC (MS14-068), remote execution, golden ticket, skeleton key malware, reconnaissance, and brute force attacks.
ATA not only detects ongoing attacks, but also finds vulnerabilities that make attacks probable. For example, the tool detects user accounts belonging to system services that use passwords in the clear, incorrect trust relationship settings, and vulnerabilities in protocols and their interfaces.
Information Kept Simple
One of ATA's benefits is that you do not fully need to understand the variegated and complex attack vectors yourself as an administrator. ATA handles the network analysis and notifies you of all incidents. The interface for this is kept very simple and is easily understood by administrators who are not security experts.
There is also no need to define rules, install agents, or implement complex security scenarios to use ATA. The application analyzes domain controllers and networks for suspicious activity and gives you a level of detail that allows you to act on the information. Check out the AD developer blog to see what an attack can look like and how ATA reveals it to you [1].
The first step is for ATA to analyze the entire data traffic in the AD environment and the user access. All actions of the servers and users are logged, measured, and investigated. On the basis of this information, ATA then learns what a normal transaction looks like and which approaches are atypical and suspicious on the network. Then, based on its analyses, ATA can detect attacks on the network and discover the precise sequence of the attacks and their times. Attacks are reported to the administrators and countermeasures are launched. You are given a precise timeline of information, revealing when the suspicious activities occurred. For example, you can see when a user with a compromised account and computer accessed resources, and what these resources were.
Establishing the ATA Infrastructure
ATA comprises gateways that collect the information on the network and perform analyses. The general layout of an ATA infrastructure is not complicated. You first install the ATA Center on a server on your network. The installation wizard is a fast point-and-click experience. Microsoft ensured that provisioning the solution takes just a couple of minutes.
The ATA Center is the central management tool that collects all the information from the environment. You can connect various gateways to an ATA Center. To establish the environment, you thus ideally need multiple servers, but you can complete the entire installation on a single server. After completing the installation, ATA generates some rules of its own and analyzes the network, with no need for additional configuration or data updates – ATA works completely autonomously. Once the software has learned your users' habits, it can quickly identify unusual user behavior. The longer you operate the system, the more it learns.
Make sure you enable the necessary ports between the servers and for alerting administrators, which means the ports for SSL (443), HTTP (80), and HTTPS (443). One ATA gateway must be able to see all your network traffic. For this to happen, you need to set up port mirroring for each domain controller (DC) you want the tool to monitor. Microsoft describes the precise system requirements on TechNet [2].
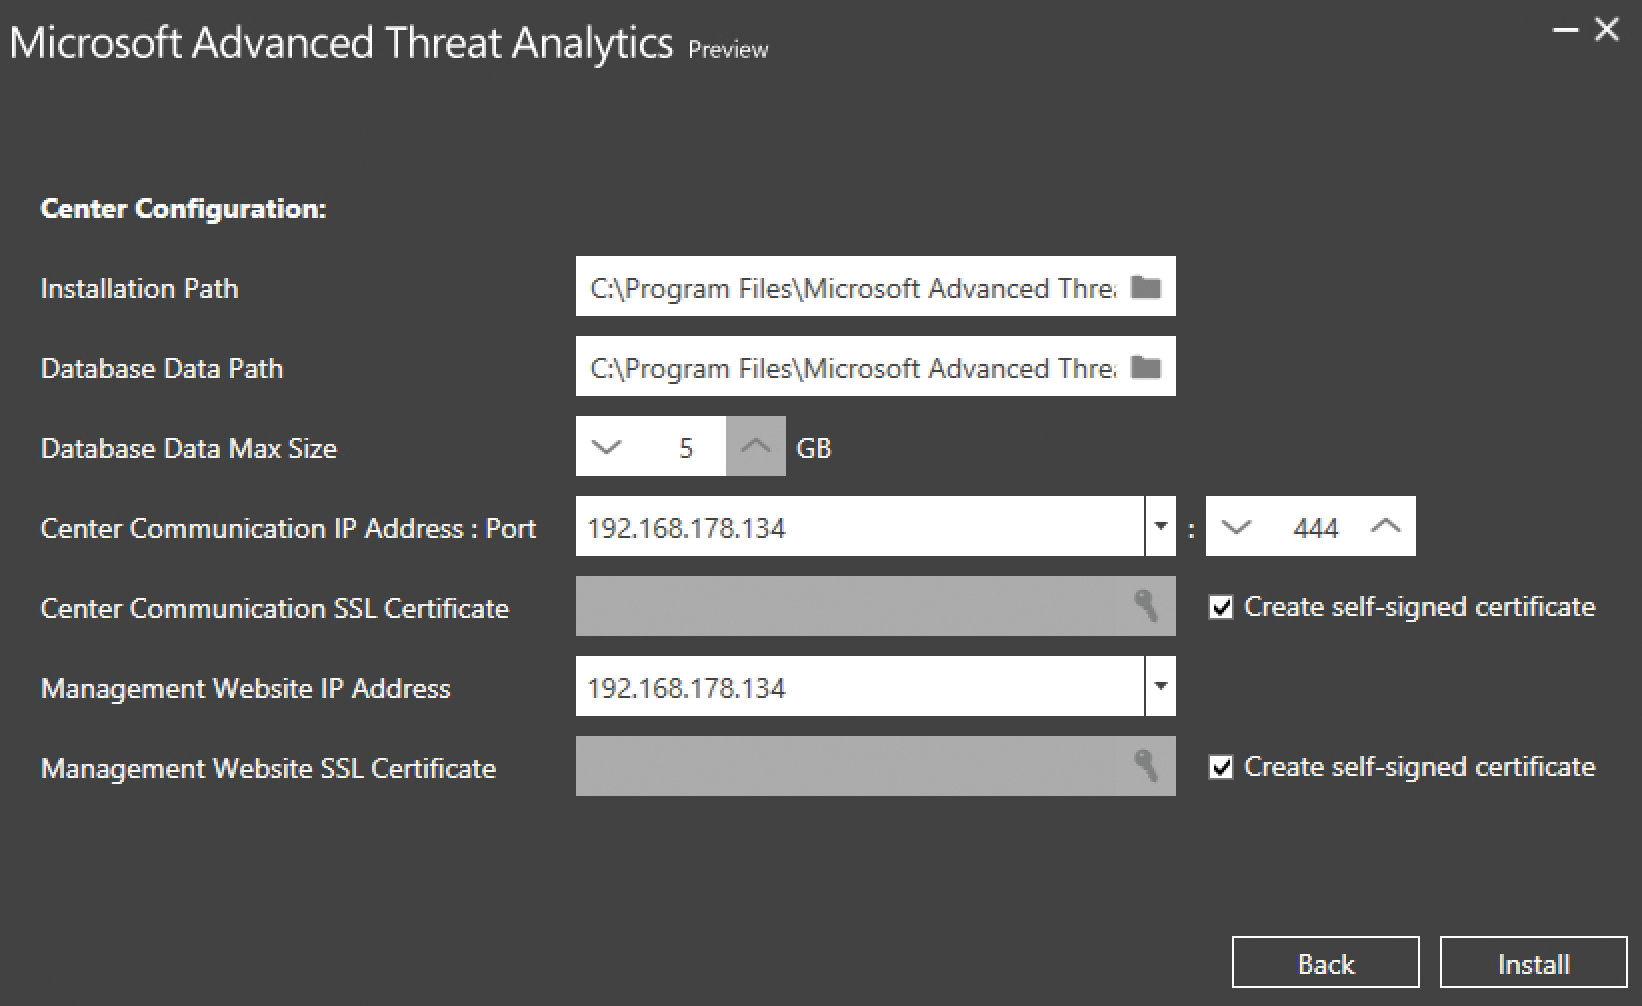
After meeting all the requirements, you then install the ATA Center. In the course of doing so, you also define the database size, the IP addresses, and other important settings. However, these details are fairly trivial. At the same time, you store the certificates for secure connections (Figure 2). In a lab environment, you can work with self-signed certificates. The Center Communication IP Address:Port can be set to the IP address of the management website during the setup. The important thing here is to use a different port.

ATA uses the free MongoDB database to store the data. By default, this resides in the %programfiles%\Microsoft Advanced Threat Analytics\Center\MongoDB\bin\data directory. The wizard stores the system files in %programfiles%\Microsoft Advanced Threat Analytics\Center. After using the wizard to set up the ATA Center, you need to open a connection to the console via the web interface. To do this, enter the IP address or name of the Center in your web browser. After logging in to the Center, you can manage the ATA environment in this console. Then, the main window will show you suspicious attacks and the actions that have occurred. First, however, you need to complete the configuration of the environment. To do so, you need the ATA gateways that investigate the network itself.
Configuring the ATA Gateways
After installing and setting up the ATA Center, you can access its management page by clicking the button on the server desktop or surfing to https://<server name or IP address>. After installing in a production environment, or in case of errors, you can check out the logfiles for troubleshooting. The file Microsoft.Tri.Center-Errors.log resides in %programfiles%\Microsoft Advanced Threat Analytics\Center\Logs.
The ATA Center and the ATA Gateway both run as services. Thus, you need to check that both of these services are running for the environment to work. You can also monitor ATA with the Windows Performance Monitor. To allow this, Microsoft has added the NetworkListener Captured Messages/sec and EntityTransfer Activity Transfers/sec features. For more information, check out the TechNet forum on ATA [3].
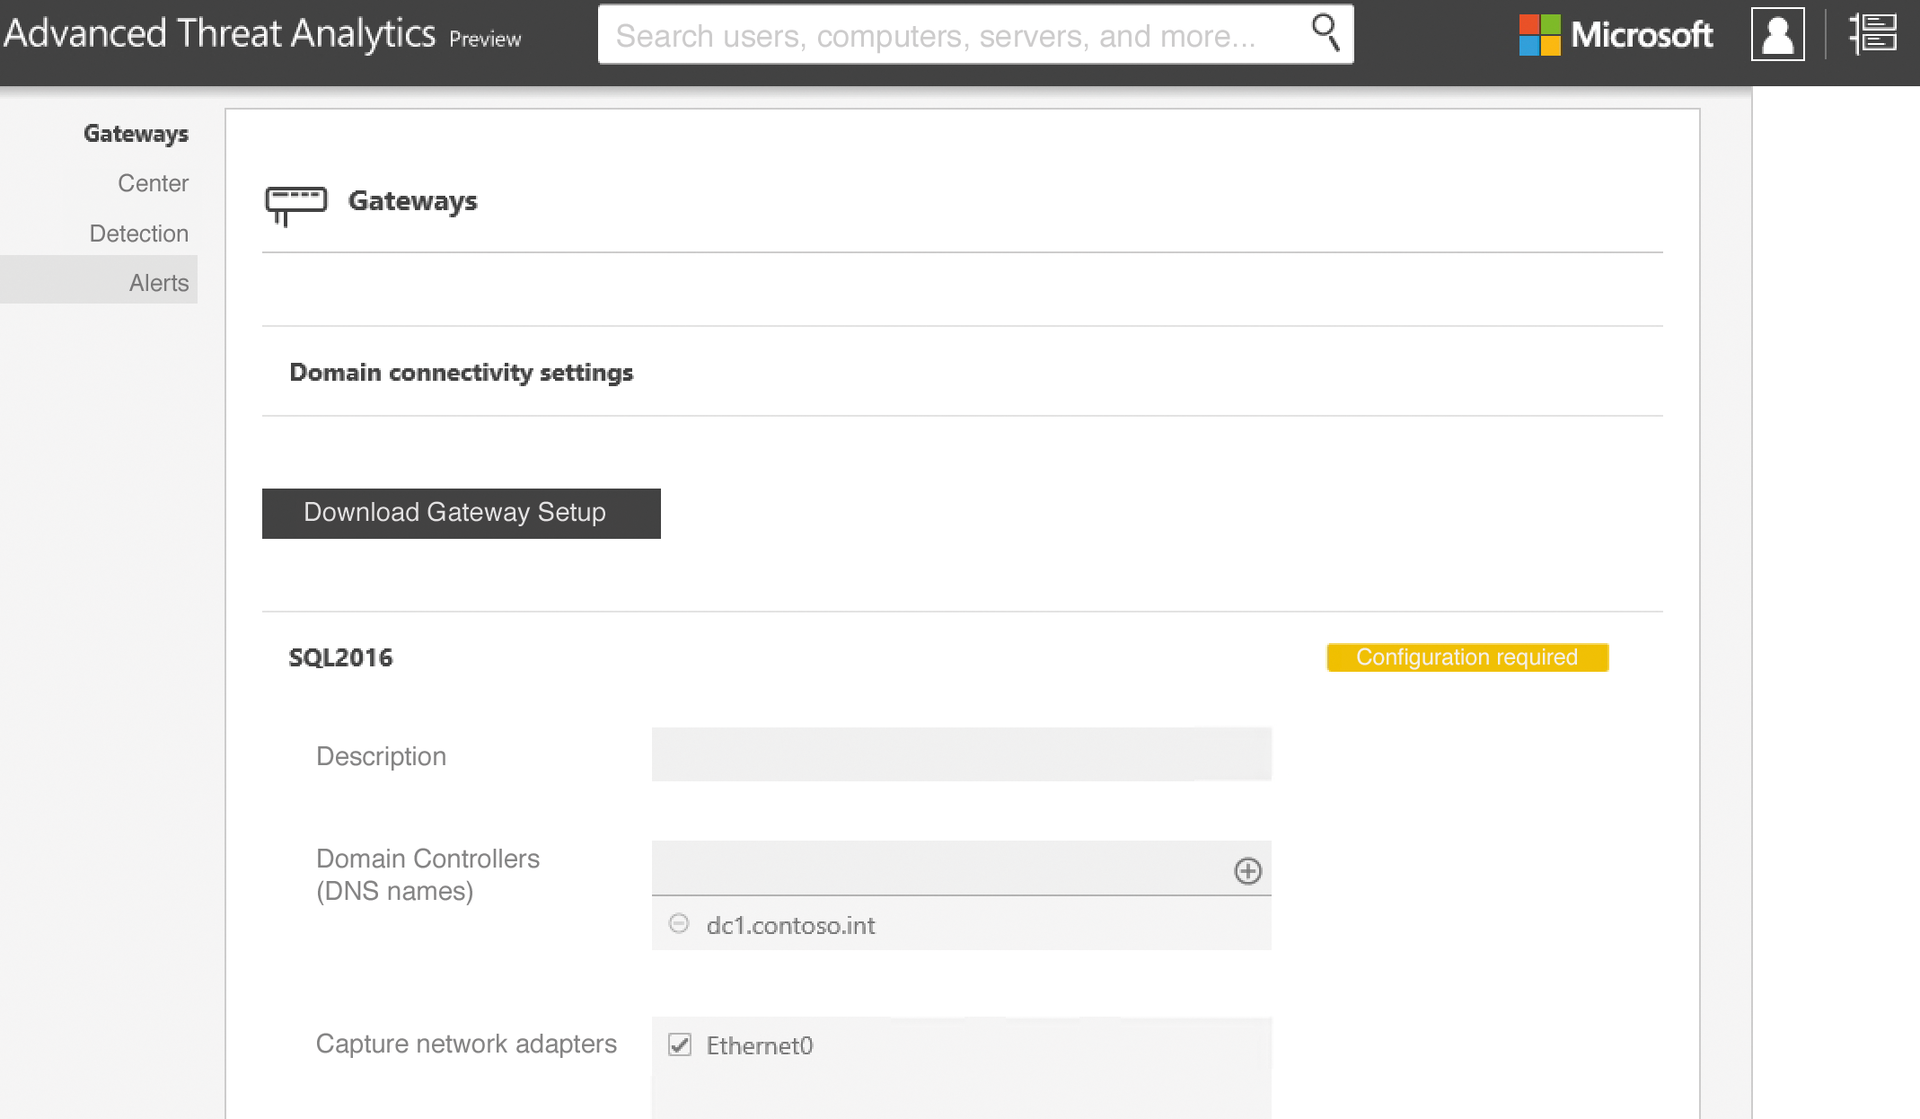
The next step is to configure a first ATA gateway (Figure 3). To log in to the ATA Center, use either a domain administrator account, the local administrator account, or an account that you added to the local Microsoft Advanced Threat Analytics Administrators group. The fastest way to start local user management is to type lusrmgr.msc. In the web interface, change to the settings. Use the Gateways section to define the login credentials under Domain connectivity settings. The gateways will use these later on to register with the ATA Center. You can either use separate user accounts or an administrative account.

In the web interface, you can also download the required installation files for the gateways directly off the web. Basically, you install the gateway like the ATA Center by extracting the ZIP file and running the installer. You can also use the installation file on multiple gateways. If you want to install multiple gateways, simply copy the installation files to a share on the network. In smaller environments or lab environments, you can run the gateway and the Center on the same server. If needed, you can install more gateways at any time and add them to the system.
In the course of the installation, you need to log the gateway onto the Center. To do so, enter the username and password in the window. You also have the option of configuring the gateway with self-signed certificates. After completing the install, you can also launch the ATA Center management console from the gateway. This is a good way to test the connection between the gateway and the Center. The gateway installation files are located in %programfiles%\Microsoft Advanced Threat Analytics\Gateway.
After you install a gateway, it appears in the ATA Center management console. You can open the management tool via the gear icon at the top right in the console. All gateways are then found via the Gateways menu item. After registering a gateway, you then need to configure its settings. To do this, the web interface shows you a Configuration required button. If you deploy multiple gateways, you can also synchronize the settings at this point.
The important thing is to add a DNS server to your AD, define the network interface, and select a suitable IP address, which the gateway locks onto and monitors. Via the Center, you can configure the URL for management and the IP endpoint for the gateway connections. You also configure a number of other settings on detection. For example, you can use the Alerts item to define how ATA should alert. You have the option of defining an email server or syslog server here, although these settings are optional (Figure 4). After completing the configuration, ATA is now set up and can protect your network. The setup can also be done on virtual servers.

Managing Alerts in the Console
The ATA Center's management page shows detailed information and provides this information interactively. You are thus given an in-depth analysis of user accounts and the detected attacks. You will also find charts and a list of threats, as well as suspicious actions performed by users or attackers. You see the time at which they occurred, the resources, and the account used.
To access this information, right-click on the Alerts icon in the management interface. The interface then shows you the number of different alerts on the left, with the details in the middle of the window; you can click your way through them. At the top, you will also find a search field that lets you search for specific users or computers.
Finding the Correct License
ATA is licensed via the Enterprise Client Access License (CAL) Suite, Enterprise Mobility Suite (EMS), or Enterprise Cloud Suite (ECS). Enterprises will need to contact their Microsoft partner who is best able to plan the licensing details. Basically, you can license ATA by user or by installed device. The price is around $60 per device or $80 per user. However, you only need to license the devices that users access with Active Directory login information.
The number thus mainly depends on two factors: the number of domain controllers on your network, and the number of Active Directory users and computers on the network that the DC needs to authenticate. Although ATA monitors the network for attacks on disabled user accounts, you do not need to license those accounts. If you connect ATA with a SIEM, you do not need a special license for that link.
Enterprises that use the Enterprise Client Access License (ECAL) suite have been able to use ATA free of charge since August 2015. All licenses for ATA are included in the ECAL. Companies that deploy the Enterprise Mobility Suite (EMS) or Enterprise Cloud Suite (ECS) can also use ATA free of charge. However, if you do not have a license for all users of devices with ECAL, EMS, or ECS, you need to purchase ATA CALs for the missing users.
Uninstalling the ATA Center and the ATA gateways is just as easy as installing. If you decide to stop using the solution, simply call the installed program management on the servers involved and uninstall the gateway or Center there – depending on what you want to remove. Afterward, it is a good idea to reboot the remaining servers in the ATA infrastructure so they can parse the new configuration files.
Conclusions
Microsoft Advanced Threat Analytics is an easy-to-use tool that helps you monitor your network security. If you have BYOD-style users with smartphones, tablets, home computers, or multiple workstations spread over various branches, using ATA makes sense.
You do not need a trained security expert to deploy ATA; you simply set up the ATA Center and a gateway. The software immediately starts monitoring and informs you of any suspicious activity. Admins who want to keep their networks as secure as possible but do not have the budget or time for complex security audits would do well to try ATA.
