Automate the Active Directory Federation Services install
One Click
For this article on Active Directory Federation Services (ADFS) automation, I assume the work on Active Directory (AD) and DNS itself is complete and that the SQL Server is installed and available. The service account on the AD – in which context the service runs on each federation server – has no special permissions. However, it must be a member of the local Administrators group on each federation server. You can ensure this with a script or the following command at the prompt:
Net Localgroup administrators KBCORP\ADFSSrv /add
The NetBIOS name of the domain in the examples here is KBCORP, which you will see several times.
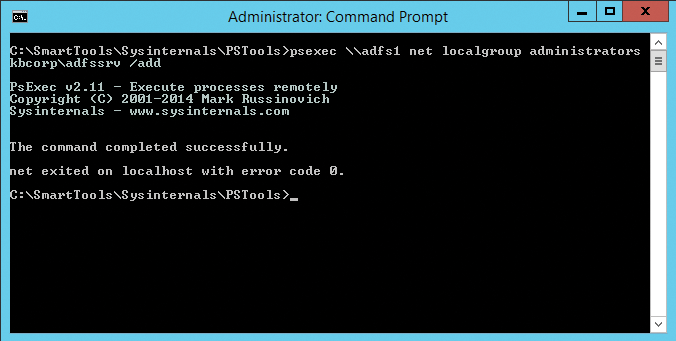
If you use multiple federated servers on your farm and want to populate the local administrator's group on the servers centrally and remotely, the Sysinternals PsExec.exe PSTools is a useful choice (Figure 1). In this age of PowerShell remoting and similar features, you have many ways to manage servers remotely, but few are as easy to handle as PSTools [1]. Without registering or installing anything on the target system or elsewhere, you can call PsExec.exe from any folder:
psexec \\adfs1 net localgroup administrators kbcorp\ADFSSrv /add

In this example, I use it to add the ADFSSrv account to the Administrators group on the federation server ADFS1.
Certificates: A Basis of Trust
The preparatory work includes making sure a service certificate, which represents the federation server, exists on all the federation servers; however, before you do this, you need to set up the federation service. Automating this process is extremely useful, because an incorrectly installed certificate can cause problems.
ADFS gives you some scope for the origin of the certificate: It can come from a certificate authority (CA) in your organization or be a public certificate that is valid outside of the corporate network. It is important to issue the certificate and then export it as a file to be able to import it automatically, and as often as you need, at the command line to other ADFS servers and Web Application Proxy (WAP) servers. A WAP server is a proxy for ADFS and a separate role that does not run on a federation server. Instead, the server is located in a DMZ, because this is the component in the ADFS environment that partly resides on the Internet. A WAP server can use the same server certificate as the ADFS server.
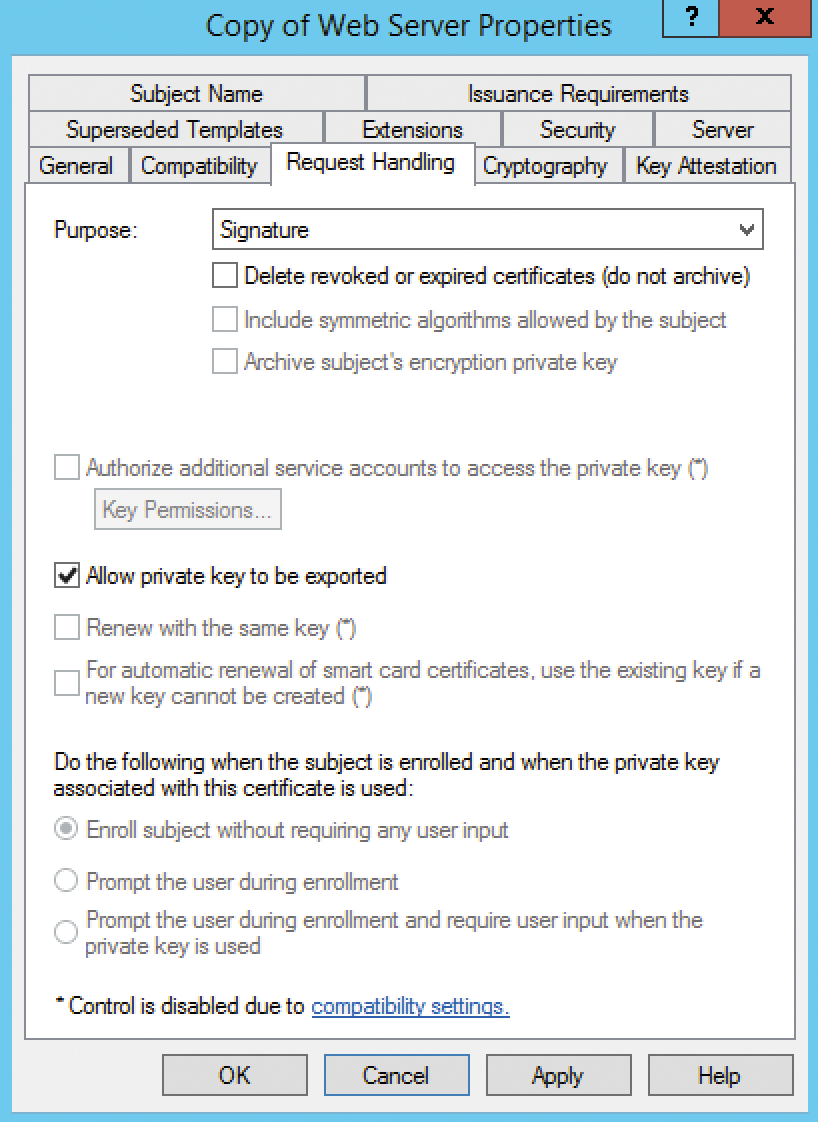
It is customary for enterprises to purchase a public certificate, especially if they communicate with external partners in their federated environment. However, a certificate from your own public key infrastructure (PKI) is sufficient for testing purposes. The web server template, which guarantees the authenticity of the server as a server certificate, acts as the certificate template in this case. To adapt it to your own needs, you first need to make a copy. After that, you can edit the properties you want to apply to certificates created on the basis of this template.
In this example, the federation server (and the WAP server) require a certificate with the option for exporting the private key (Figure 2). Everything else can remain unchanged in the template. Issuing certificates is essential and multifaceted in ADFS. Microsoft TechNet provides details [2]. By the way, you only need to take care of the service certificate. Although ADFS also requires the token decryption and token signing certificates, if you do not specify them during the setup, the routine simply creates self-signed certificates.

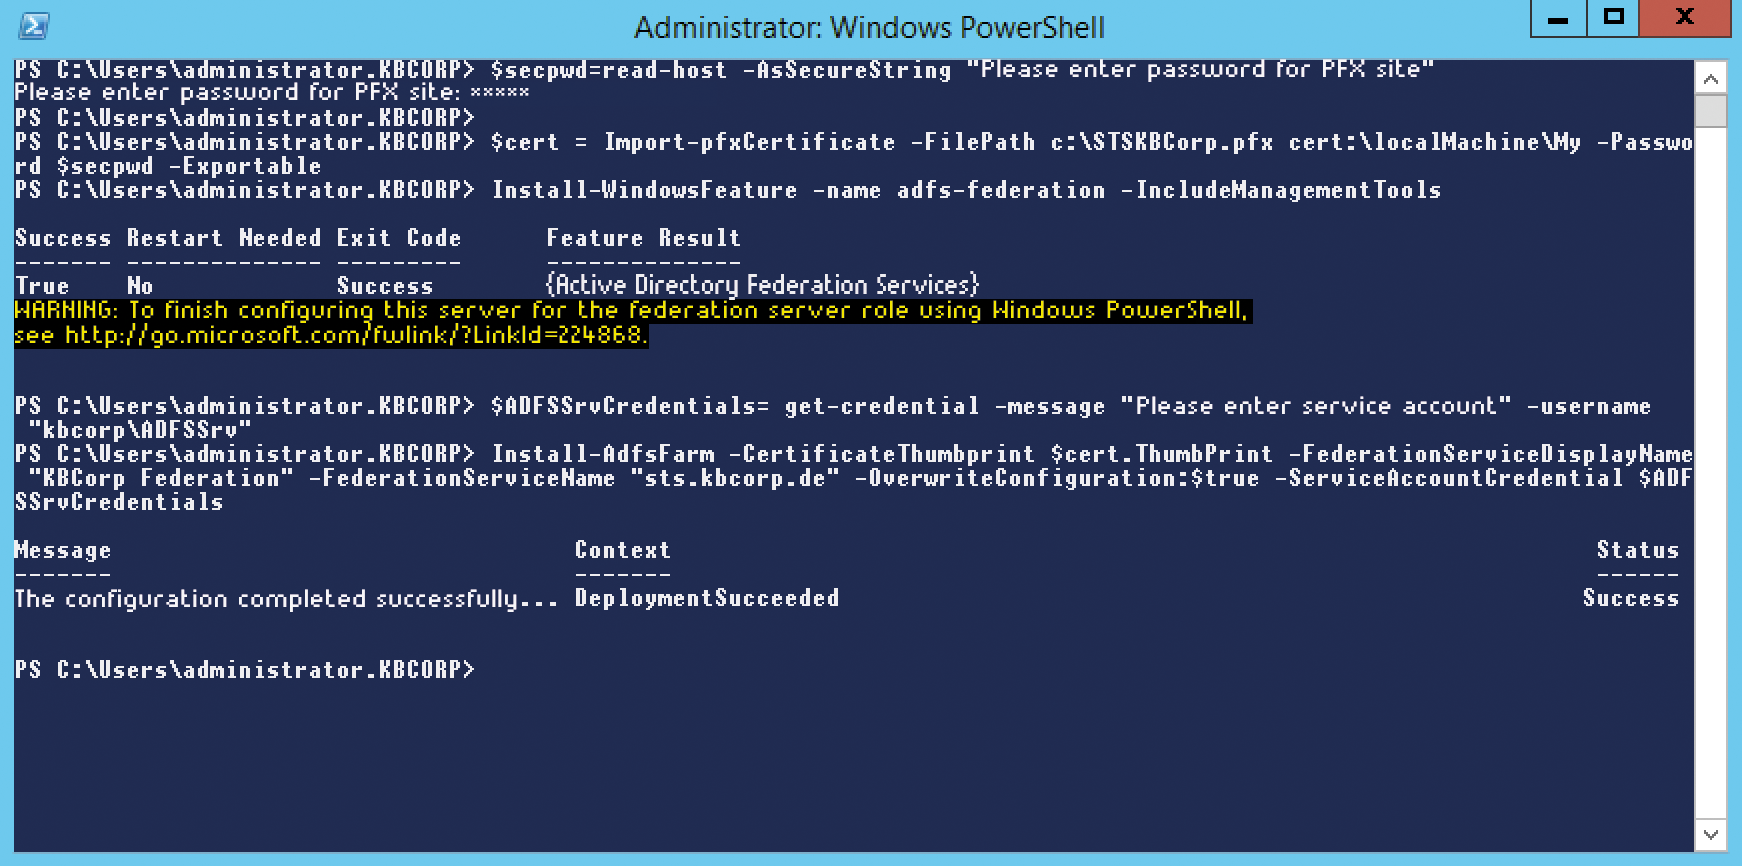
At this point, I assume that the certificate exists as a .pfx file and the private key has been exported. On the federation server, type the following command to add the computer certificate on the server (Figure 3):
$secpwd=Read-Host -AsSecureString "Please enter password for PFX file"
$cert = Import-PfxCertificate -FilePath \
  c:\STSKBCorp.pfx cert:\localMachine\My -Password $secpwd -Exportable

The Read-Host cmdlet accepts the password as a secure string and stores it in the $secpwd variable. Import-PfxCertificate then sends the certificate to the repository for computer certificates or, to be more precise, in the logical repository for My Certificates. If you run the command as described, you might notice that it is not particularly chatty; in fact, it says nothing about the successful import.
However, you can rely on this working; Import-PfxCertificate would have output an error if it had found inconsistencies with one of the parameters or the certificate itself. To be on the safe side, check the variable content of $cert (e.g., with the $cert | fl * cmdlet) and make sure you have a valid cryptography object with corresponding properties. This also shows you the thumbprint of the certificate (ThumbPrint variable); you will need this to set up the federation service on the server.
In this example, the issuing CA is also the root CA, which is not usually the case, although technically quite possible. Always remember that all certificates of the certification authorities in the certification path must exist up to the root CA. This is the only way for the respective certificate to be valid. Remember to delete the .pfx files, which contain the private key and thus offer the potential for an attack.
Earlier, I showed how to import a certificate. The counterpart to this is the Export-PfxCertificate command. Whether this is the best way to create a PFX file depends on the situation. The fact is that on a server you usually have multiple computer certificates, and the export cmdlet needs to know which certificate you want to export. You could handle this, for example, by working with the fingerprint again. However, it might be easier to export the certificate using the Certificates MMC snap-in, while remembering to set the focus to computer certificates, not user certificates.
Installing a New Farm
When installing an ADFS farm, a distinction is made between the first server and the remaining servers in the farm. In both cases, always add the ADFS Windows feature first and then configure it. An important parameter here is CertificateThumbprint. In this example, I ran the certificate import steps and ADFS configuration directly, one after the other, so that the fingerprint from the $cert object variable could be read. If the two actions take place separately, you have to read the thumbprint from the properties of the certificate, copy it via the clipboard to Notepad to remove the spaces, and then add the string as a cmdlet parameter. The command is shown in Listing 1.
Listing 1: Read ThumbPrint
Install-AdfsFarm -CertificateThumbprint "40f4e41b8174d73b06f34fd86f2432c09a63dc03"
  -FederationServiceDisplayName "KBCorp Federation" -FederationServiceName "sts.kbcorp.de"
  -OverwriteConfiguration:$true -ServiceAccountCredential $ADFSSrvCredentials
Take care to use the correct thumbprint; otherwise, the work step fails at this point. The other parameters are largely self-explanatory. What is important in this context is that you run the cmdlet as a domain administrator. If the local administrator and domain administrator roles are separate in your company, you could use the -Credential parameter. This lets you specify a different account; otherwise, the install uses the context of the logged-in admin. The whole spectrum of the cmdlets for commissioning an ADFS farm is described on Microsoft TechNet [3].
Adding New Federation Servers to the Farm
The process is similar for other servers that you add to the farm. They also need the certificate you just used, and you also need to install the adfs-federation feature for these servers. Afterward, you can continue with the Add-AdfsFarmNode cmdlet, which you use to add the server to an existing farm. To keep the example simple, the first server is ADFS1 and you then add a server named ADFS2. The command is shown in Listing 2.
Listing 2: Add-AdfsFarmNode
Add-AdfsFarmNode -PrimaryComputerName "ADFS2"
  -CertificateThumbprint $cert.ThumbPrint -ServiceAccountCredential $ADFSSrvCredentials
This cmdlet also lets you to use the -Credential parameter to change to the context of a domain administrator. For an overview with further examples, see TechNet [4]. Calling the logon page tests whether the federation service has been added correctly on a server. The commands
$ie = New-Object -ComObject InternetExplorer.Application
$ie.Navigate2("https://sts.kbcorp.de/adfs/ls/IdpInitiatedSignon.aspx")
$ie.Visible = $true
can be used to automate this process.
Special Case: Dedicated SQL Server
By default, a Windows internal database (WID, formerly SQL Express) is created on the first server of a federation server farm. Whether you use Server Manager for the setup or automate the process with PowerShell, this database resides on the first, primary ADFS server and is only writable on this server. All other ADFS servers in your farm regularly receive copies of this database. The role of the primary ADFS server can be transferred to another federation server if the primary server is not available for a long time.
This behavior changes when a separate SQL Server is used for storage. Incidentally, use of this server does not need to be restricted to the federation services; it is also useful as a SQL Server shared by multiple applications. In the PowerShell examples above, a WID was automatically created by SQL options in the cmdlet. To use a separate SQL Server instead of a WID, you need to create unique databases on the SQL Server. However, you encounter a chicken and egg problem when you try to do this: The ADFS PowerShell module provides a cmdlet that creates the SQL statements, which, in turn, create the databases. But, the cmdlets are only located on a Federation Server, and these are not installed yet, because you don't have a database.
Note that the Active DFS PowerShell module is part of the ADFS feature. It is thus sufficient to add the ADFS feature to a future network server in advance. This is easy, requiring no certificates or other configuration, by using the Install-WindowsFeature cmdlet, as seen in Figure 3. An overview of the modules on a server is provided by the Get-Module-ListAvailable command. With the ADFS module now installed, you can generate the databases with the command:
Export-AdfsDeploymentSQLScript -DestinationFolder "C:\SQLScript" \
  -ServiceAccountName "kbcorp\adfssrv"
Now, specify the service account of the Federation Service so that the permissions are set in the databases for this purpose and so that a login account is created on the SQL Server. The result is the CreateDB.sql and SetPermissions.sql files. The file names describe the respective roles of the scripts. In SQL Server Management Studio, you can run them directly, but you must be a member of the sysadmin role.
Because of permissions granted in the databases, all federation servers within the farm are required to use the same service account. Once the databases are created, you need to use the cmdlets again to create a farm and add another node to the farm. The parameter that you now need to use for the SQL configuration is -SQLConnectionString; it essentially points to the SQL Server. The previous example would look like Listing 3.
Listing 3: Create a Farm
Install-AdfsFarm -CertificateThumbprint $cert.ThumbPrint
  -FederationServiceDisplayName "KBCorp Federation" -FederationServiceName "sts.kbcorp.de"
  -OverwriteConfiguration:$true -ServiceAccountCredential $ADFSSrvCredentials
  -SQLConnectionString:"Data Source="SQL1.kbcorp.de";
  Initial Catalog=ADFSConfiguration;Integrated Security=True;Min Pool Size=20"
The -SQLConnectionString parameter is used here for a new farm node in the same way it is used for a new farm.
Integrating External Partners
Once your farm is running, you have an infrastructure that allows your users to authenticate against other IT environments based on SAML (Security Assertions Markup Language) tokens. However, there is much to do to make sure this works (i.e., you need to set up trust relationships with partners). A distinction is made here depending on whether your users need access to another network or whether you are allowing users on other network to access your resources.
The PowerShell engine for ADFS [5] offers everything you need to automate these steps. Office 365 certainly plays a special role in terms of trusts. Here, the user cannot use built-in tools on Windows Server 2012 R2 or the federation services and additionally requires the Microsoft Online Services Sign-In Wizard [6] and the Azure Active Directory module for PowerShell [7] on an ADFS management server. A three-part series by Microsoft describes step by step the task of setting up the federation services along with Office 365 [8].
Microsoft's identity tool portfolio is changing quite dynamically right now; it is thus prone to frequent updates and new features. The posting mentioned above is about a year old and based on ADFS 3.0. The overhead of building a lab environment might therefore be very much worthwhile. Additionally, this promotes an understanding of the necessary elements.
Automating Diagnostics
Microsoft support offers a PowerShell library that provides a useful supplement to the cmdlets included in ADFS. Although this library isn't an official Microsoft product and the manufacturer thus does not offer support or a warranty, the website with the download [9] refers to the moderated Microsoft Script Center for issues relating to the library. Apart from that, the cmdlets are not critical, because they only parse the federated landscape for diagnostics and testing purposes and do not support far-reaching configurations as of this writing.
Copy the downloaded library to a directory of your choice, and import it into PowerShell with the
Import-Module c:\Downloads\ADFSDiagnostics.psm1
command. To a certain extent, the cmdlets can be used for small-scale monitoring. The
Get-command -Module ADFSDiagnostics
command digs up all the cmdlets from the module, and you can use Test-ADFSServerHealth cmdlet for automated small-scale federated server monitoring.
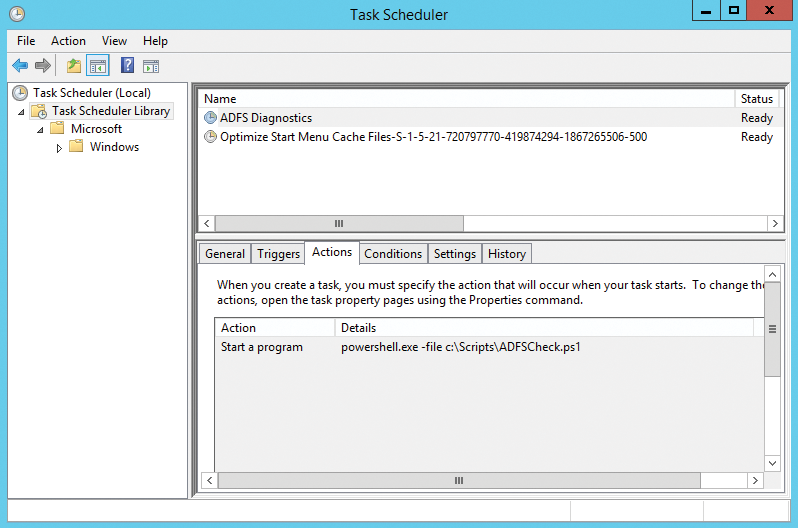
In combination with the Task Scheduler, you can either set up scheduled tasks on each of the federation servers or create a task centrally on a workstation to check out what your federation servers are doing with PowerShell remoting (Figure 4). The cmdlet that gives you information on the status of the environment is:
Test-AdfsServerHealth | where {$_.Result -eq "Fail"}

The command only returns rows that contain an error. Pour this into a .ps1 file that first imports the Diagnostics module and then executes the command. If you pipe the output of the cmdlet to an output file on a central file share to which all administrators have access using OutFile <Path\File>.txt, and you have an easy way to learn about the environment. This is only intended as a suggestion and to demonstrate the many possibilities.
Office 365 and Other Trusts
If you plan to use the diagnostics module, please note the following: The cmdlet I just looked at, Test-AdfsServerHealth, performs a series of tests to check trust relationships with partners, including Office 365, and the validity of the certificates. You need to pay special attention to this. If the certificates are due to expire in the next 90 days, the cmdlet notifies you and gives you time to respond. If the federation services have problems with an expired certificate, for example, authenticating against partners becomes impossible all of a sudden.
The Test-ADFSServerToken cmdlet is like ping for ADFS, and it checks against Azure Active Directory to see whether a token can be issued and thus whether authentication is okay. This means you do not have to wait for a user to call and tell you that things are going wrong because you can automatically keep an eye on the federation services with any account and password (Get-Credential).
Conclusions
In this article, I took just a little excursion into the possibilities of automating the federation services. Quickly setting up a couple of servers along with a federation service farm is not only less prone to error with the commands I looked at, but it's also faster than using the GUI. The whole thing can be extended of course; after all, many more tasks are involved in establishing federation services. For example, the DNS record for the ADFS service must exist, the ADFS service name must be added as trusted in the Internet Explorer zones, and the load balancer needs to be adapted when you add a node. The commands shown in this article are thus designed to act as an incentive for expanding the features you looked at in your ADFS environment.
