Virtual networks with Hyper-V in Windows Server 2016
Network in a Box
Microsoft expands Hyper-V's functionality in Windows Server 2016. One interesting new feature is that Hyper-V containers are included in Technical Preview 4 (TP4), which let you virtualize Docker in Hyper-V.
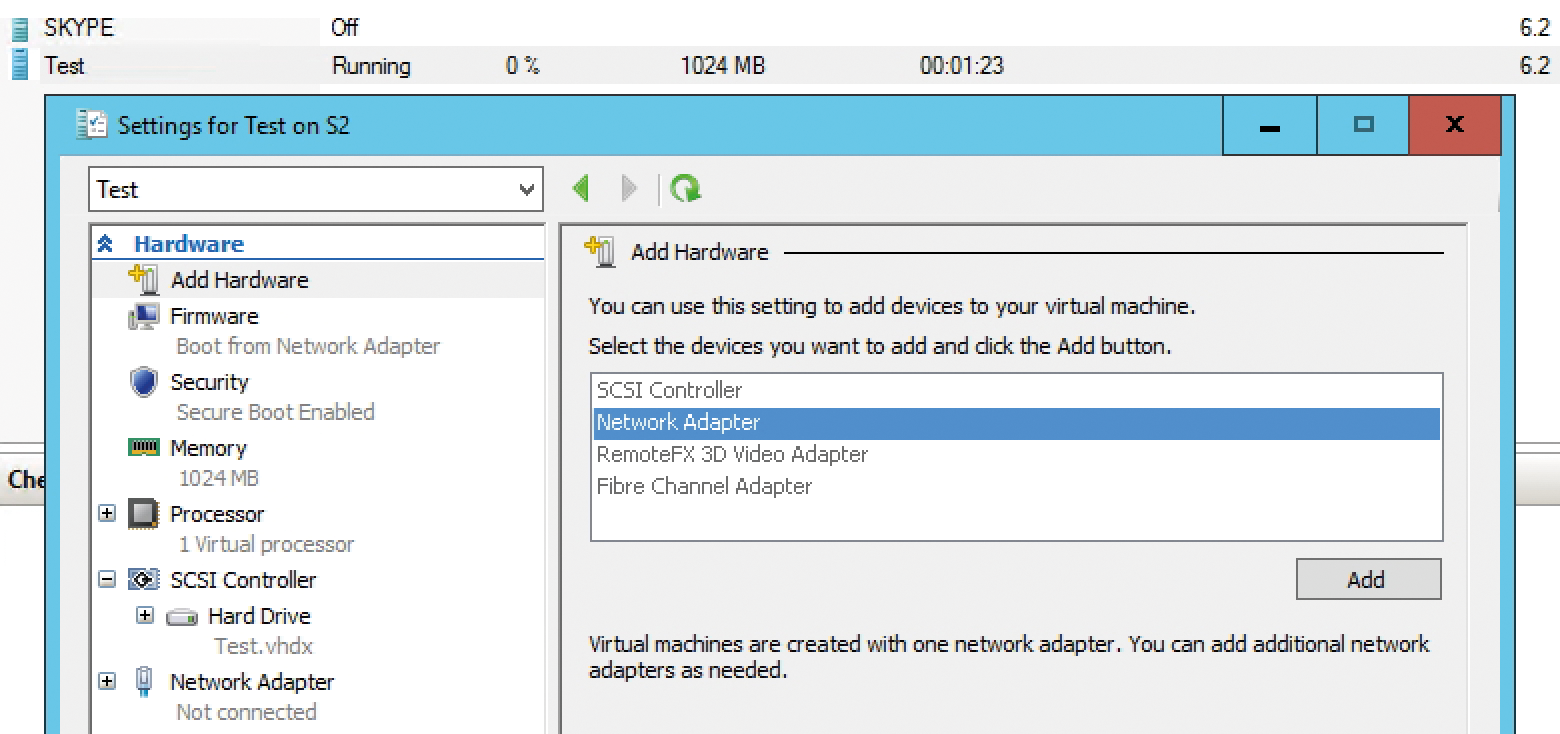
In Windows Server 2016, you can add and remove network adapters on the fly (Figure 1). You do not need to shut down VMs to shut down an adapter. This feature is particularly useful if you work with different VLANs or network segments and need a way to connect VMs to networks quickly and easily. But this feature only works with generation 2 VMs. You need to decide when you create a virtual server whether you want to use these options because you can no longer change the generation retroactively.

Embedded virtualization (nested virtualization) is possible in Windows Server 2016, as of TP4, and Windows 10 from build 10565. You can thus install Hyper-V on a virtual server, which you virtualized with Windows 10 or Windows Server 2016, and create virtual switches. You can virtualize virtual switches again, which is useful not only for test environments, but also for the new Windows server or Hyper-V containers. You can operate virtual server containers on a virtual container host, which, in turn, is installed on a physical Hyper-V virtual machine. Hyper-V is considerably more flexible through these functions. The Host Guardian Service is integrated as a new server role in Server Manager. The main purpose of the host guardian is hardening the host against individual VMs, or isolating VMs. Manage the new service with System Center Virtual Machine Manager 2016; you will need at least Technical Preview 3. See the TechNet description for additional information [1].
Centralized Network Management
In the field of network security, the network controller plays an important role. The server service supports central control and monitoring of physical network devices, as well as virtual switches and virtual network cards based on Hyper-V. Network Controller extends the software-defined networking features in Windows Server to include central control and monitoring. You can thus centrally manage your virtual switches. Once the service is installed and set up, you can manage your networks with System Center Virtual Machine Manager 2012 R2 or 2016, as well as System Center Operations Manager 2012 R2/2016. The background to this technology is that management programs no longer individually access all the components of the network but open a connection to the network controller. The network components are connected to the controller, which supports centralized control as a kind of management gateway. The service works with the Host Guardian Service and can be managed in SCVMM 2016.
Understanding Virtual Network Cards
In the current preview, virtual switches are already in production and configurable. All the virtual machines you create on a Hyper-V server use the virtual switches for network communication. Nothing of this basic Hyper-V structure changes in Windows Server 2016. Simply put, virtual switches connect the virtual machine with the host's physical network cards and allow VMs to communicate with the rest of the network, with each other, or with the host itself. Windows Server 2012 R2 and Windows Server 2016 do not differ substantially. In addition to the simple connection of the virtual NICs on the VMs with the virtual switches on the Hyper-V hosts, you can configure advanced settings to connect virtual servers on the network in a better way. Windows Server 2016 essentially supports the functionality of Windows Server 2012 R2.
For better performance on the network, virtual servers in Windows Server 2016 can access even more hardware functions of the network cards, thus greatly accelerating the speed. Windows Server 2012 R2 introduced the ability to limit the bandwidth usage of virtual servers via the virtual network adapter settings. To limit bandwidth, you need to configure the Enable bandwidth management function and enter the value you want the virtual network card to use as a minimum and maximum bandwidth.
The Advanced Features field in the virtual network card settings on servers lets you block unwanted DHCP or router packages from VMs. This feature prevents virtual servers from acting as rogue DHCP servers or routers and affecting the network by sending routing or DHCP packets.
Separate from the Physical Network
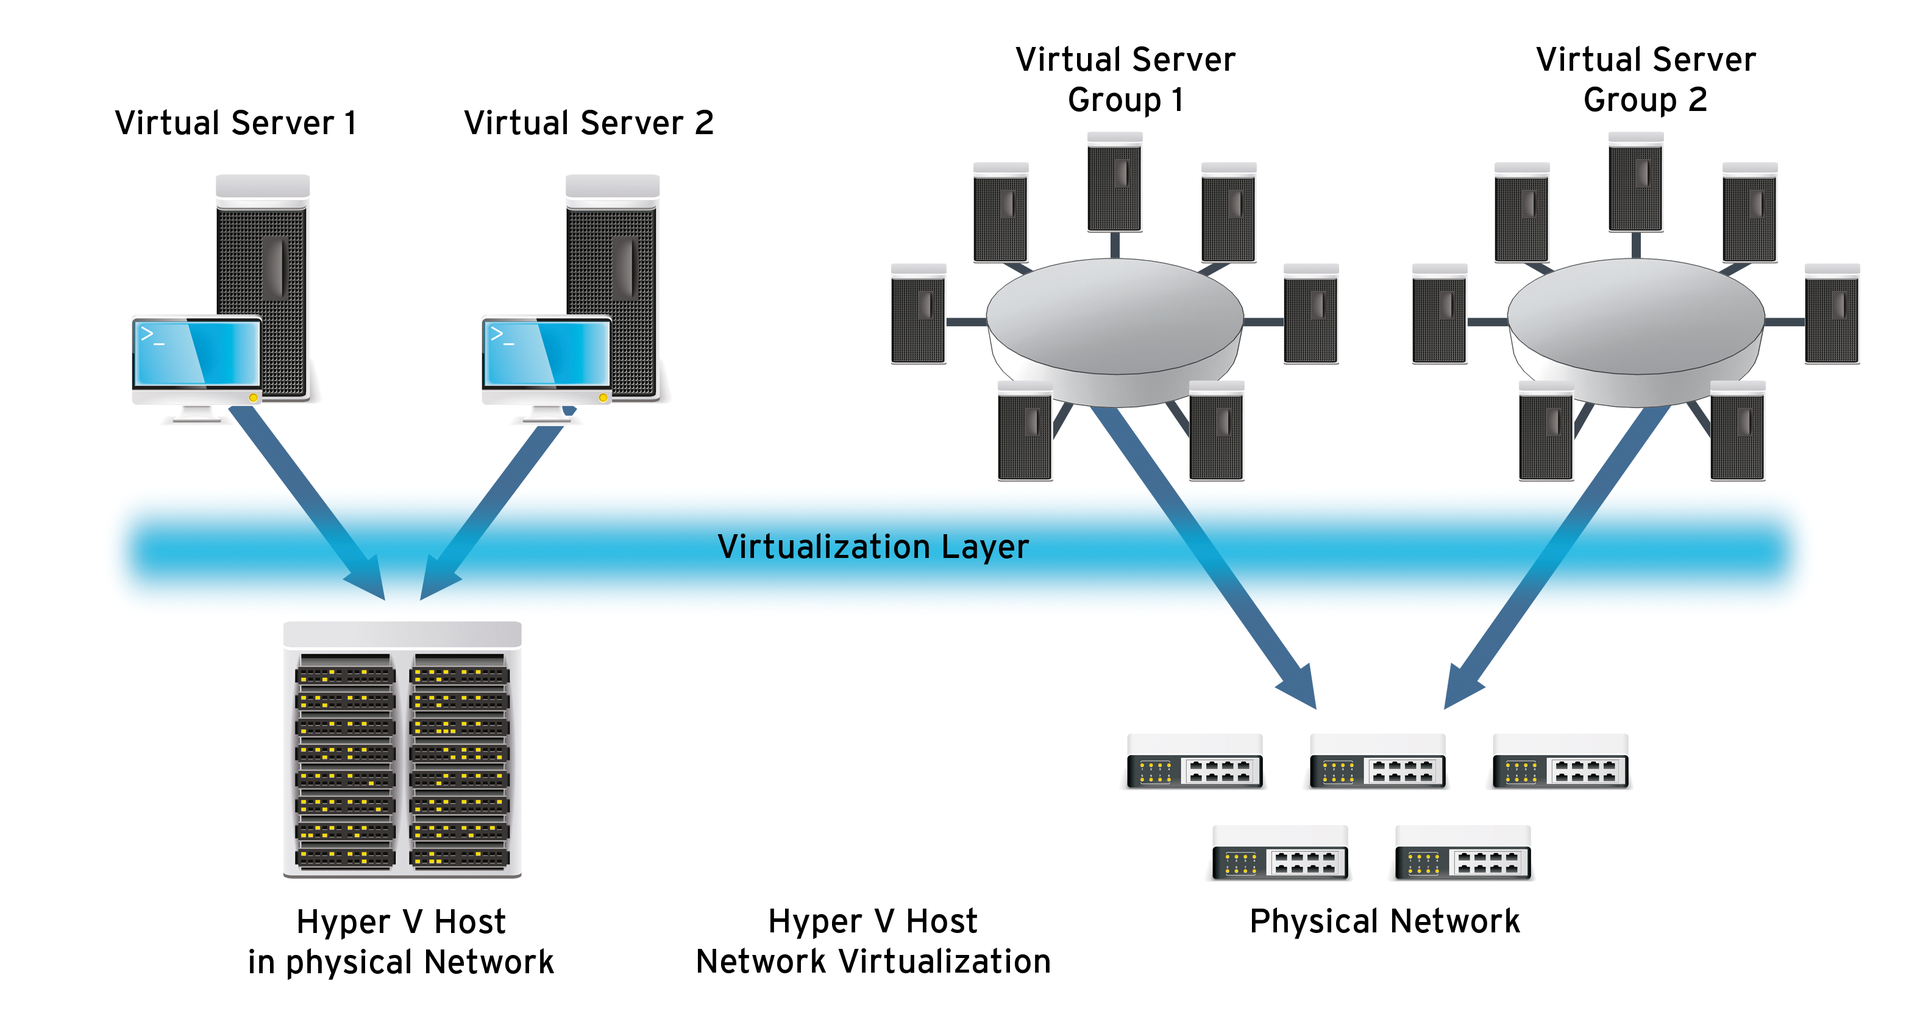
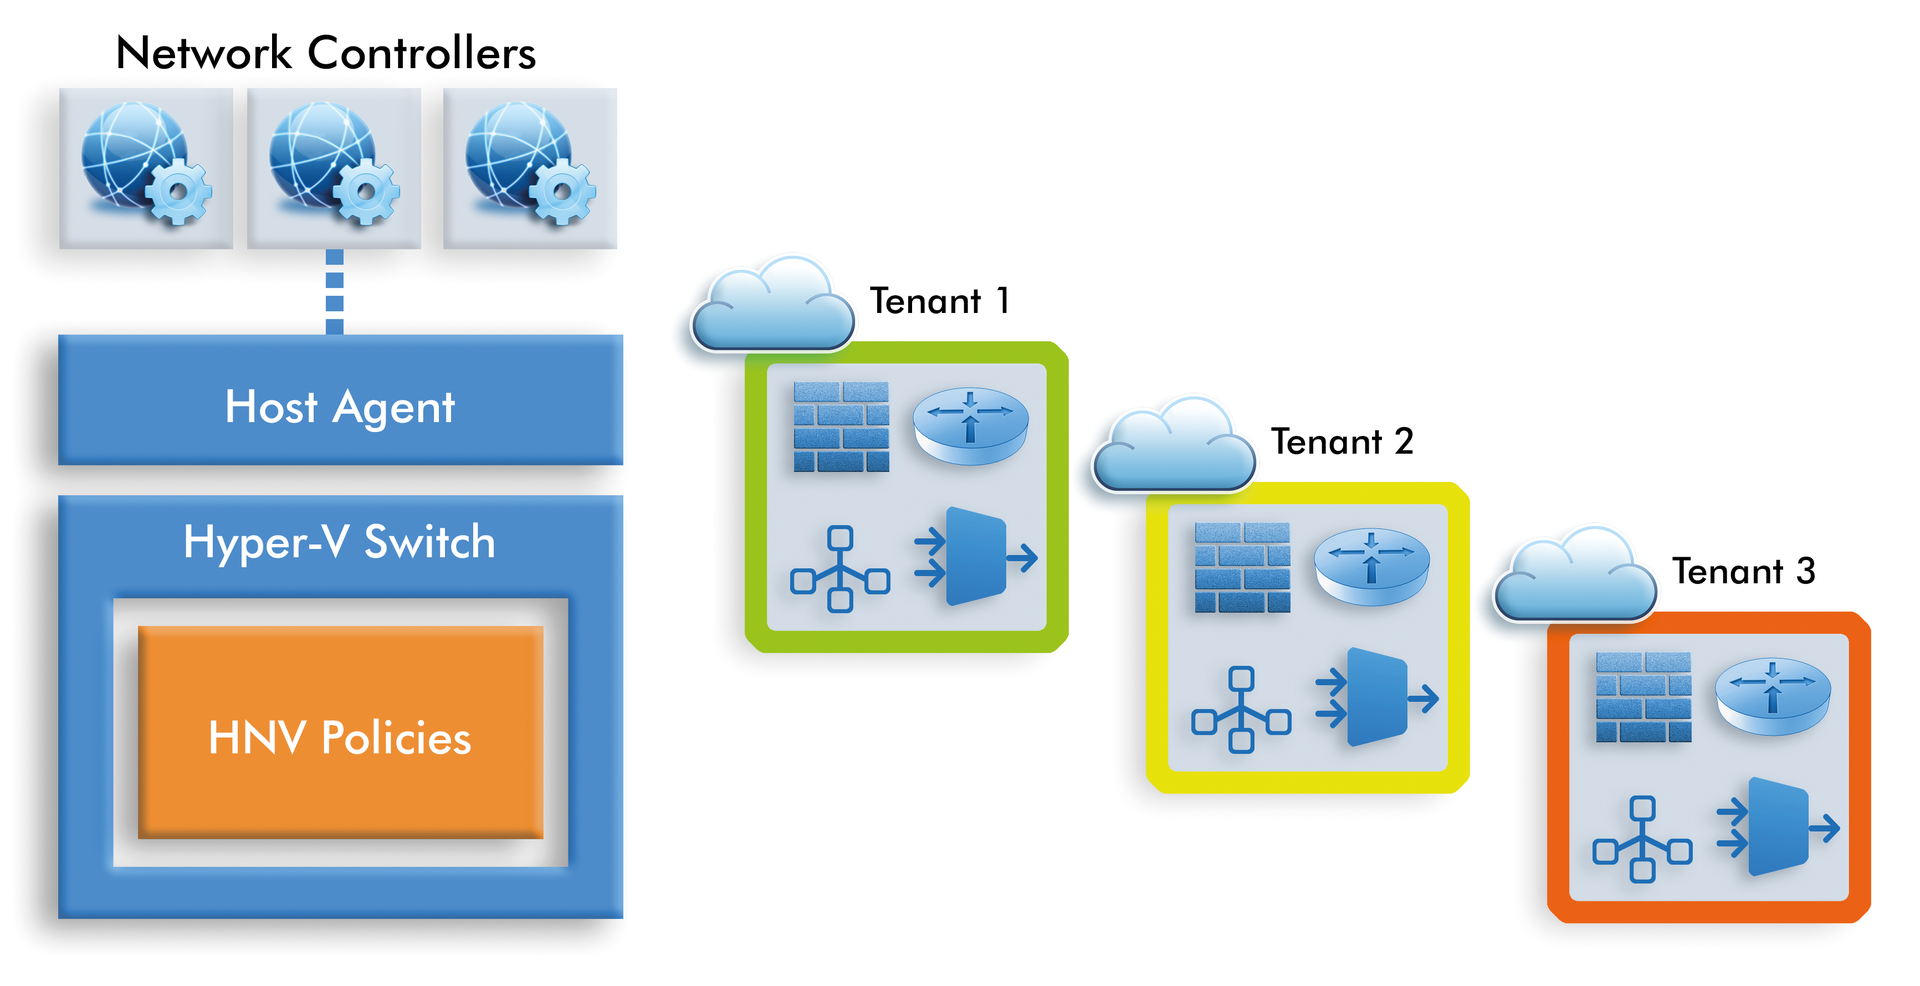
With Hyper-V network virtualization, you can separate virtual networks from the physical network (Figure 2). The virtual servers can communicate with each other without compromising other servers. The exchange of data between the networks can occur using Hyper-V Network Virtualization (HNV) gateways (Figure 3), which let virtual servers on the same network communicate without compromising physical networks. With HNV technology, you can use virtual networks in parallel to each other on the same physical network. The virtual networks can use the same or a different IP address space.


Hyper-V network virtualization supports dynamic IP addresses. Dynamic addressing is useful in data centers, to configure an IP address failover configuration. If you work with HNV, two IP addresses are assigned to each virtual network adapter on the network: the customer address (CA) and the provider address (PA). The CA allows virtual servers on the network to exchange data. The PA supports data exchange between the VM and the Hyper-V host, as well as the physical network. Third-party products can access the CA and communicate over the PA.
Virtual switches and Network Virtualization Generic Routing Encapsulation (NVGRE) work together. Third-party products have the option of accessing the virtualized network through integration with the virtual switch and of communicating with both virtual servers and the physical network. All traffic in the virtual switches on Windows Server 2016 runs over the virtualized network and the optional integrated third-party products. Network card teams also cooperate with the virtualized network.
In this context, large enterprises and cloud providers can access the Access Control Lists (ACL) of virtual switches and centrally manage firewall settings, permissions, and network protection for the data center. Windows Server 2016 offers the possibility to easily integrate the port in the firewall rules. HNV is manageable through the network controller service in Windows Server 2016. Additionally, Windows Server 2016 supports Virtual eXtensible Local Area Network (VXLAN). VXLAN allows for a large number of VLANs, which is very interesting for service providers. VXLAN relies on MAC-based Layer 2 environments that are encapsulated in Layer 4 UDP packets. You could theoretically establish up to 16,777,215 (24-bit) Layer 2 infrastructures that contain 4,096 VLANs each. Also, HNV is now fully operational in load-balancing environments.
Another setting is Enable single-root I/O virtualization (SR-IOV). This setting also relates to the physical features of network cards that work in Hyper-V. Network adapters that support this feature provide implemented I/O channels for virtualized environments, which the network cards use to pretend to be multiple network adapters when talking to virtualized servers. SR-IOV is interesting, especially, for I/O-intensive applications.
Creating and Configuring Virtual Switches
You create virtual switches on Windows Server 2016 that are generally similar to those in Windows Server 2012 R2. In large environments, you create and manage virtual switches with System Center Virtual Machine Manager 2016 and Network Controller. In medium-sized and small environments, you would work with Hyper-V Manager and PowerShell. In Hyper-V Manager, start by opening the Virtual Switch Manager. Select New virtual network switch to create a virtual switch for the physical network cards in a computer, select the switch type (External, Internal, Private), and then press the button labeled Create Virtual Switch. In the window, select the physical network adapter that you want to assign to the virtual switch and define what kind of network to assign to the switch:
- External network: An external network allows the virtual machines to communicate with the entire network and supports communication between virtual machines on the host. In the Hyper-V Manager, you can only create one external network for each available physical network adapter, but multiple virtual machines can share this external network.
- Internal network: These networks allow communication of virtual machines among themselves on the physical host. The computers cannot communicate with the network, except with the Hyper-V host and other virtual machines on the Hyper-V host. No network card is required for this connection because the connection is virtualized.
- Private network: These networks allow communication between virtual machines on the host. Communication with the host itself is not possible with this type of network.
If you installed multiple NICs in the Hyper-V host, you can create multiple virtual switches on the basis of these cards. For the virtual switches, you can enable NIC teaming and then, on the virtual servers, create NIC teams; that is, you can connect multiple virtual NICs from different virtual switches. For this configuration to work, you first need to enable the NIC teaming feature on the virtual network cards.
Virtual Switches and PowerShell
You can create and manage virtual switches in PowerShell. The corresponding cmdlets are displayed with:
get-command *vmswitch*
In addition to the switches, you can manage the virtual network adapters in PowerShell. The commands for managing adapters are displayed when you type:
get-command *vmnetworkadapter*
PowerShell displays information on virtual switches when you type Get-VMSwitch. Display the virtual network card settings with:
Get-VMNetworkAdapter -VMName <name of the virtual server> |fl
With this cmdlet, you also see the MAC address and IP address of the virtual server on the Hyper-V host. The command
Get-VM -computername Hyper-V-Host | foreach{(Get-VMNetworkAdapter $_).IPAddresses}
lets you read the IP addresses of the virtual servers on a local Hyper-V host, as well as hosts on the network. You can customize and extend the command to meet your needs.
Virtual Network Cards
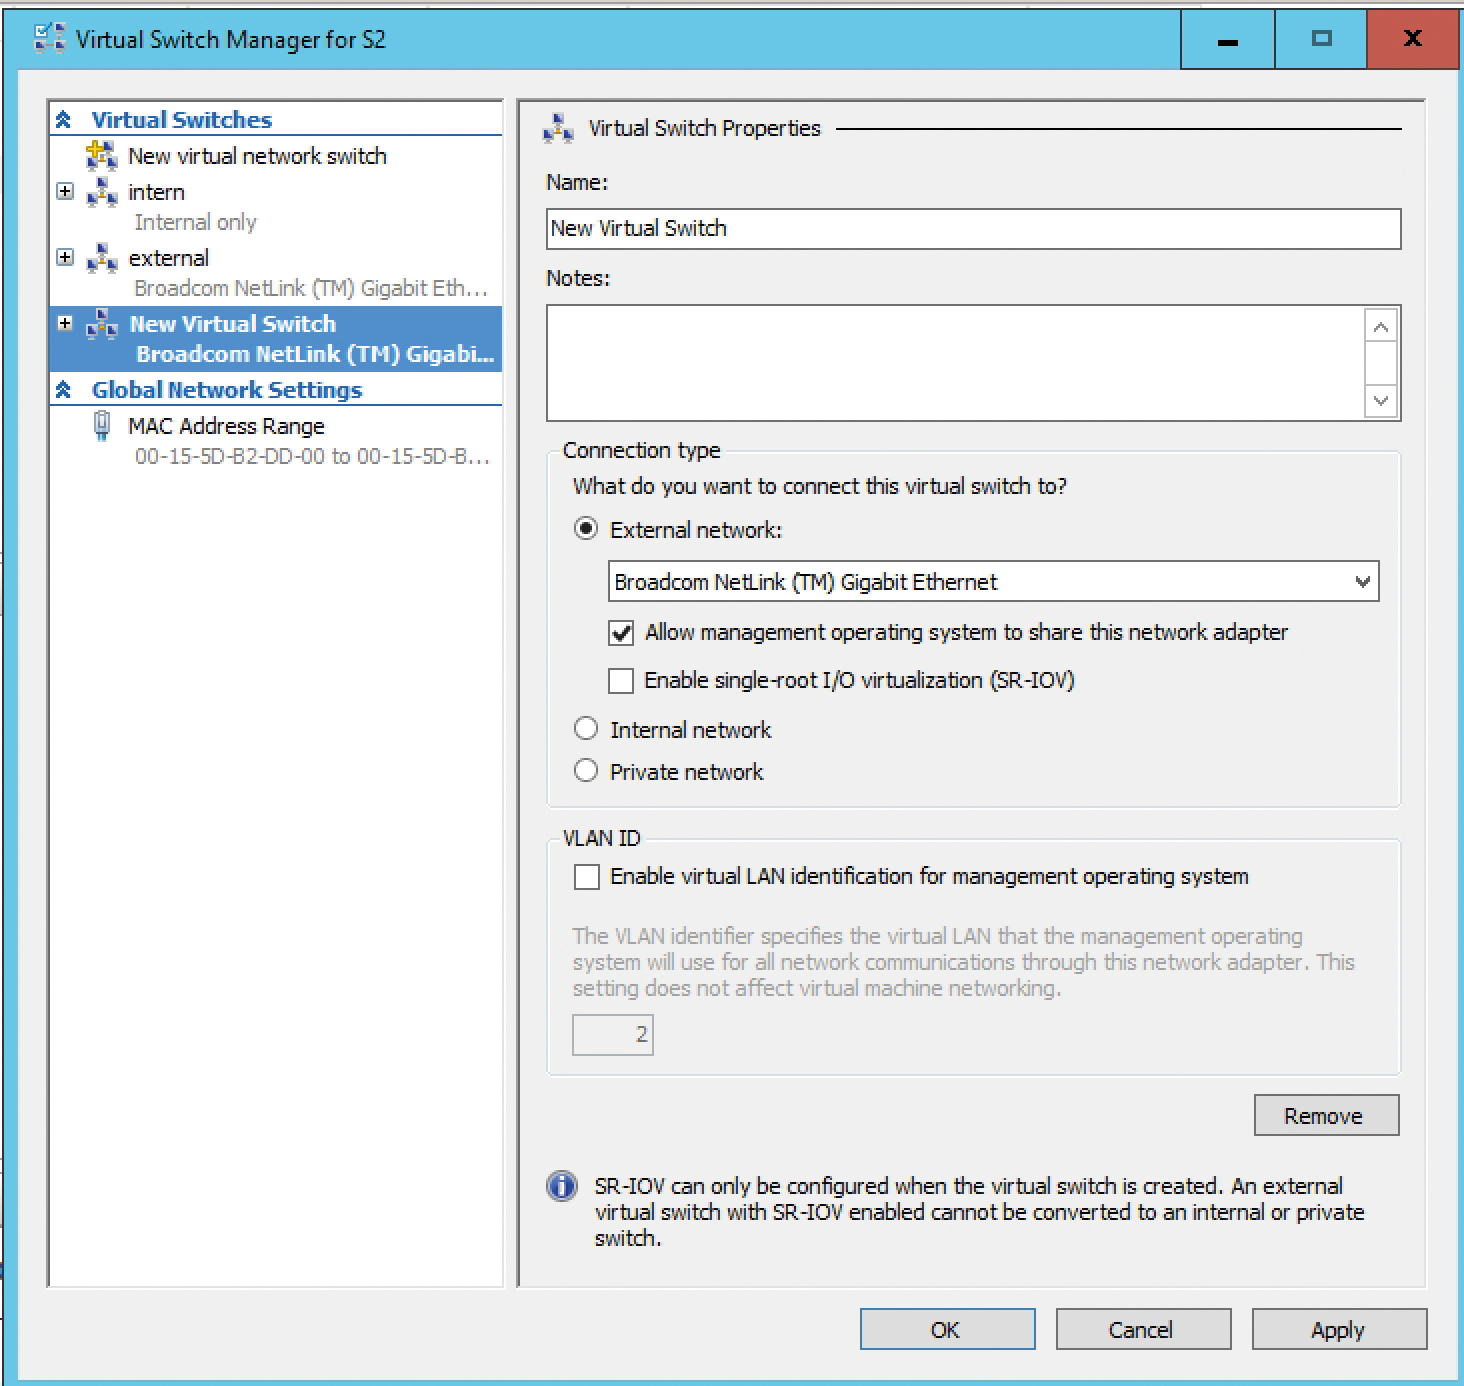
When you assign the new virtual network adapters to virtual servers, you can select the virtual switch to which you want to link the cards (Figure 4). You can change this setting at any time, also on the fly. The hardware acceleration features under the settings for the virtual Network Adapter, are also very interesting. In the Hardware Acceleration menu, you can choose to allow the virtual machines to pass on data to the physical network adapter.

In the Advanced Features, you will find two settings named DHCP guard and Router guard. These settings are designed to prevent the virtual server from acting as a rogue DHCP server or router. You can also define whether the virtual network card can be configured as a member of a NIC team. Moreover, you can enable port mirroring of virtual servers. Port mirroring allows forwarding of network packets to other virtual servers responsible for monitoring the various virtual servers on the host.
MAC Addresses for Hyper-V
Configure the settings for virtual MAC addresses in the virtual network adapter settings, which are accessible through the virtual server properties. For an optimal configuration, you might want to configure settings for Live Migrations. Additionally, these settings play a role in NLB clusters. You can either assign Static MAC addresses to virtual servers or use Dynamic allocation. The range of MAC addresses allocated to the virtual servers is shown below the virtual switch properties in the MAC Address Range field.
MAC address settings are important for cluster operations. When virtual servers move between cluster nodes, the MAC addresses change on reboot, since each Hyper-V host uses its own pool of dynamic MAC addresses.
VLANs Separate Networks
Thanks to virtual LANs, you can create multiple logical networks with different subnets using a single physical infrastructure. The advantage of this configuration is the ability to separate server groups or the network into various work areas. In addition to VXLANs, of course, you can still use traditional VLANs in Windows Server 2016.
In the network adapter settings on the Hyper-V host, define the VLAN ID with which the card will communicate on the network. After that, you can also define the VLAN ID in Hyper-V Manager. Windows Server 2016 handles this process much like Windows Server 2012 R2. After the Hyper-V host is configured, you can connect the virtual servers to VLANs. After connecting a virtual switch to a VLAN, all virtual servers can immediately connect to a particular VLAN. To connect a VLAN, you need to set the Enable virtual LAN identification for the management operating system option on the virtual switch. After you have specified the ID, traffic will flow from this link via the configured ID.
Internal networks in Hyper-V also support VLANs. The servers cannot communicate with VMs on the Hyper-V host or the cluster, but with other computers on the network. In the virtual server settings, you can specify the VLAN IDs for individual servers through the properties of the virtual network adapters. If you want virtual servers to communicate with multiple VLANs, add multiple virtual NICs on the servers, which are then associated with a specific VLAN.
With Linux Integration Services 3.5, you can use VLANs for virtual Linux servers. The settings are identical to the options for virtual Windows servers. The connection is not at the operating system level, but at hypervisor level, on the virtual machine. Network card teams also support connections to VLANs. Microsoft recommends configuring VLAN connectivity via the virtual switch – and not for the virtual NIC team. Incorrect configurations entail a risk of data collisions.
Hyper-V Containers with Windows Server 2016 TP4
The Hyper-V containers introduced in TP4 of Windows Server 2016 extend the capabilities of Windows Server containers and are also connected to the network via virtual switches. Hyper-V and Windows Server containers are supported in parallel in the final version of Windows Server 2016. Both types of container will be provided in cooperation with Docker and can be managed using the Docker client, as well as with standard tools like PowerShell in Windows Server 2016. The advantage of Hyper-V containers is more efficient isolation, as well as optimizations of the environment for Hyper-V. Hyper-V containers are always isolated from other containers and the host. Windows Server containers share parts of the operating system with the host, so there is a risk that a container could have an effect on the entire host and other containers. With Hyper-V containers, this problem is not possible, because the operating system is isolated and virtualized. This virtualization allows containers to operate with applications running in "lower trust" environments.
Nano Servers with Windows Server 2016 TP4
Nano Servers are certainly one of the most important innovations in Windows Server 2016. Companies can use the new deployment version of Windows servers to create much leaner servers with very limited operating system files. Because the servers are usable for virtualization, you can also use virtual switches or virtualize Nano Servers and connect them with virtual switches on Hyper-V hosts on the basis of Windows Server 2016. Nano Servers work with the new Windows Server containers, as well as with Hyper-V containers.
You could install a Hyper-V host, and a virtual Nano Server on the server, and then configure this server as a host for Docker containers. The connection to the network is then routed via a virtual switch that you configure exactly as if you were connecting a traditional server.
To create a new Nano Server named NanoS1, enter the commands in Listing 1 from the NanoServer directory of the Windows Server 2016 installation directory. The commands create a virtual server from the NanoServer.wim file and connect it to a virtual switch named external. You can thus connect multiple Nano and other virtual servers to a shared virtual switch.
Listing 1: Creating a new Nano Server
> . .\\new-nanoserverimage.ps1
> New-NanoServerImage -MediaPath d:\ -BasePath c:\vm\nanos1temp -TargetPath c:\vm\nanos1 -Compute -GuestDrivers -ComputerName nanos1 -AdministratorPassword (convertto-securestring -string "P@ssw0rd" -asplaintext -force) -DomainName contoso.int -Language en-us
> New-VM -Name nanos1 -MemoryStartupBytes 512MB -SwitchName external -VHDPath c:\vm\nanos1\nanos1.vhd -Path c:\vm\nanos1 -Generation 1
Conclusion
Microsoft continues to develop a portfolio of virtualization services available through Hyper-V and the Windows Server environment. Virtual container support, Nano Servers, and other innovations create new options for deploying and managing virtualization on Windows networks.
