Affordable hardware switch for SDN
Wheel in the Sky
Most OpenFlow test and lab environments are built by admins and researchers using the Open vSwitch virtual switch [1]. Another common tool for test labs is the Mininet environment [2], which connects Open vSwitch with Linux namespaces to simulate various devices. Running your OpenFlow tests on real hardware is a little more complicated. Hardware switches with OpenFlow support (such as white-label switches with PicOS) cost a solid, four-figure sum and are thus prohibitively expensive for a small test lab.
Northbound Networks [3], with the aid of a Kickstarter campaign, has developed the inexpensive Zodiac FX as an alternative for testing OpenFlow configurations on real hardware. Zodiac FX is a four-port, 100MB switch controlled by an Atmel CPU. The Zodiac FX switch works with the OpenFlow protocol Version 1.3, and it comes with support for open source firmware.
The Hardware
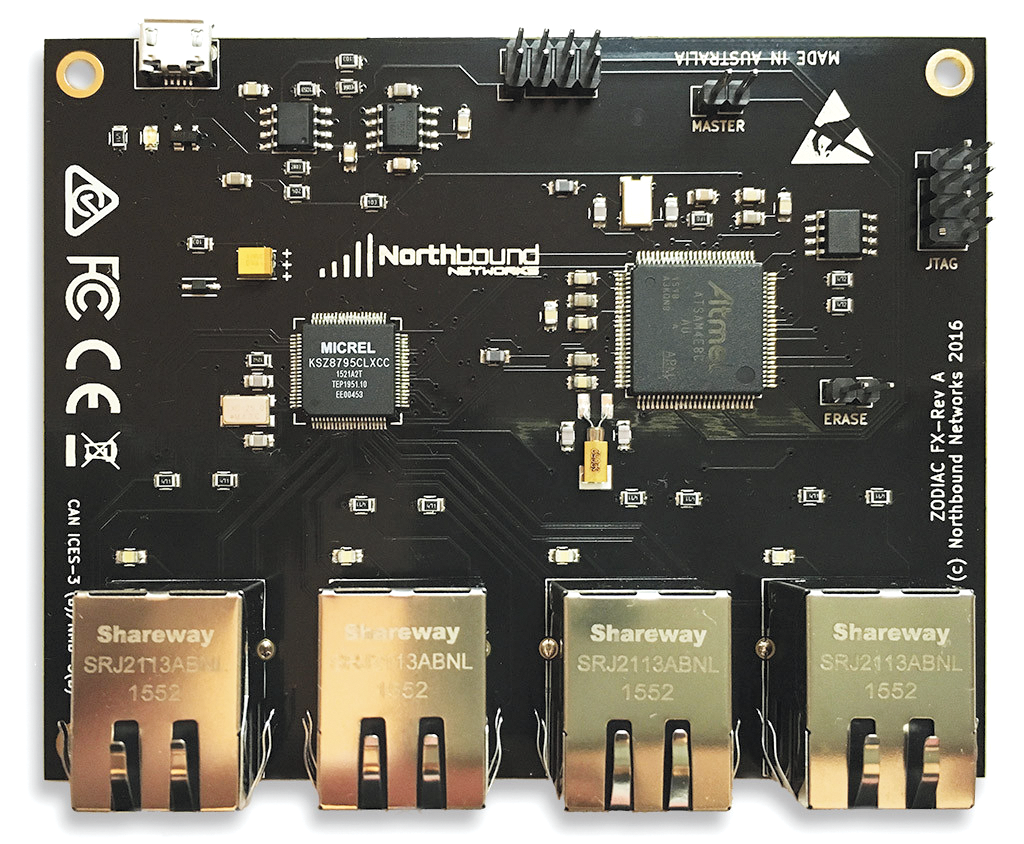
Figure 1 shows the Zodiac FX, which takes the form of a Printed Circuit Board (PCB) system. Only the first three (from the left) of the four interfaces are available for flow control with OpenFlow; the fourth interface communicates with the OpenFlow Controller.

Power is supplied by a USB cable that also makes the console available for basic configuration on the connected PC. As the admin, you can establish a connection with a terminal program like minicom with /dev/ttyACM0.
The Erase and Master jumpers are important. You can delete the old firmware with the Erase jumper before running the new firmware. The Master jumper sets the OpenFlow master role for the switch.
The Service
The command-line interface (CLI) is very minimalistic, which is no wonder, considering the small size of the firmware image. It is not possible to complete a command with Tab or display the options with ?, as admins are accustomed to doing with other devices.
The CLI does provide a help command. You can switch between the base, config, debug, and openflow modes and receive information about the software version, the link status of the ports, and the device itself by means of the show version, show ports, and show status commands.
Find your way into configuration mode with config, where you can modify the network configuration with:
set ip address ip_address
set netmask netmask
set gateway gateway_address
The connection to the OpenFlow controller is made with the commands:
set of-controller IP_address
set of-port port_number
The fourth port is dedicated to management, and the switch connects to the controller using this port. In configuration mode, you can still define VLANs and assign the three ports to the VLANs. The show config command is also important in order to display the current configuration, as is save to save the configuration. You return to basic mode with exit. Further functions, such as tunnel protocols, are still not available.
In openflow mode, the show status command reveals the connection status to the controller, while show tables lists the level of the OpenFlow tables, and show flows shows the flows that have been installed. With clear flows, you can delete the installed flows, though there is not any CLI command to create flows.
As the fourth member of band, debug mode helps firmware developers read and write to individual registers.
Interoperability
In practical tests, it turns out time and time again that the OpenFlow compatable label is not a clear message. OpenFlow support varies from supplier to supplier. Also, you need to consider which OpenFlow version is used, and which filters (matches) and actions this version supports. In addition, the handshake between controller and switch does not always work, though this problem may well be the fault of the controller.
In the test for the Zodiac FX, across four firmware generations of the switch and two service releases of OpenDaylight [4], the connection setup between switch and the OpenDaylight controller always got stuck in the same place. A discussion in the Northbound Networks forum, which also involved package dumps, was able to point out the place the problem occurred in the handshake; at the time of the test, however, the forum had not posted a solution.
By interacting with the Floodlight OpenFlow controller [5], however, the communication worked effortlessly, with Zodiac FX showing its strengths. The switch accepted all the filters tested, including IPv6 addresses and Multiprotocol Label Switching (MPLS) fields, as well as all the actions; show flows also displayed this information. However, a few errors were still concealed in firmware version 0.57 which we used in this article. The current firmware version is 0.65.
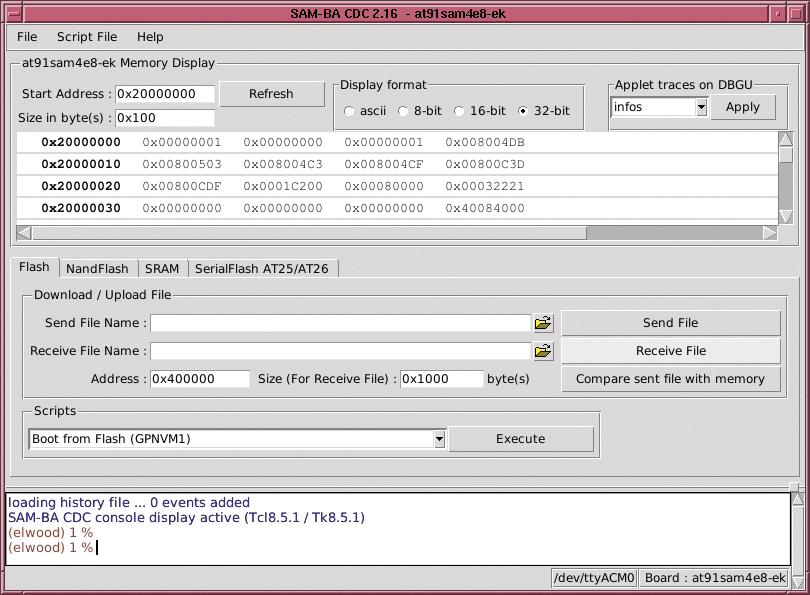
To update the firmware, you'll need the SAM-BA tool [6] by Atmel Corporation. The latest firmware adds support for the OpenDaylight Lithium release. The upgrade requires some manual work: for a disconnected switch, you first need to close the Erase jumper. Next, supply electricity to the switch for five seconds to reset it. Then remove the switch again from the power, open the jumper, and reconnect the device.
After starting Zodiac FX, select the version. The dialog in Figure 2 then lets you select the new firmware image, upload it, and inform the switch that it should boot the new firmware. After the next connection and disconnection, the new firmware is ready; in our test, the configuration survived the upgrade.

Conclusions
The Zodiac FX costs around Aus$100 (roughly US$65 to $75, depending on the exchange rate), includes shipping and without customs charges. In return, you receive a nice little single-board system that lets you experiment with OpenFlow outside of the virtual world. You will also find a Lab Pack with four switches for Aus$350 [3].
The Zodiac FX is certainly not suited for production use, but as a development environment, it is an encouraging alternative to the Open vSwitch option.
