The practical benefits of network namespaces
Lightweight Nets
Linux Containers (LXC) [1] and Docker [2], as well as software-defined network (SDN) solutions [3], make extensive use of Linux namespaces, which allow you to define and use multiple virtual instances of the resources of a host and kernel. At this time, Linux namespaces include Cgroup, IPC, Network, Mount, PID, User, and UTS.
Network namespaces have been in the admin's toolkit, ready for production, since kernel 2.6.24. In container solutions, network namespaces allow individual containers exclusive access to virtual network resources, and each container can be assigned a separate network stack. However, the use of network namespaces also makes great sense independent of containers.
From Device to Socket
With network namespaces, you can virtualize network devices, IPv4 and IPv6 protocol stacks, routing tables, ARP tables, and firewalls separately, as well as /proc/net, /sys/class/net/, QoS policies, port numbers, and sockets in such a way that individual applications can find a particular network setup without the use of containers. Several services can use namespaces to connect without conflict to the same port on the very same system, and each is able to hold its own routing table.
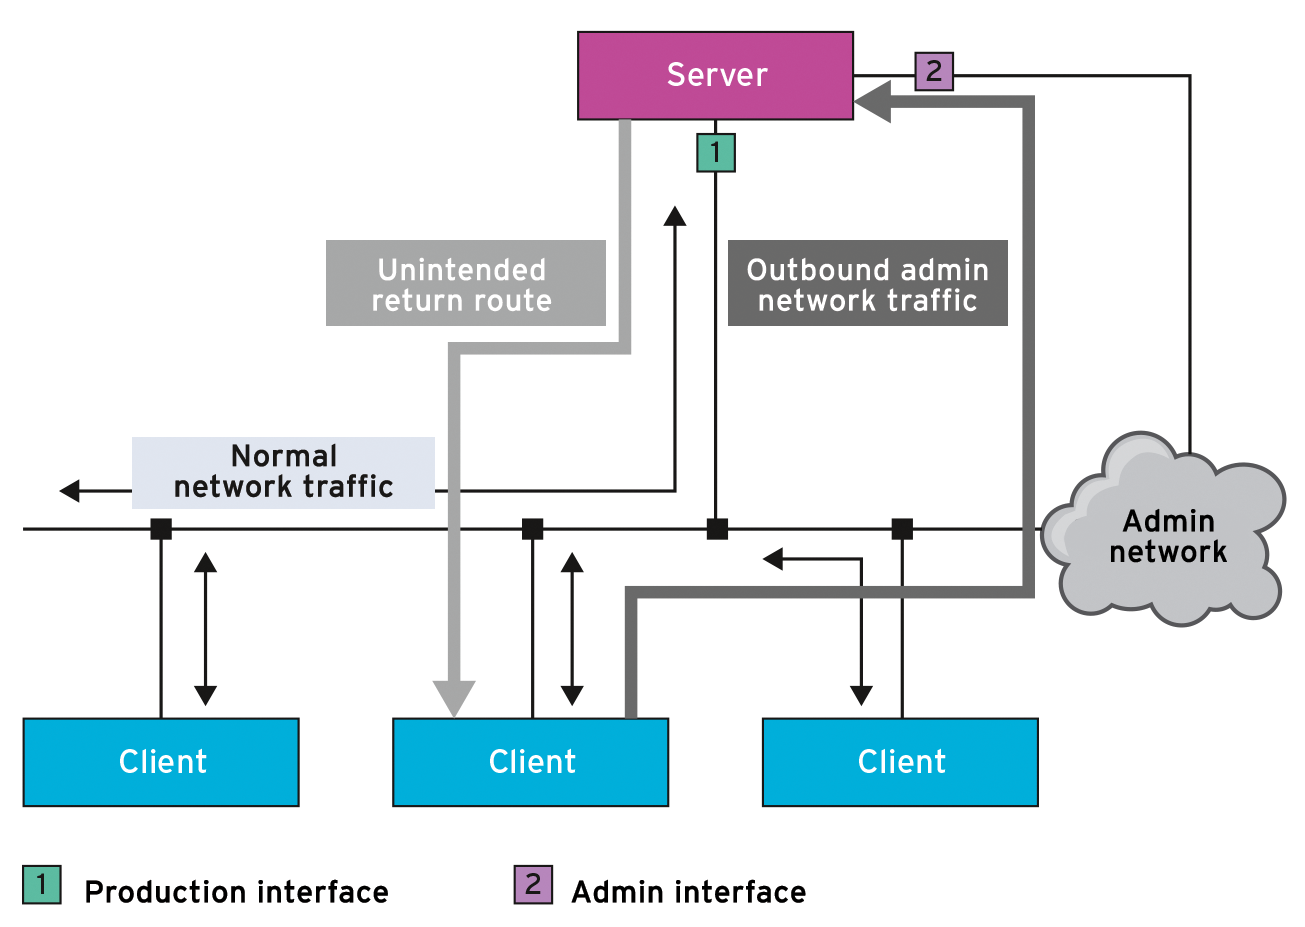
A typical use case is avoiding asymmetrical routing – for instance, if you manage a server in a separate admin network via a separate interface because you want to keep administrative traffic away from the production network (Figure 1). A client that wants to address the admin interface of a server is (rightly) sent via the router, which would be impossible to achieve with classic routing tables for return traffic. This task is easier if the admin interface only exists in its own, self-contained network namespace and maintains its own routing tables.

In practice, virtual veth<x> network devices are fairly typical for network namespaces. Whereas a physical device can only exist in a network namespace, a pair of virtual devices can be interconnected as a bridge or work as a pipe; in this way, you can build a type of tunnel between namespaces you created on your host.
Namespaces API
For the following examples to function, the kernel needs to be compiled with the option CONFIG_NET_NS=y. The command
cat /proc/config.gz | gunzip - | grep CONFIG_NET_NS
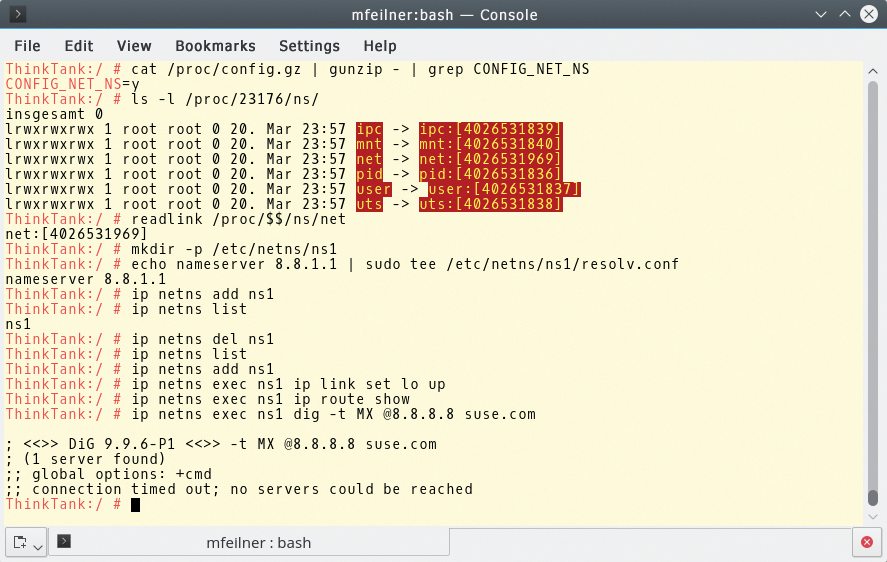
tests whether this is so (Figure 2). The namespaces API comprises three system calls – clone(2), unshare(2), and setns(2) – as well as a few /proc entries. Processes in user space open files with /proc/<PID>/ns/ and use their file descriptors to stay in the relevant namespace. Namespaces identify the inodes generated by /proc during their creation.

CONFIG_NET_NS kernel parameter must be switched on so that the /proc system can transport information via namespaces.The clone system call normally creates a new process. However, if clone receives the CLONE_NEWNET flag as an argument along the way, it initiates not only a child process, but also a new network namespace. The new process becomes a member therein. The unshare call moves the calling process into a new namespace, landing there with a CLONE_NEWNET flag, and setns allows the calling process to join an existing namespace.
The handle for the network namespaces is /proc/<PID>/ns/net; since kernel 3.8, these are symbolic links. Its name comprises a string with the namespace type and the inode number:
$ readlink /proc/$$/ns/net
net:[4026531956]
Bind mounts (mount --bind) keep the network namespace alive, even if all processes within the namespace have come to an end. If you open the file (or a file mounted there), you will be sent a file handle for the relevant namespace. You could then change the namespace with setns.
Configuring the Namespace
Linux applications able to handle namespaces spontaneously search for global configuration data with /etc/netns/<Namespace> and then with /etc. Numerous userspace tools can control interactions with network namespaces: ethtool, iproute2 (which also provides the ip management tool), iw for wireless connections, and util-linux.
Using namespaces is easy. For example, a very simple, isolated DNS resolver configuration sets up a separate network namespace named ns1:
sudo mkdir -p /etc/netns/ns1
echo nameserver 8.8.1.1 | sudo tee /etc/netns/ns1/resolv.conf
This ability can also be extended to applications that do not provide any namespace capabilities. With these, you can simply create a mount namespace, managing in it all the files relevant for the network namespace in their usual locations (generally with /etc). This means that nothing conflicts with other processes, which provides some flexibility.
Pivot and Focal Point
Only rarely does the admin need to dive deep into the details, because the ip netns command simplifies handling. The command comes with the iproute2 package, and administers the creation and deletion of network namespaces, as well as the distribution of resources between them. Root privileges, or course, are necessary; all commands described here only function properly under the administrator.
The tool's syntax is simple, and fits comfortably with classic ip logic. The commands
ip netns add ns1
ip netns list
ip netns del ns1
add the ns1 namespace, display existing namespaces, and delete ns1 (Figure 2). The configuration of networks in a namespace can be linked optionally to the ip command, as would also occur on a single-namespace device. Only the exec <namespace> command separates the two parts.
Initially, the complete command looks quite difficult, but the logic behind it is simple. It allows applications that can only operate within one namespace to reach the target without diversions. The entry
ip netns exec ns1 ip link set lo up
creates a loopback interface in the ns1 namespace. The command
ip netns exec ns1 ip route show
displays the routing tables in the namespace. However, these are still empty at this moment, which is why calling up a DNS query with
ip netns exec ns1 dig -t MX @8.8.8.8 suse.com
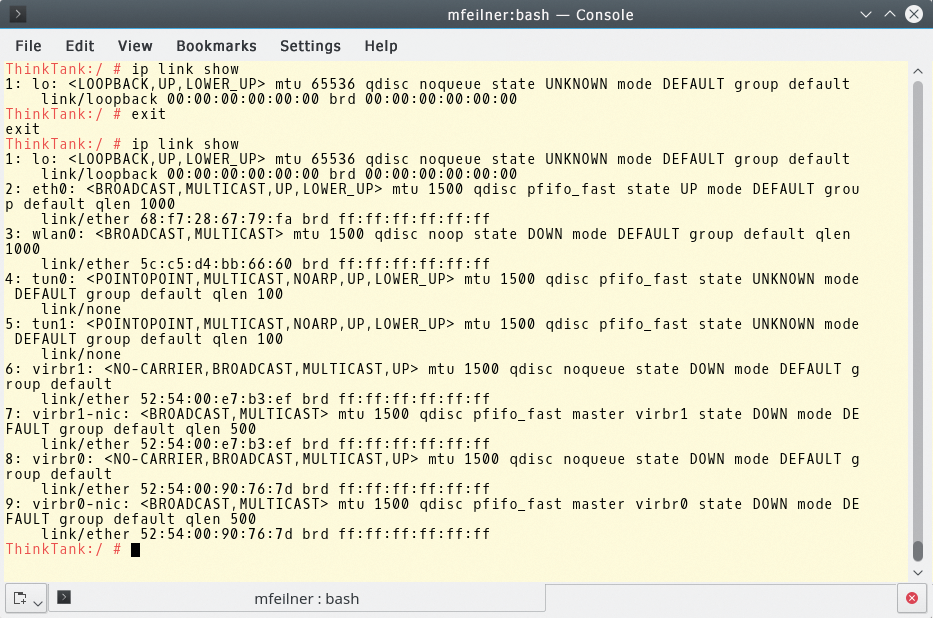
still does not produce a result (Figure 2). Figure 3 shows many network devices in the operating system at hand, although with only a single loopback in the ns1 namespace. You can leave the namespace using exit to return to the previous environment.

ns1 namespace, in which only the previously created loopback interface is present.Bearing in mind the somewhat wider ranging configuration tasks now facing admins, one available option is to open a shell with ip to submit several commands (Listing 1) consecutively in the namespace.
Listing 1: Configuring eth1
ip netns exec ns1 bash
ip link set eth1 up
ip addr add 192.168.1.123/24 dev eth1
ip -f inet addr show
exit
More Examples
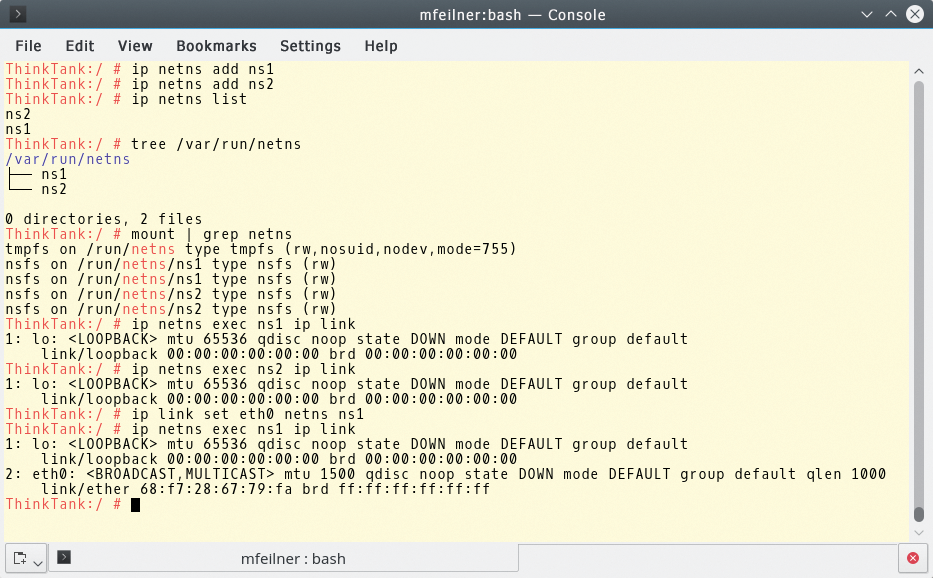
Figure 4 shows other simple examples of using namespaces. Whether creating another namespace, displaying a namespace, or displaying the structure of a namespace with /var, these tasks are child's play:
$ ip netns add ns1
$ ip netns add ns2
$ ip netns list
ns2
ns1
$ tree /var/run/netns
/var/run/netns/
|---ns1
|---ns2

The mount command shows the newly set mountpoints (Listing 2).
Listing 2: View Mountpoints
$ mount | grep netns
tmpfs on /run/netns type tmpfs (rw,nosuid,nodev,mode=755)
proc on /run/netns/ns1 type proc (rw,nosuid,nodev,noexec,relatime)
proc on /run/netns/ns1 type proc (rw,nosuid,nodev,noexec,relatime)
proc on /run/netns/ns2 type proc (rw,nosuid,nodev,noexec,relatime)
proc on /run/netns/ns2 type proc (rw,nosuid,nodev,noexec,relatime)
If you examine the boot procedure of your Linux system closely, you will notice that it has already created an init_net namespace during bootup. You will then receive the assigned loopback interface, along with all the physical devices and sockets. Only the loopback device contains the newly created namespace:
$ ip netns exec ns1 ip link
1: lo: <LOOPBACK> mtu 65536 qdisc noop state DOWN group default
   link/loopback 00:00:00:00:00:00 brd 00:00:00:00:00:00
The set command adds a device that already exists in a host system into a namespace. However, because it is exclusive, the device disappears from then on in the host namespace. In the ns1 namespace, you must first configure the device (Listing 3). This system has two network cards, one of which is now exclusively assigned to ns1. As a whole, it functions very rigorously, as a look into the sysfs virtual filesystem demonstrates:
$ tree /sys/class/net
/sys/class/net
|---eth0 -> ../../devices/pci0000:00/0000:00:03.0/net/eth0
|---lo -> ../../devices/virtual/net/lo
The device is no longer listed in the default namespace.
Listing 3: Configuring Devices
$ ip link set eth1 netns ns1
$ ip netns exec ns1 ip link
1: lo: <LOOPBACK> mtu 65536 qdisc noop state DOWN mode DEFAULT group default link/loopback 00:00:00:00:00:00 brd 00:00:00:00:00:00
3: eth1: <BROADCAST,MULTICAST> mtu 1500 qdisc noop state DOWN mode DEFAULT group default qlen 1000 link/ether 52:54:00:02:e3:f1 brd ff:ff:ff:ff:ff:ff
$ ip link
1: lo: <LOOPBACK,UP,LOWER_UP> mtu 65536 qdisc noqueue state UNKNOWN mode DEFAULT group default link/loopback 00:00:00:00:00:00 brd 00:00:00:00:00:00
2: eth0: <BROADCAST,MULTICAST,UP,LOWER_UP> mtu 1500 qdisc pfifo_fast state UP mode DEFAULT group default qlen 1000 link/ether 52:54:00:01:b0:24 brd ff:ff:ff:ff:ff:ff
The asynchronous routing example in Listing 4 is complete within a few steps. Here, you define interfaces, addresses, and routes, have the results displayed, and put it through a ping test. The routing table, as defined in line 12, is only present in the ns1 namespace. With /etc/netns/ns1,
$ mkdir -pv /etc/netns/ns1
mkdir: created directory ?/etc/netns?
mkdir: created directory ?/etc/netns/ns1?
$ echo 1.2.3.4\ mytest | tee /etc/netns/ns1/hosts
$ ip netns exec ns1 getent hosts
1.2.3.4     mytest
you can also manage your own configurations.
Listing 4: Isolating the Network
01 $ ip netns exec ns1 ip link set lo up
02 $ ip netns exec ns1 ip link set eth1 up
03 $ ip netns exec ns1 ip addr add 192.168.1.123/24 dev eth1
04 $ ip netns exec ns1 ip -f inet addr show
05 1: lo: <LOOPBACK,UP,LOWER_UP> mtu 65536 qdisc noqueue state UNKNOWN group default
06    inet 127.0.0.1/8 scope host lo
07       valid_lft forever preferred_lft forever
08 3: eth1: <BROADCAST,MULTICAST,UP,LOWER_UP> mtu 1500 qdisc pfifo_fast state UP group default qlen 1000
09    inet 192.168.1.123/24 scope global eth1
10       valid_lft forever preferred_lft forever
11
12 $ ip netns exec ns1 ip route add default via 192.168.1.1 dev eth1
13 $ ip netns exec ns1 ping -c2 8.8.8.8
14 PING 8.8.8.8 (8.8.8.8) 56(84) bytes of data.
15 64 bytes from 8.8.8.8: icmp_seq=1 ttl=51 time=22.1 ms
16 64 bytes from 8.8.8.8: icmp_seq=2 ttl=51 time=20.1 ms
Namespace Discussion
Virtual Ethernet devices are the means through which resources from different namespaces communicate with one another. They always come in pairs and function like a pipe, in that everything sent by the operating system to a veth comes back to the other side (the peer). The process documented in Listing 5 demonstrates how this works.
Listing 5: Virtual Ethernet Devices
01 $ ip netns exec ns1 ip link add name veth1 type veth peer name veth2
02 $ ip netns exec ns1 tree /sys/class/net
03 /sys/class/net
04 |---eth1 -> ../../devices/pci0000:00/0000:00:08.0/net/eth1
05 |---lo -> ../../devices/virtual/net/lo
06 |---veth1 -> ../../devices/virtual/net/veth1
07 |---veth2 -> ../../devices/virtual/net/veth2
08
09 $ ip netns exec ns1 ip link set dev veth2 netns ns2
10 $ ip netns exec ns2 ip link
11 1: lo: <LOOPBACK> mtu 65536 qdisc noop state DOWN mode DEFAULT group default
12    link/loopback 00:00:00:00:00:00 brd 00:00:00:00:00:00
13 2: veth2: <BROADCAST,MULTICAST> mtu 1500 qdisc noop state DOWN mode DEFAULT group default qlen 1000
14    link/ether 8e:1b:5d:87:62:db brd ff:ff:ff:ff:ff:ff
15
16 $ ip netns exec ns1 ip addr add 1.1.1.1/10 dev veth1
17 $ ip netns exec ns2 ip addr add 1.1.1.2/10 dev veth2
18 $ ip netns exec ns1 ip link set veth1 up
19 $ ip netns exec ns2 ip link set veth2 up
20
21 $ ip netns exec ns1 ping -c2 1.1.1.2
22 PING 1.1.1.2 (1.1.1.2) 56(84) bytes of data.
23 64 bytes from 1.1.1.2: icmp_seq=1 ttl=64 time=0.021 ms
24 64 bytes from 1.1.1.2: icmp_seq=2 ttl=64 time=0.022 ms
At the beginning, you create two virtual network devices – veth1 and veth2 – then use the readout from line 2 to see whether they are present in the namespace. In line 9, veth2 is moved into the correct namespace (i.e., ns2). This second namespace will contain the loopback and the peer interface (lines 10-14).
For communication between the peers to function, both naturally need IP addresses (lines 16 and 17). Now you are able to start the two devices and test the connectivity (lines 18-21). Clearly, the connection works. If you have connected the namespaces with a physical interface, you can also work with bridges.
The next step should show how an SSH server can only be made available within this namespace. The command
$ ip netns exec ns1 /usr/sbin/sshd -o PidFile=/run/sshd-ns1.pid -o ListenAddress=1.1.1.1
starts the SSH daemon in the ns1 namespace and forwards a PID file and an IP address on which to eavesdrop. The PID file is necessary to distinguish this SSH server service from the instance also running in the global namespace. The second SSH server only eavesdrops on 1.1.1.1, the IP of the veth1 interface, which is only available in the ns1 namespace (Listing 6).
Listing 6: Eavesdropping
$ ps -ef | grep $(cat /run/sshd-ns1.pid)
root  7387  1  0  00:13 ?   00:00:00 /usr/sbin/sshd -o PidFile=/run/sshd-ns1.pid -o ListenAddress=1.1.1.1
$ ip netns exec ns1 ss -ltn
State   Recv-Q  Send-Q  Local Address:Port  Peer Address:Port
LISTEN  0       128           1.1.1.1:22               *:*
For the last test, an SSH session from ns1 to ns2, one small detail proves useful: because bash is running inside the ns1 session, you can also configure the namespace there without prefixing the ip netns exec commands (Listing 7).
Listing 7: SSH in Namespaces
$ ip netns exec ns2 ssh 1.1.1.1
$ ip -f inet addr show
1: lo: <LOOPBACK,UP,LOWER_UP> mtu 65536 qdisc noqueue state UNKNOWN group default inet 127.0.0.1/8 scope host lo valid_lft forever preferred_lft forever
3: eth1: <BROADCAST,MULTICAST,UP,LOWER_UP> mtu 1500 qdisc pfifo_fast state UP group default qlen 1000 inet 192.168.1.123/24 scope global eth1 valid_lft forever preferred_lft forever
4: veth1: <BROADCAST,MULTICAST,UP,LOWER_UP> mtu 1500 qdisc pfifo_fast state UP group default qlen 1000 inet 1.1.1.1/10 scope global veth1 valid_lft forever preferred_lft forever
$ ss -etn
State Recv-Q Send-Q  Local Address:Port  Peer Address:Port
ESTAB 0       0              1.1.1.1:22          1.1.1.2:40412   timer:(keepalive,109min,0) ino:34868 sk:ffff880036f8b4c0 <->
Building Bridges
Along with the handy tunnel through veth devices, bridges offer some advantages for those wanting to connect namespaces with the real network. Listing 8 shows how a virtual device with a real Ethernet device, eth0, can be connected. First, you delete one of the existing virtual devices and create it afresh in the default namespace. Because both devices are connected by the peer directive, veth1 automatically disappears.
Listing 8: Building a Bridge
01 $ ip netns exec ns1 ip link delete veth1
02 $ ip link add name veth1 type veth peer name veth2
03 $ ip link
04 1: lo: <LOOPBACK,UP,LOWER_UP> mtu 65536 qdisc noqueue state UNKNOWN mode DEFAULT group default
05    link/loopback 00:00:00:00:00:00 brd 00:00:00:00:00:00
06 2: eth0: <BROADCAST,MULTICAST,UP,LOWER_UP> mtu 1500 qdisc pfifo_fast state UP mode DEFAULT group default qlen 1000
07    link/ether 52:54:00:01:b0:24 brd ff:ff:ff:ff:ff:ff
08 3: eth1: <BROADCAST,MULTICAST,UP,LOWER_UP> mtu 1500 qdisc pfifo_fast state UP mode DEFAULT group default qlen 1000
09    link/ether 52:54:00:02:e3:f1 brd ff:ff:ff:ff:ff:ff
10 7: veth2: <BROADCAST,MULTICAST> mtu 1500 qdisc noop state DOWN mode DEFAULT group default qlen 1000
11    link/ether c6:27:2a:a8:06:ca brd ff:ff:ff:ff:ff:ff
12 8: veth1: <BROADCAST,MULTICAST> mtu 1500 qdisc noop state DOWN mode DEFAULT group default qlen 1000
13    link/ether 26:3e:ce:c5:de:de brd ff:ff:ff:ff:ff:ff
14
15 $ ip -f inet addr show eth0
16 2: eth0: <BROADCAST,MULTICAST,UP,LOWER_UP> mtu 1500 qdisc pfifo_fast state UP group default qlen 1000
17    inet 192.168.56.130/24 brd 192.168.56.255 scope global eth0
18       valid_lft forever preferred_lft forever
19
20 $ ip addr del 192.168.56.130/24 dev eth0
21 $ brctl addbr br0
22 $ ip addr add 192.168.56.130/24 dev br0
23 $ ip link set br0 up
24 $ ip -f inet addr show br0
25 9: br0: <BROADCAST,MULTICAST,UP,LOWER_UP> mtu 1500 qdisc noqueue state UNKNOWN group default
26    inet 192.168.56.130/24 scope global br0
27       valid_lft forever preferred_lft forever
28
29 $ brctl addif br0 eth0
30 $ brctl addif br0 veth1
31 $ brctl show
32 bridge name   bridge id           STP enabled   interfaces
33 br0           8000.263ecec5dede   no            eth0
First, a Demolition
To add one of the Ethernet devices installed in the host to a bridge, you next delete and disengage your IP address. Line 15 displays the Ethernet device, and line 20 deletes the configuration. The command in lines 21 and 22 sets up a br0 bridge, and line 23 starts it. Next, the virtual device can be connected with the bridge, as shown in line 29, and verified in line 31.
For the final step, the veth2 device is moved into the ns1 namespace and gets an IP address before the devices are started:
$ ip link set veth2 netns ns1
$ ip netns exec ns1 ip addr add 192.168.56.131/24 dev veth2
$ ip netns exec ns1 ip link set lo up
$ ip netns exec ns1 ip link set veth2 up
In the tests for this article, the final steps failed inexplicably on some systems; the veth2 interface seemed to be down, and the pings did not arrive. On other systems, on the other hand, everything functioned without complaint.
Cleaning Up
Because network namespaces are not persistent, if you completely mess up while playing around and testing, you can start again with a clean slate after a reboot. However, that also means you need a startup script so that your namespaces are preserved on production systems.
Without a reboot, though, you can also delete the configuration by recommitting the devices to the init_net namespace:
$ ip netns exec ns1 ip link delete veth1
$ ip netns exec ns1 ip link set eth1 netns 1
$ ip netns del ns1
$ ip netns del ns2
By deleting a namespace, you also automatically remove the entries in /var/run/netns; the operating system unmounts them and removes the mountpoints, which normally brings the real devices back into the default namespace. However, in some situations, it would not be appropriate: If you delete a namespace before processes inside it have ended, you are headed for trouble with mountpoints.
Normally, an error report will prevent this situation (mountpoint in use). Unfortunately, the message does not always appear, in which case, the device belonging to a deleted namespace is lost along with the processes that were present.
You should therefore always go through the PIDs and manually kill the affected processes, if necessary, by going through the /proc/ directory and finding all the processes that belong to the network namespace in question with:
ip netns pids <namespace>
You can see this command used in Listing 9 (line 1). Line 4 kills processes from the ns1 namespace. You could also use identify, with the aid of the PID (line 6), to find the relevant namespace for each individual process. The monitor command (line 8) helps to understand what modifications the commands have made: The wider ranging the environment, the more helpful this approach becomes.
Listing 9: Manual Cleanup
01 $ ps auxww | grep $(ip netns pids ns1)
02 root  7811  0.0  0.0  46900  1024 ?   Ss   01:05   0:00   /usr/sbin/sshd -o PidFile=/run/sshd-ns1.pid -o ListenAddress=1.1.1.1
03
04 $ ip netns pids ns1 | xargs kill
05 $ ip netns del ns1
06 $ ip netns identify 1445
07 ns1
08 $ ip netns monitor
09 add ns1
10 add ns2
11 delete ns2
12 delete ns1
Light Work
Container technologies like Docker and LXC make extensive use of namespaces. Few people, however, know that the lightweight isolation technology provided for some time by the Linux kernel enables interesting setups for admins without sky-high cloud stacks. As we hope we have demonstrated in this article, you can familiarize yourself with the necessary tools quite quickly.
