
Swagger and OpenAPI Specification for documents
ElegantSpiceworks
Web applications often offer a REST interface for external use of their services. Developers address this from their own programs by accessing it through special URLs and HTTP requests, assuming the REST API is documented as completely as possible. A library that allows for a more convenient access to the service and thus facilitates the process of writing client programs would be even better.
However, for the web application vendor this involves much work: They not only need to develop the documentation and the library but also update both in case of any interface changes. A miracle tool named Swagger [1] automates both. Swagger is both a specification [2] and a collection of tools that generate interactive documentation for a REST API, and it's even a small software development kit (SDK) for client programs on request.
Division of Responsibilities
What initially sounds complicated proves to be remarkably simple in practice [3]. First, the developer describes the feature set of their REST API in a text file; it is written either manually or generated automatically from the source code of the web application. Generating it automatically implies that one of the frameworks supported by the Swagger tools is used, including JAX-RS [4] and Node.js [5]. In any case, two tools then access the API description and produce a complete API reference, as well as a matching SDK. The developer integrates the Swagger tools in the build process; the documentation and client SDK are automatically kept up to date.
Swagger, developed by SmartBear [6], comprises in part a comprehensive specification [2]. It describes in detail how the developer has to write the REST API in the text file. SmartBear handed over the complete specification of Swagger January 1, 2016, to the Open API initiative [7], which in turn is backed by the Linux Foundation. The specification was renamed OpenAPI Specification [8]. Because it is based on version 2.0 of the Swagger specification, the OpenAPI Specification also has this version number.
Hammer and Chisel
Centered on the specification, SmartBear has published a number of useful tools, including the Swagger Editor [9], with which the user conveniently can create and edit the description of the REST API. It not only includes syntax highlighting but checks the description for syntax errors against the Swagger specification. Errors are generally highlighted in color; it also gives you formatting tips and displays a preview of future documentation.
One of the most important tools in the bunch is the Swagger user interface (UI). It creates practical interactive HTML documentation from the description of the REST API. Users can call the functions of the service directly from the documentation if needed.
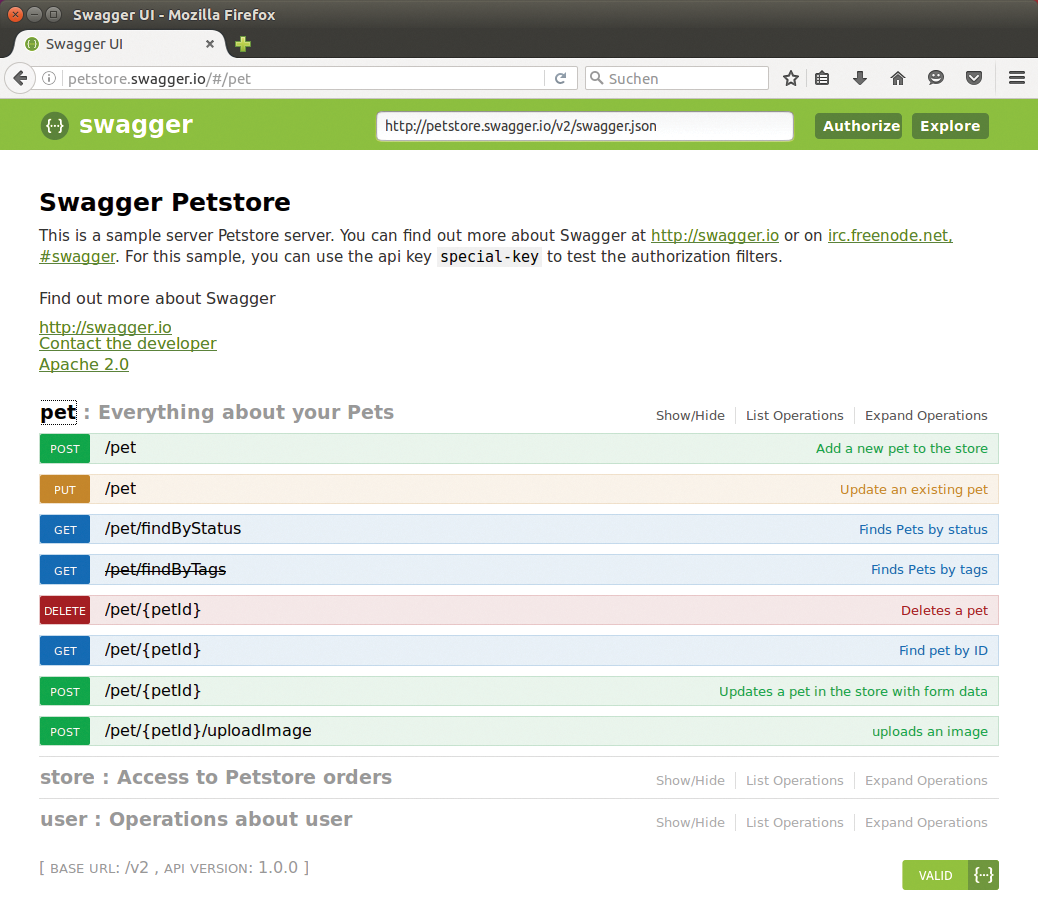
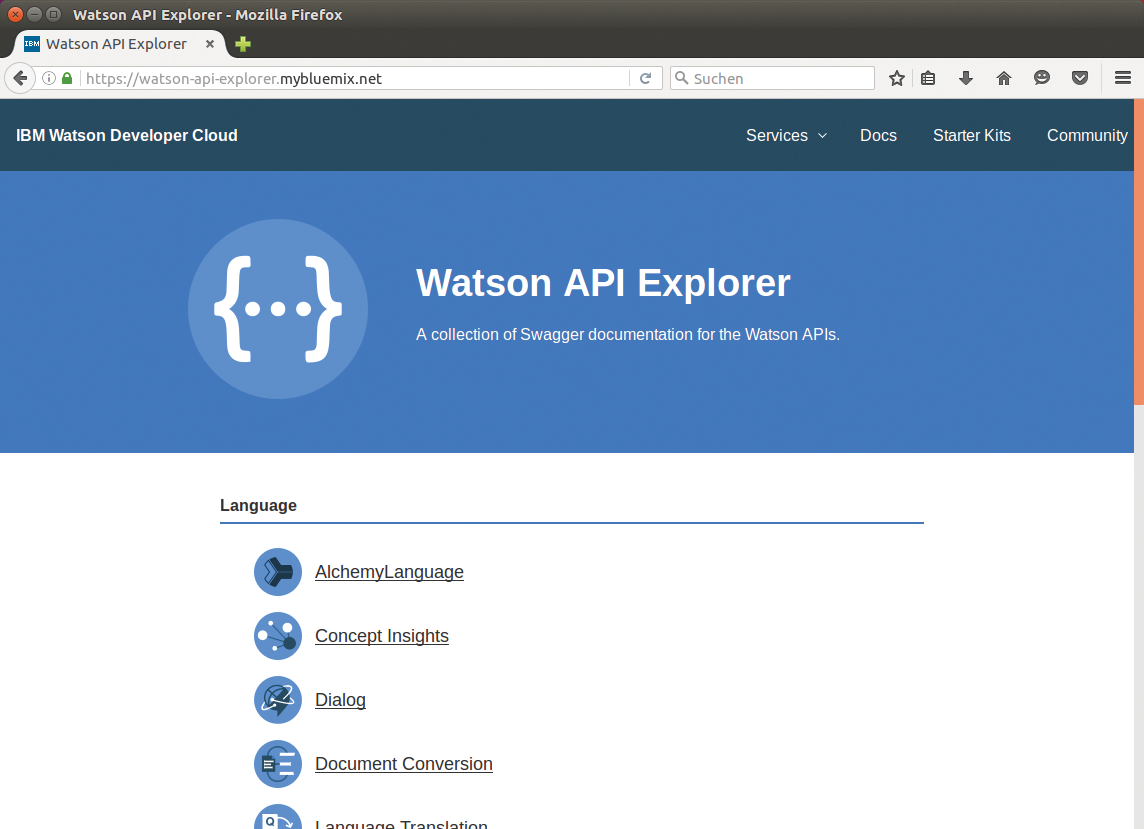
The Swagger makers demonstrate what this kind of documentation looks like on their website, providing a fictitious online pet shop that users can control via a REST interface. Thanks to the API reference [10] created with Swagger, users can both see the functionalities offered by the online shop and add new animals with a few mouse clicks (Figure 1). The Swagger UI is written completely in HTML, CSS, and JavaScript; developers quite simply adapt the look of the documentation to suit their needs (Figure 2) [11].
The Swagger codegen [12] tool generates a complete SDK from the description of the REST API, which developers can eventually use to author client applications for the service. The SDKs are created for various programming languages – ranging from Java, Python, PHP, and Ruby to Scala. Swagger makers like to call the complete package, comprising of the Swagger specification and the associated tools, the API framework.
All the tools mentioned are under the liberal Apache 2.0 license. The complete Swagger framework is used, according to SmartBear, by Getty Images, Microsoft, and PayPal (see also the "Swagger in the Wild" box).
Building Plan
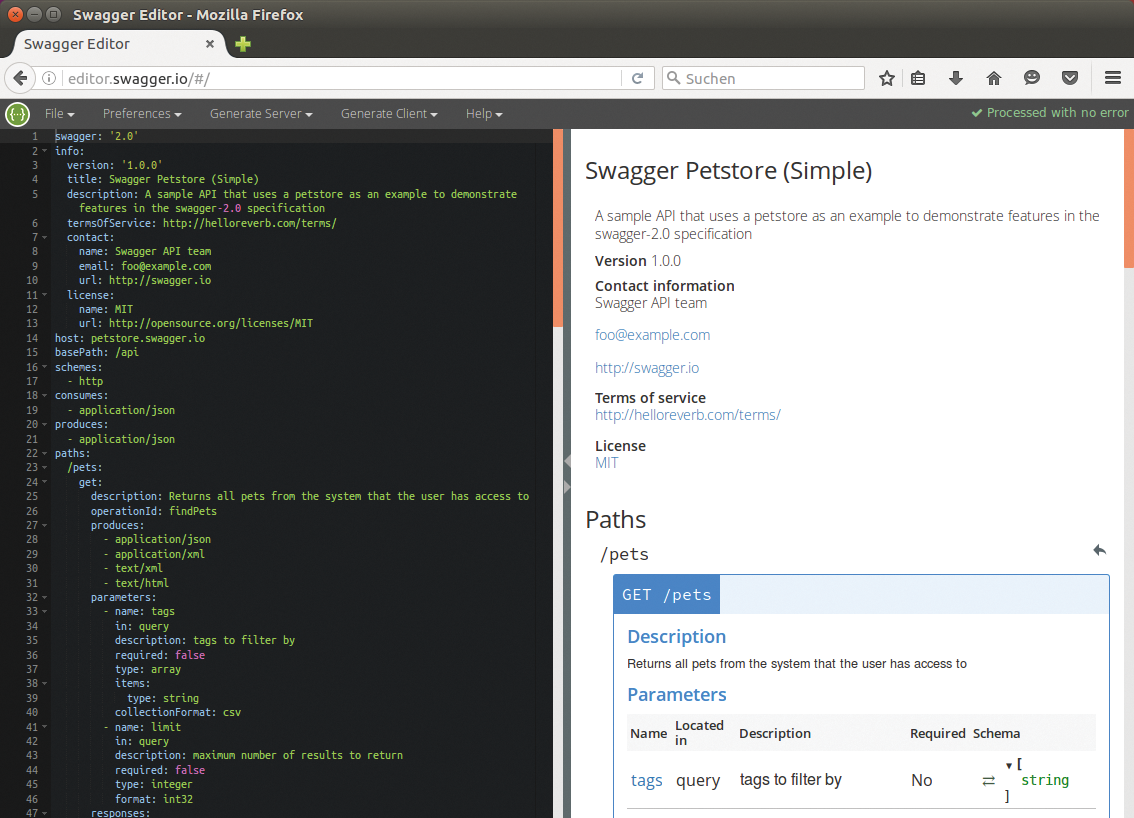
The REST API can be easily described in the Swagger Editor, a web application that requires a web server. If you want to save the trouble of installing, you can use the editor directly on the Swagger homepage (Figure 3) [9]. Operators of a (local) web server first download the swagger editor.zip archive for the current Swagger editor (not the source code) [15]. Unzip this and then upload the complete contents of the swagger-editor directory to the web server or the local DocumentRoot directory.
If you don't want to install a web server, you can resort to the Node.js module http-server. Install this and launch the commands in Listing 1 on Ubuntu. You also install the latest 2.10.1 version of the Swagger Editor on your disk at the same time. After entering all the commands, you can access the editor on http://localhost:8080. Docker fans can power up the editor with two Docker commands:
docker pull swaggerapi/swagger-editor
docker run -p 80:8080 swaggerapi/swagger-editor
Listing 1: Swagger Editor with Node.js
¤¤nonumber
01 sudo apt-get install npm nodejs-legacy
02 sudo npm install -g http-server
03 wget https://github.com/swagger-api/swagger-editor/releases/download/v<2.10.1>/swagger-editor.zip
04 unzip swagger-editor.zip
05 http-server swagger-editor
In any case, you are taken to the user interface shown in Figure 3. Type in the description of the REST API on the left; on the right you will either see a preview of the documentation or an error message, parallel to this.
By default the editor shows a slightly more complex example below File | Open Example, but a few easier ones can also be found. The minimal.yaml example is well suited as a skeleton for your own descriptions. It is slightly more compact than the skeleton created by File | New.
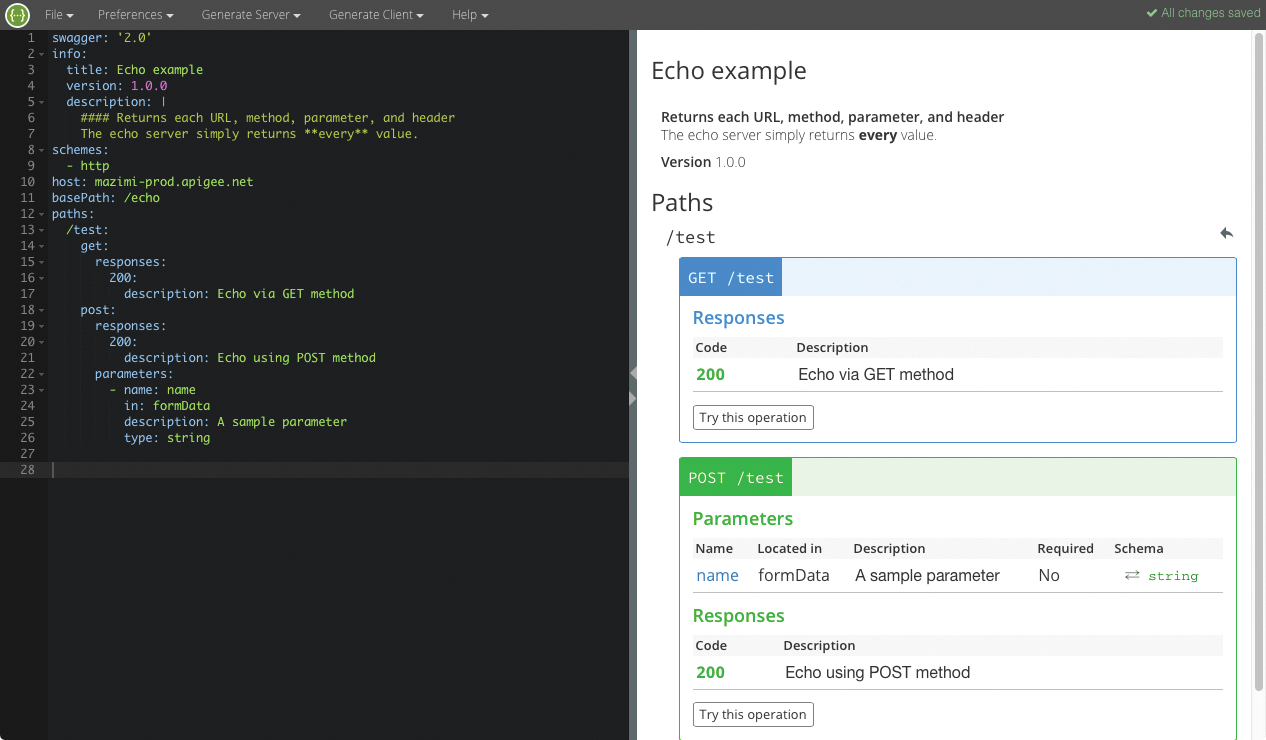
Next, you describe the structure of the REST API in either JSON or YAML format. The latter is a little easier to read but uses indentation to structure the code. Listing 2 shows a simple example of an API description in YAML, which is based in turn on the example echo.yaml. It describes the REST interface of the echo service [16] and simply returns all the information sent to it back to the sender.
Listing 2: Swagger Spec for the Echo Service
¤¤nonumber
01 swagger: '2.0'
02 info:
03   title: Echo example
04   version: 1.0.0
05   description: |
06     #### Returns each URL, method, parameter and header
07     The echo server simply returns **every** value.
08 schemes:
09   - http
10 host: mazimi-prod.apigee.net
11 basePath: /echo
12 paths:
13   /test:
14     get:
15       responses:
16         200:
17           description: Echo via GET method
18     post:
19       responses:
20         200:
21           description: Echo using POST method
22       parameters:
23         - name: name
24           in: formData
25           description: A sample parameter
26           type: string
Nested Characters
In line 1 of Listing 2, swagger is followed by the version number of the underlying Swagger specification. The subsequent info block provides some basic information. The service is named in the title line, and it is later seen in bold as a heading in the documentation (e.g., Swagger Petstore (Simple) in Figure 3).
The API offered by the Echo service [16] exists as version 1.0.0, which is revealed by the entry in line 4. In other words, neither the version of the service nor the Swagger specification version number follows. The line starting with description briefly describes the service. The text following the hashes (#) and the text between asterisks (*) is printed in bold type later.
The transfer protocols used by the service follow schemes; the Echo service accepts only HTTP requests. Line 10, which begins with host, is followed by the hostname or IP address of the service, both without further parameters or prefixes. Only a port specification is allowed. The base path to the service follows separately behind basePath. Developers enter this relative to the hostname prepended with a slash. In the example, the echo service thus is available on the Echo server [16].
The resources that exist there and the operations that clients can perform on them are defined in the block below paths. The example has only one resource, /test. The GET and POST methods can be run on it. GET always delivers a status code of 200 (success); description is followed by a short, but informative, description of the operation.
The POST method additionally has a parameters section, which is a string, as defined by type in the last line, named name. Details about how the service transfers the parameters follow in (line 24); additional supported values are query, header, path, formData, and body.
The documentation generated by the editor from this description is shown in Figure 4. Using Try this operation developers can also try out the method directly. It only works in the editor if the service is allowed to perform a cross-origin call. This is usually not permitted for security reasons, meaning that the request will fail.
UI in Action
The developer now downloads the final specification – either in YAML format via File | Download YAML or as a JSON file with File | Download JSON. You then install the Swagger UI and point it at the JSON or YAML file.
To do so, first download the current source code archive for the Swagger UI [17]. On unzipping, several directories are created. Using the browser, open the index.html file in the dist subfolder. If you want to publish the documentation, you only need to push the contents of the dist subfolder to the web server or the corresponding DocumentRoot.
In any case, the Swagger UI that appears in the browser first presents the sample documentation for the fictitious online pet store (as shown in Figure 1). For the UI to display the documentation for your own REST API, you need to copy the file created with the Swagger Editor dist directory.
Open the index.html file in a text editor and replace http://petstore.swagger.io/v2/swagger.jsonurl at the top after url= with the file name of the JSON or YAML file. If you will be using the Swagger UI offline and opening index.html directly in the browser, you need to specify the full path to the file, as in /home/tim/swagger-ui/dist/swagger.yaml. The Swagger UI then grabs this file and generates the appropriate documentation. For the description from Listing 2, the API reference then looks like Figure 5.
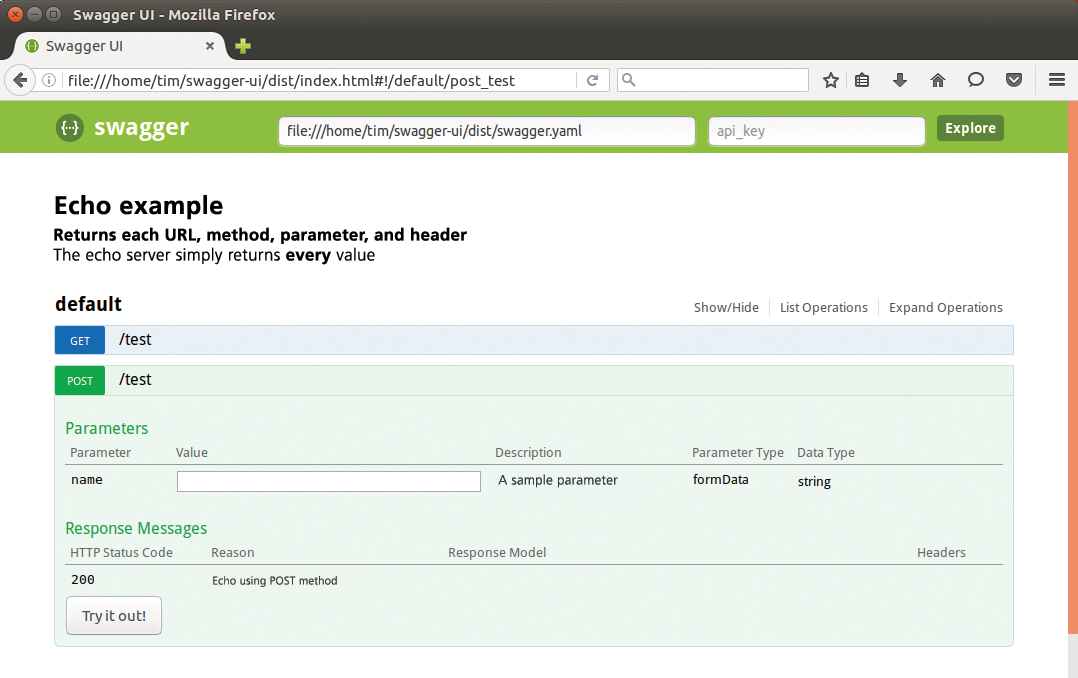
The Swagger UI not only delivers the documentation but also always tries to validate the description against the Swagger specification. This only works if the description is publicly accessible. If it is only used offline or on an intranet, a red Error message appears in the bottom right corner. If you want to get rid of this, you need to modify the source code in the Swagger UI.
User-Friendly Clientele
The Swagger Editor can directly generate a client SDK from the description. To do this, open the Generate Client menu and select the desired programming language. This gives you a ZIP archive containing all the files necessary for client development, including the README.md, which briefly describes how to set up and operate the SDK. The documentation generated in Figure 5 is not part of the SDK.
As an alternative to the editor, you can create the SDK with Swagger codegen [18]. This command-line tool requires at least Java 7. If a corresponding JRE is installed, you can pick up the final version 2.1.6 of codegen with the command:
wget http://repo1.maven.org/maven2/io/swagger/swagger-codegen-cli/2.1.6/swagger-codegen-cli-2.1.6.jar -O swagger-codegen-cli.jar
Afterward, type
java -jar swagger-codegen-cli.jar help
for a list of all available command-line options. If you want to find out what programming languages are supported by codegen, you can do so with the command:
java -jar swagger-codegen-cli.jar langs
In the list of shortcuts, look for the desired programming language and then call Swagger codegen accordingly. The following example would produce an SDK for Python, where the description of the REST API resides in the swagger.yaml file, and the finished SDK ends up in the directory mysdk:
java -jar swagger-codegen-cli.jar generate -l python -i swagger.yaml -o mysdk
Finally, for Java developers, a Swagger Core package is available online [19] with several libraries that read and create Swagger descriptions. The Swagger Editor also generates a basic framework for an appropriate server application from the API description. To do this, you need to open the Generate Server menu and select the preferred framework. Swagger thus also helps to build a REST API.
Conclusions
The pages generated by the Swagger UI look pretty spartan and stand apart, at least visually, from the remaining documentation. Integration into existing online help requires a suitable redesign and major interventions. The information content also depends significantly on how extensively the provider specifies its service in the API description. Not least, the use of the Swagger UI pages is not always self-explanatory.
On the up side, the use of Swagger involves very little additional work, while facilitating access to the REST API for users or other developers. If you integrate the tools into your build process, you will benefit from constantly updated documentation, including a client SDK. Conversely, programmers can use Swagger to generate a client SDK quickly for a third-party REST API and save at least some typing. It could thus be worthwhile for all parties to take a look at Swagger and its associated tools.
