Automation with System Center 2012 R2 Orchestrator
Guided Steps
In the form of System Center Orchestrator (SCO) [1], Microsoft provides a tool for automating the workflows and processes of an IT infrastructure. This promises to save valuable time and money. Getting started is easy, and the first automated processes are rapidly accomplished, but Orchestrator only unfolds its full power in conjunction with other tools.
SCO 2012 R2 lets admins create various tasks and procedures using a graphical user interface in the Runbook Designer. The result is a Runbook that can be used to automate IT operations and which is executed, for example, in Runbook Designer or the Orchestration Console. You can implement the following tasks with the help of SCO:
- Automation of processes in the datacenter, regardless of hardware or platform.
- Automation of IT operations and standardization of methods to improve efficiency.
- Connecting systems by different providers, without requiring any knowledge of scripting or programming languages.
Powerful Automation through Collaboration
A functional SCO environment comprises numerous components that can be installed together on a single system or distributed across multiple computers:
- Management server
- Orchestrator web service
- Orchestration Console
- Runbook Designer
- Runbook server
- Deployment Manager
The Orchestrator Management server is the communication layer between the Runbook Designer and the orchestration database that runs on a SQL Server. The Orchestrator web service gives applications the ability to communicate with the Orchestrator service via a representational state transfer (REST) interface. Using the orchestration console, you can start, stop, and check the status of Runbooks. And, as already mentioned, Runbook Designer is the central instrument for creating and editing Runbooks. Runbooks that you create run on a Runbook server. Several Runbook servers can be installed to increase the efficiency of SCO. The installation of integration packs, providing Runbook servers and Runbook Designers is the task of the Deployment Manager.
The strength of SCO is even more noticeable in combination with other products from System Center Suite. By integrating the Orchestrator integration packages with the other System Center products, Microsoft has created an orchestration tool that enables full automation in private or hybrid cloud environments.
The following example provides an example of full automation: An end user reports on the System Center Service Manager Portal that response from the email application is very slow. The help desk staff discovers by reference to the System Center operation Manager data that the performance of the Exchange Server is poor (or it escalates the problem to second-level service).
The help desk will now trigger an automatic process that relies on SCO to create a new virtual machine from a virtual machine template via Virtual Machine Manager. This virtual machine is automatically installed with Exchange Server and added to the existing database availability group. System Center Configuration Manager is used to install any required applications and agents, and the Windows updates, on the new Exchange Server. SCO then again communicates with System Center Service Manager and reports a solution to the problem so that the help desk staff can close the incident and inform the user of the solution. The example very impressively shows what is possible with the System Center Suite.
Getting Started with SCO
You have the option with SCO to install the software on one computer or to distribute the roles across multiple systems. Installation of Orchestrator on a domain controller is not supported. For the installation of all SCO components on a single computer make sure you comply with the following hardware requirements:
- Minimum 1GB RAM, 2GB RAM recommended
- 200MB available hard disk space
- Dual-core processor with 2.1GHz or better
Windows Server 2008 R2, Windows Server 2012, and 2012 R2 can be used as the operating system for the Orchestrator components.
An installation of Microsoft SQL Server with the following configuration is required to operate the System Center Orchestrator components:
- Microsoft SQL Server 2008 R2 or Microsoft SQL Server with the database services 2012 installed.
- SQL Server sort order (SQL_ Latin1_General_CP1_CI_AS).
- If the Management and Runbook servers are installed on the same computer, they must use the same database.
- The Management server must be running as a 32-bit application.
- Microsoft Internet Information Services (IIS) are required. The SCO setup enables the necessary IIS components, if they are not installed.
- Microsoft .NET Framework 3.5 SP1.
- Microsoft .NET Framework 4.5 and WCF HTTP activation.
Once all system requirements are met, you then run SCO Setup. A QuickStart deployment guide [2] lists all the necessary steps for the install. Before installing the SCO components, you should create appropriate service accounts for the Microsoft SQL Server services and the Orchestrator components, as well as an Active Directory security group to hold the Orchestrator users.
In the course of the SCO Setup, you need to select all the Orchestrator components to be installed. Next specify the Orchestrator service account you created, specify the location for the SQL Server database that you are using, and, if necessary, change the ports the Orchestrator Web Service uses. Complete the installation wizard and start the Setup.
After successful installation, reboot the server and then check for Microsoft updates and install them. Check that the SCO components are working by starting the various SCO consoles and searching in Windows event viewer for Orchestrator related events.
Integration Packages
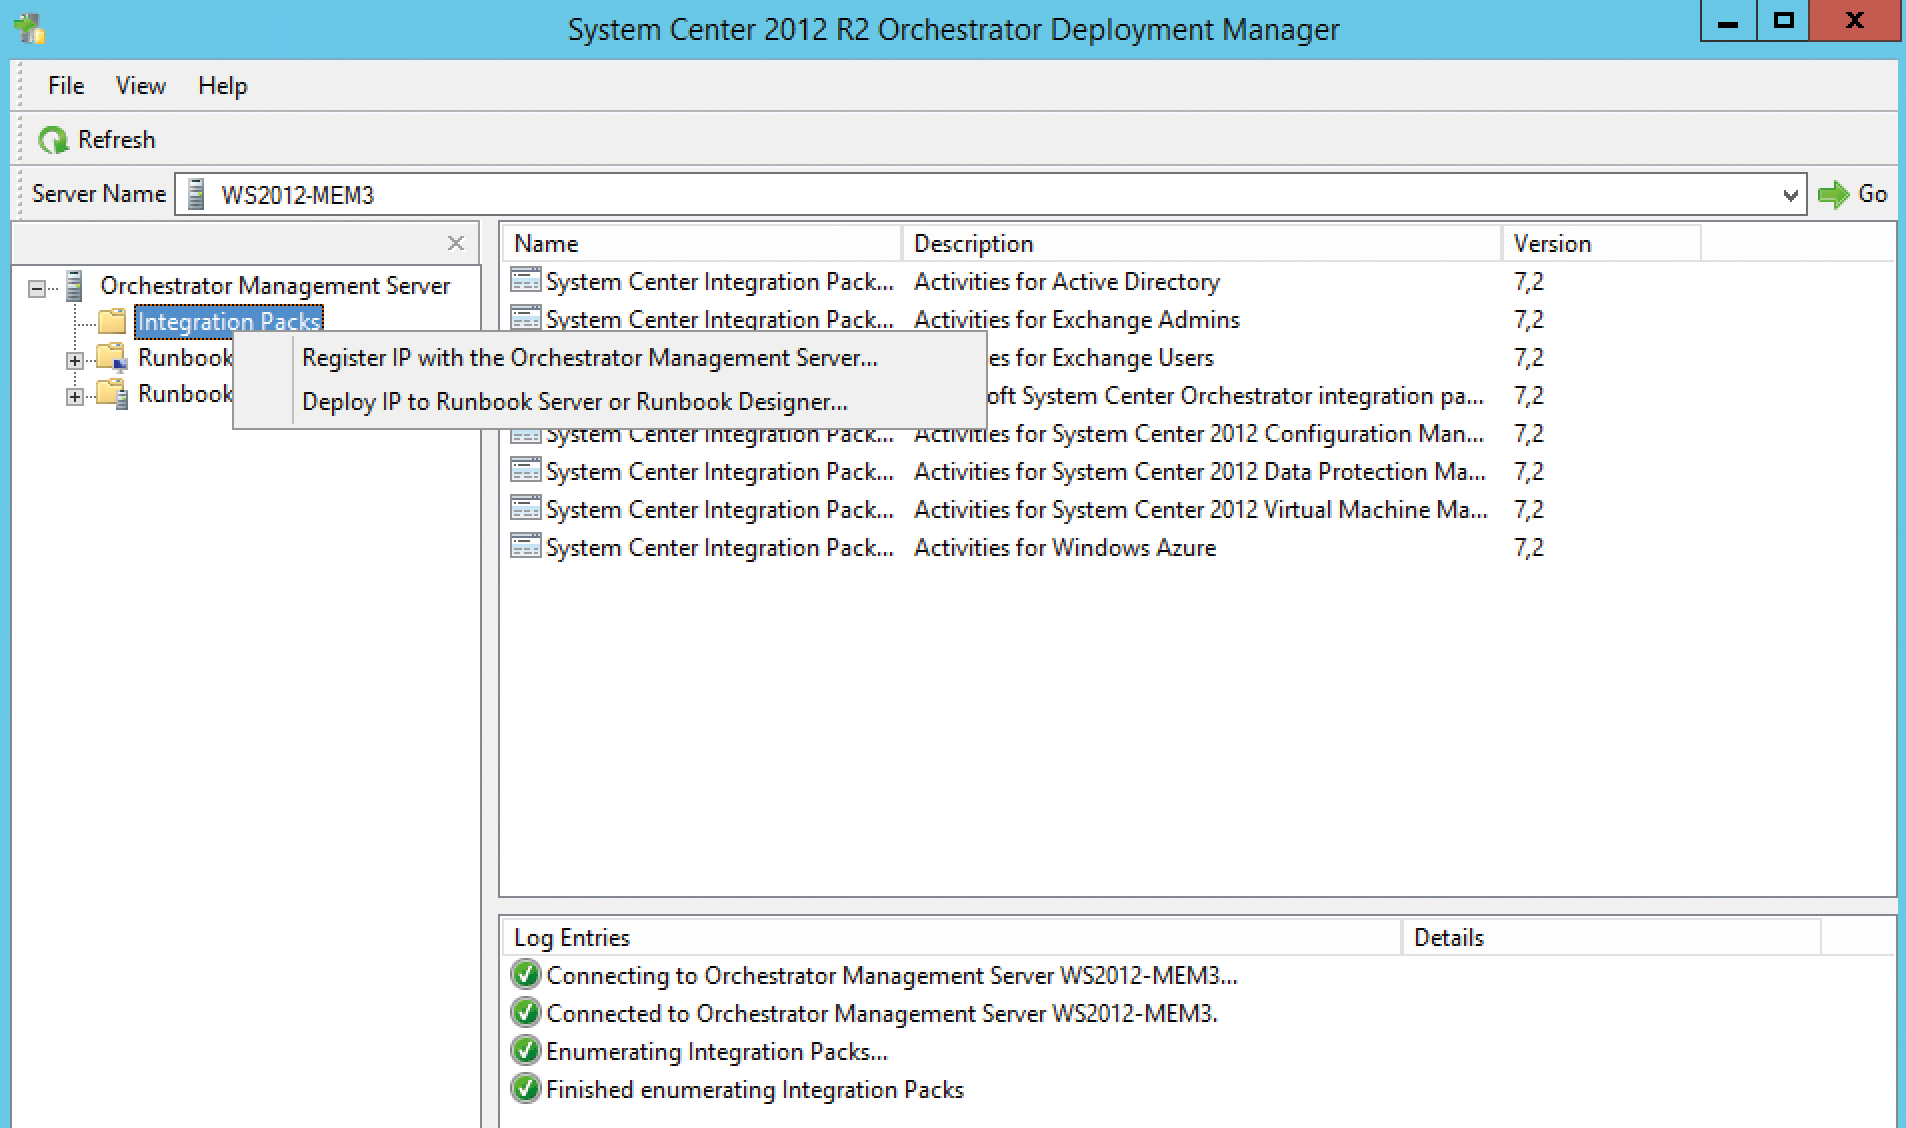
In the next step, you install the SCO integration packages [3]. SCO comprises several dozen built-in standard workflow activities that help you perform a variety of functions. Through the installation of integration packages, the Orchestrator functions can be extended and integrated with other Microsoft and third-party applications (Figure 1).

Download the integration packages from the Microsoft Download Center or from vendor websites. Make sure that you only download trusted packages as integration packages can automatically execute far-reaching actions. There is a guide with installation instructions, a description of known issues, and some reference information for all activities supported by the integration package.
Microsoft offers integration packages for all System Center products and other products and technologies by Microsoft and third parties [4]. The most popular integration packages include:
- Active Directory
- System Center
- HP iLO and OA
- HP Operations Manager
- HP Service Manager
- IBM Tivoli Netcool/OMNIbus
- VMware vSphere
After you have downloaded the integration packages, start Orchestrator Deployment Manager and, in the management console, right-click the Integration packs / Register IP with the Orchestration Management Server structure. Select the previously downloaded integration package and then click Finish to register the package on the local management server.
Next, you install the integration package on a Runbook server or Runbook Designer. To do this, click on Deploy IP to Runbook Server or Runbook Designer in Orchestrator's Deployment Manager. Select the integration packages to redistribute, specify the computer name, and set the installation time. The integration package is then installed on the server.
After successfully installing the integration packages, you complete the configuration in the Runbook Designer Management Console. In the Management Console, click Options in the menu and then configure the integration packages. For example, you need to set the user account and password, for example, for the Active Directory (AD) integration package, with which you will be querying Active Directory, along with the domain controller to use and the entry point, from which AD will be searched.
Automation with Runbooks
The central element of SCO is the Runbook server. As mentioned, operations are automated via Runbooks created using Runbook Designer [5] executed on the Runbook server. Runbook servers communicate directly with the Orchestration database on the SQL Server. You can deploy multiple Runbook servers for each Orchestrator installation to increase capacity and redundancy. With the help of the Runbook Tester, you can check any Runbooks you develop before shifting them into production.
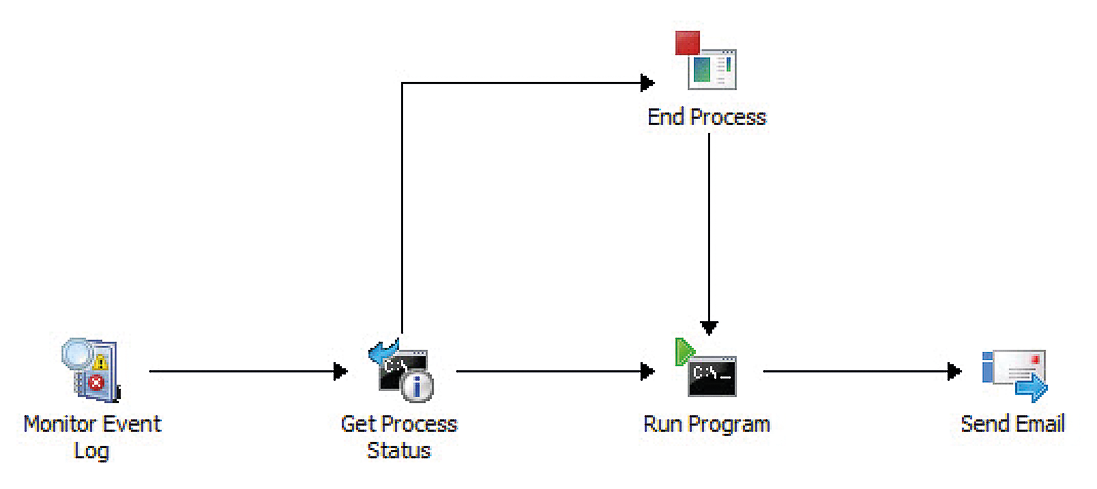
A Runbook provides the technical steps for the execution and automation of processes. Figure 2 shows a simple Runbook that queries the Windows Event Viewer for a specific event ID, shuts down a process – if it is running and/or is running a program – and then sends an email.

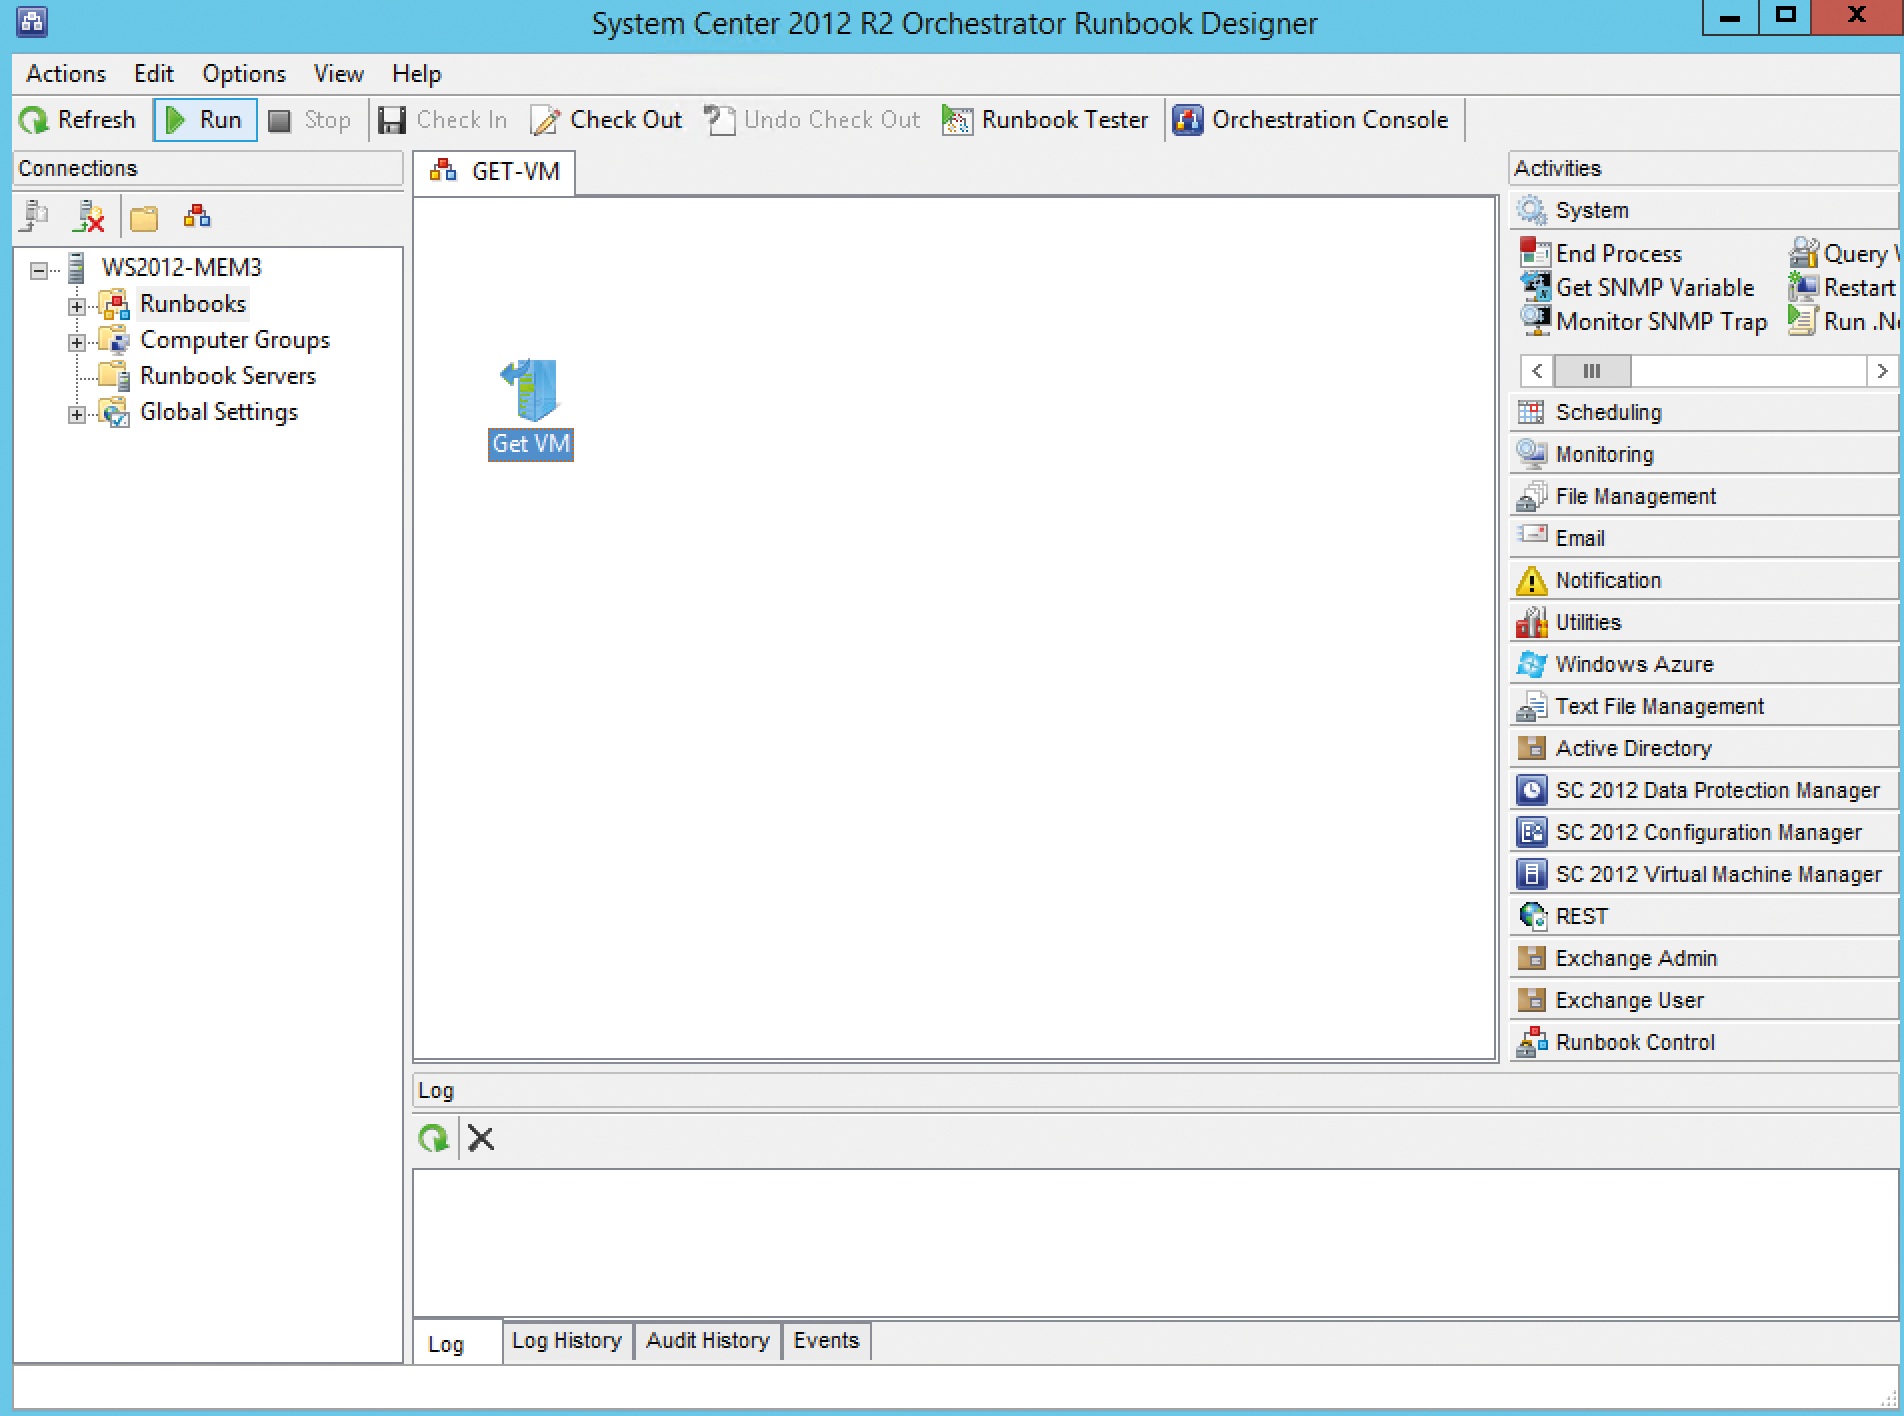
To create a Runbook, launch Runbook Designer, navigate to the Runbooks node and click New / Runbook in the context menu, which opens a new tab with a blank Runbook. Now various functions can be executed in the context menu of the new Runbook's tab. First, you should assign a descriptive name to the Runbook.
The Activities section on the right side of the Runbook Designer Management Console contains all the configuration options (Figure 3). Installed integration packages provide additional activities. For the previously shown example – which triggers an action when an event ID occurs and then sends an email notification – select the group in the Monitoring / Monitor event log activity area. In the properties of the activity, you can now define the computer on which you want to monitor the event ID. You can drag and drop activities to the Runbook window and configure further actions and links between activities.

The Runbook is first checked out and thus reserved for exclusive editing. As additional activities, you can use Get Process Status / End Process / Run Program and Send Email. For the Get Process Status activity, select the process to be terminated, if it is not already terminated. For the Run Program activity, you can define any program or command-line program (VBScript, PowerShell, and many more). Finally, for Send Email, you need to define the connection information for the email server, the account, and the password information.
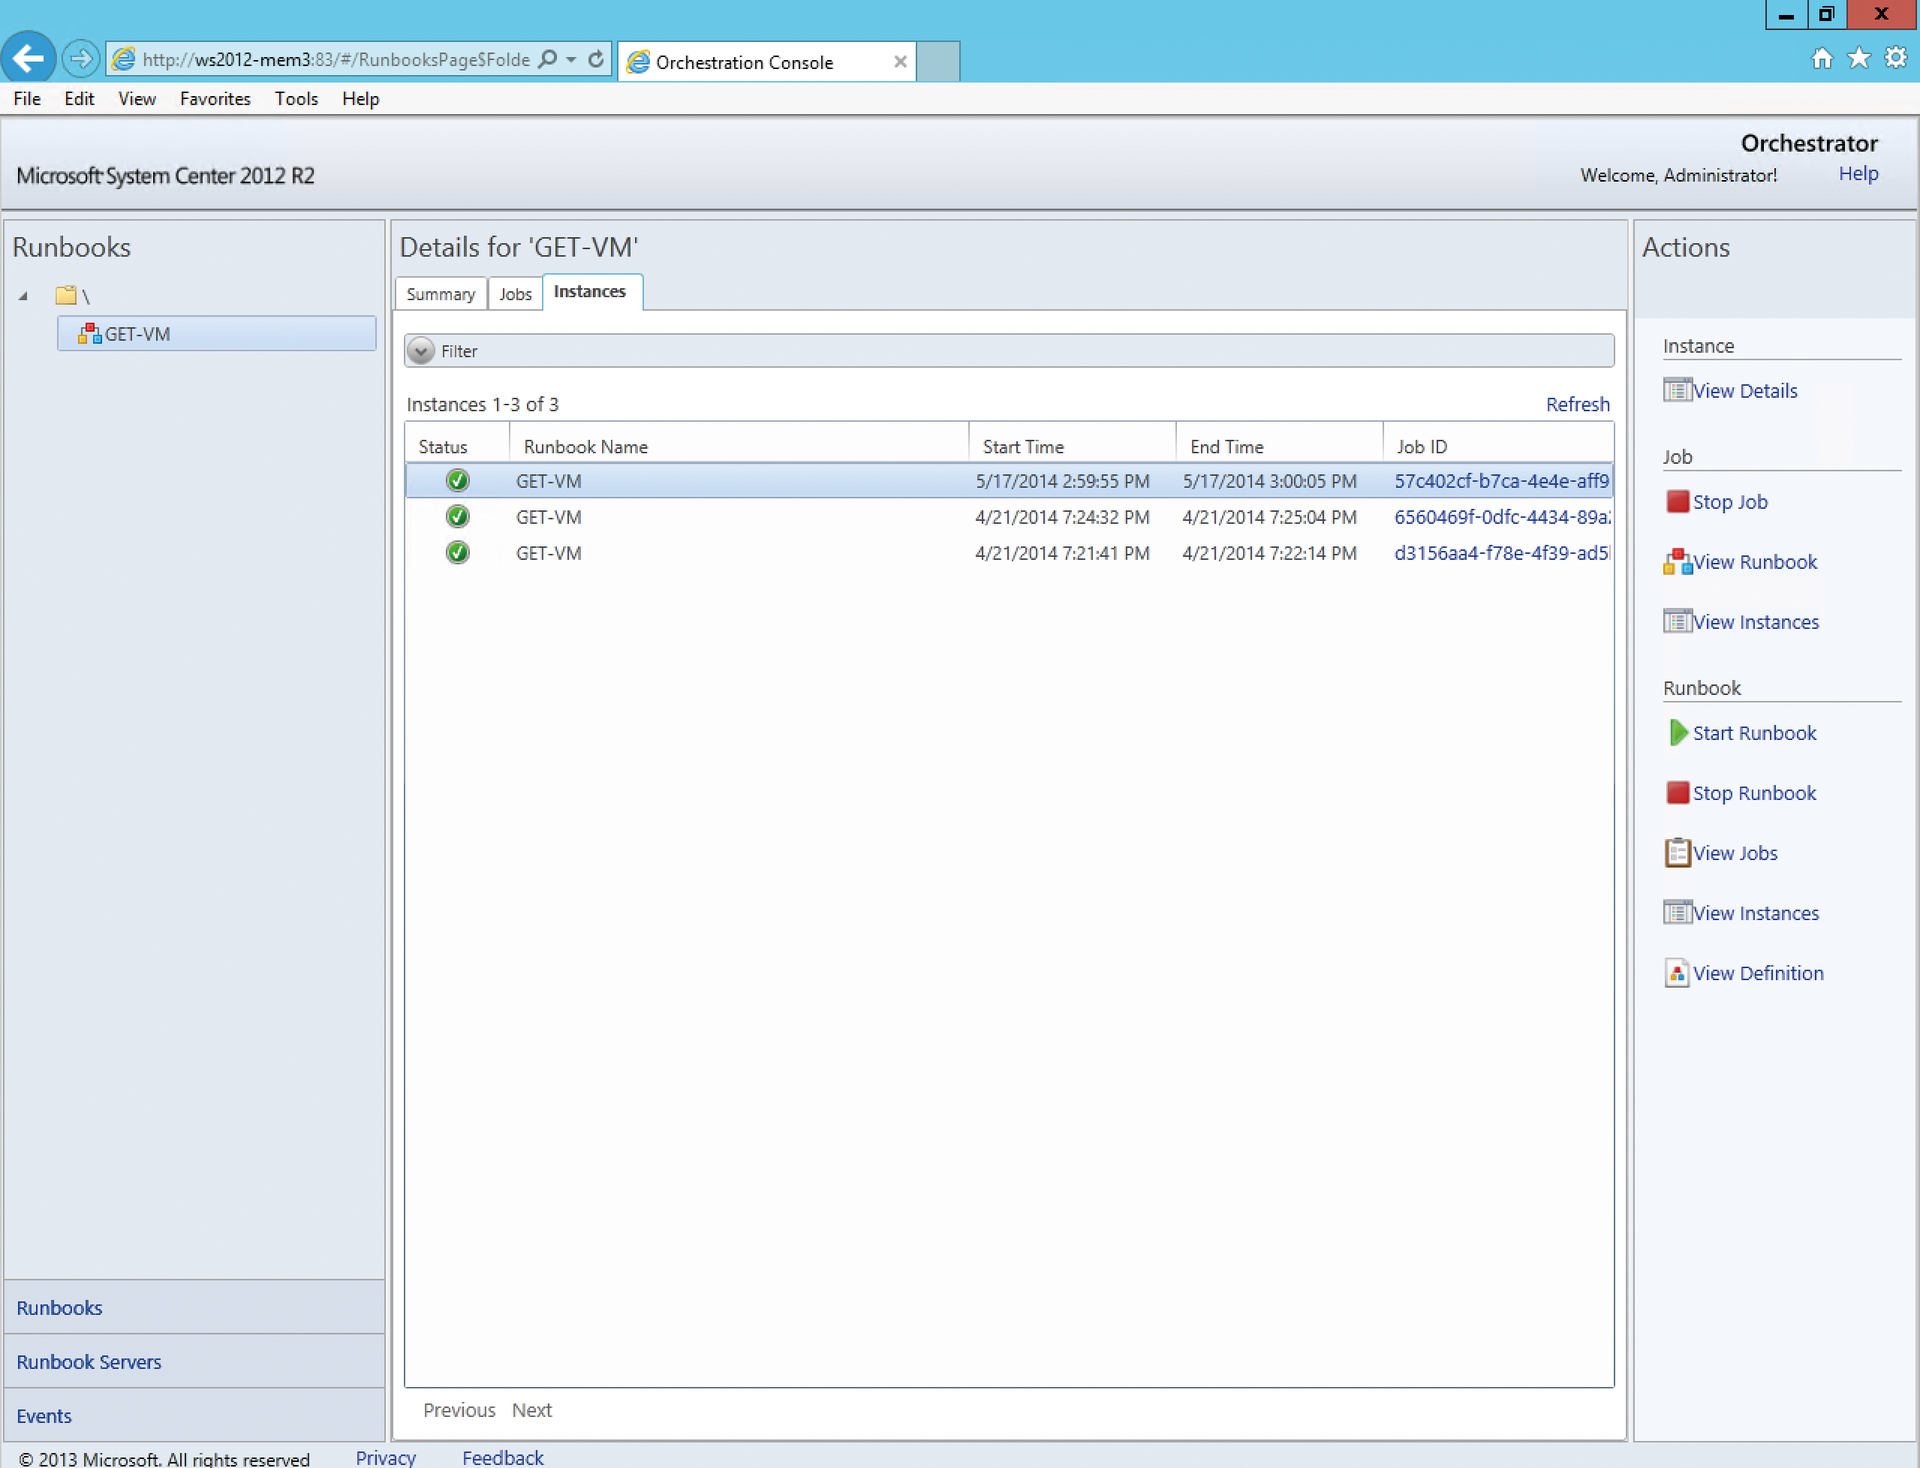
To test the Runbook, press the Runbook tester button. This opens a new window where you click on Run in the ribbon bar to run through the Runbook. Clicking on Step Through takes you through the various Runbook steps. After verifying that the Runbook is working correctly, you then export the Runbook to the Runbook Designer to back it up. The Runbook can now be executed via Runbook Designer or the Orchestration Console (Figure 4). A Runbook that you have already created can be modified after creation by selecting the Runbook in Runbook Designer and making changes.

The Orchestrator web service is a REST-based service through which custom applications can be connected to SCO in order to start or to stop Runbooks. You can also retrieve information on transactions using custom applications or scripts. In the Orchestration Console, the web service is used for interaction with SCO. You can connect to the Orchestrator Web Console [6] by calling the SCO web server URL. In addition to starting and stopping existing Runbooks, you can see an overview of the current Runbooks, the Runbook definitions, and the instances in the web console.
Conclusions
System Center 2012 R2 Orchestrator is a powerful tool that helps administrators automate almost all the processes in the enterprise, assuming that almost all System Center products are in place. Orchestrator plays to its strengths in the Microsoft cloud environment and is a required component if companies are looking for full automation of IT operations with automatic provisioning. However, the complexity of the product should not be underestimated, and IT managers need to be aware that ongoing operation of Orchestrator requires significant staff resources.
