Moving data to Drupal 8
Moving Up
Moving data from a different technology, such as migrating an old website from Drupal 6 or importing a database of news articles into Drupal 8, can be a daunting task. In Drupal 7, data migrations were possible using the contributed Migrate [1] module. The new Migrate API in Drupal 8 is based on the same methodologies for moving your data into Drupal (see the "Experimental Status" box). The Migrate API is excellent for upgrading from Drupal 6 or 7 and for one-time imports of large datasets. In this article, I look briefly at Drupal-to-Drupal upgrades and provide an in-depth example of migrations, including custom Source, Destination, and Process plugins.
Drupal-to-Drupal Upgrades
The Migrate API comprises three modules in Drupal 8 core (Figure 1). You might need to enable one, two, or all three modules depending on your requirements. The Migrate module contains the main API used to define and run migrations. Migrate Drupal provides plugins for upgrading from an older version of Drupal. Migrate Drupal UI contains the interface for the official upgrade from Drupal 6 or Drupal 7. Before diving into custom migrations, I'll take a quick look at the Migrate Drupal UI module.

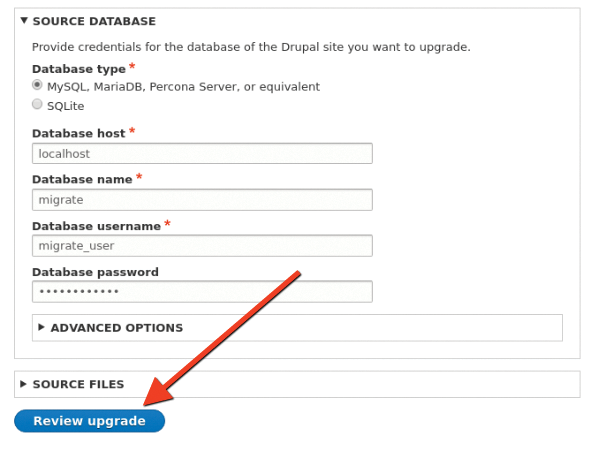
In theory, the Migrate Drupal UI module is a one-stop shop for Drupal upgrades. To try it out, make sure you are logged in as User 1 and navigate to the upgrade form at /upgrade. Follow the prompts to connect to an old Drupal 6 or 7 database and click Review upgrade (Figure 2). The module builds all the migrations needed for an entire upgrade.

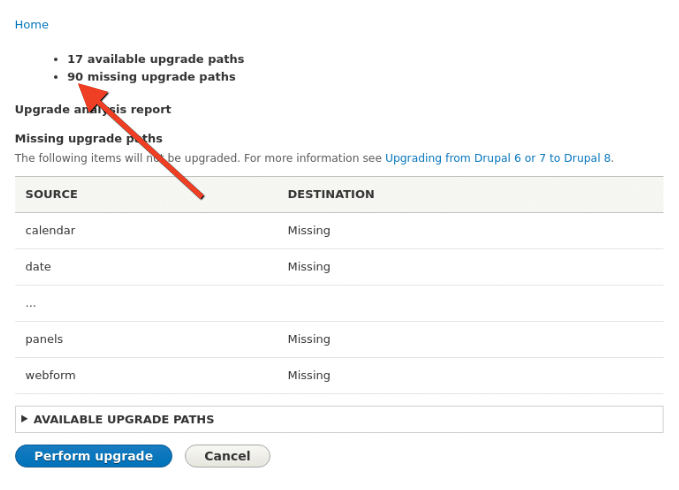
The upgrade process has been tested for core upgrades but depends on contributed modules providing their own upgrade paths. Most Drupal sites use many contributed modules, and after you click Review upgrade, you will see a list of missing upgrade paths (Figure 3). Before you can use this UI, you will need to wait for contributed modules to provide an upgrade path or create your own. Drupal-to-Drupal upgrades via the UI are all or nothing.

A better solution (for now) is to build your own custom migrations (see the "Migration Help Hint" box) by building a new Drupal 8 site from scratch, including content types and other configurations, instead of migrating everything; then, run custom migrations to import discrete pieces of content from the old site. Building a new site from scratch lets you use the latest modules and best practices instead of working around a legacy system. This method also gives you an opportunity to clean up data as it is imported.
Custom migrations are also used if you are migrating data from a non-Drupal source.
Building Custom Migrations
To write custom migrations, you should be comfortable managing Drupal 8 configurations in the YAML format. For more advanced migrations, you should be able to perform basic object-oriented tasks like extending a class, overriding methods, implementing an interface, and working with PHP annotations.
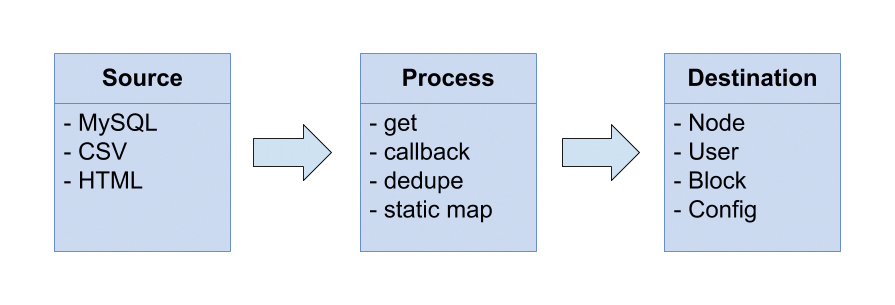
A Drupal migration is a configuration object consisting of a source and a destination. The source could be another database, a .csv-formatted file, or even content scraped from an HTML document. The destination is a component of Drupal where data is saved, such as an entity (node, user, etc.) or configuration (content type, vocabulary, etc.). When the migration is executed, a row of data is fetched from the source, and each field is mapped to the destination using a process plugin. Different process plugins are used to manipulate the data before it is saved to the destination. Figure 4 shows this migration workflow.

Two contributed modules help configure and run custom migrations: Migrate Plus [2] and Migrate Tools [3]. Migrate Plus provides additional API tools and allows you to group similar migrations. It also includes a number of example migrations. Migrate Tools adds Drush commands to list, import, and roll back individual migrations. As of this article, Drush is the only way to run custom migrations, but a UI is currently in progress. You can follow the UI progress in the Migrate Tools issue queue [4].
Migration Example: Pets
Looking at an example is a great way to learn. Imagine you have a database full of information about dogs and cats and their owners. You just built a Drupal 8 website with a Pet content type and want to migrate the pet data. Pet owners become Drupal user accounts and pets are imported into Pet nodes. In the source database, the Pet table contains five fields:
-
pid– Unique pet ID -
oid– Owner ID -
type– Type of pet (dog or cat) -
name– Pet's name -
picture– Photo of the pet
The Owner table contains three fields:
-
oid– Unique owner ID -
name– Owner name -
email– Owner's email address
To import this data, you need to create two migrations and a migration group, along with custom source, destination, and process plugins.
Migration Groups
The first step is to create a migration group. Migration groups are configuration entities provided by Migrate Plus. The configuration management system in Drupal 8 uses configuration entities to import and export configurations between different environments. Configuration entities are defined in a YAML file. The group configuration should be placed in the config/install/ directory of a custom module. For the pet migrations, a pets group is created and placed in config/install/migrate_plus.migration_group.pets.yml:
id: pets
label: Pet migrations
description: A few simple pet migrations.source_type: Custom tables
source:
key: migrate
The group has a machine id and human readable label and description. The source_type key contains a human-readable description of the data source. In this case, the source is a custom database table. Additional keys may be added to the group configuration and will be shared by all migrations that are part of the group. The source[key] field defines the source database connection. This key must exist in the $databases array in settings.php. For example:
$databases = array(
  'default' => array(...),
  'migrate' => array(
    'default' => array(
      'database' => 'pets',
      ...
    ),
  ),
);
You can organize migrations into as many groups as necessary and import an entire group or individual entities.
Migration Configurations
The next step is to create migration configurations. Migrations are also created as configuration entities provided by Migrate Plus. They tell Drupal about the source and destination types and provide field mappings. Migration configurations should be placed in the config/install/ directory.
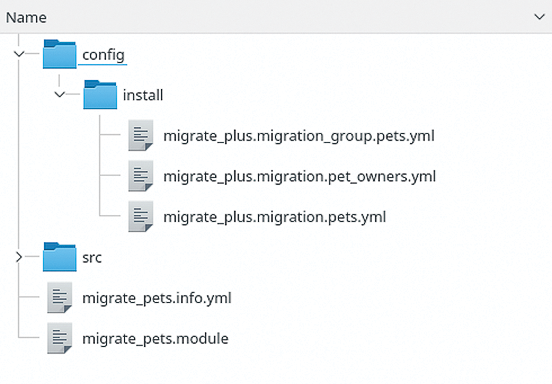
The pet owner migration is defined in config/install/migrate_plus.migration.pet_owners.yml, and the pet migration is defined in config/install/migrate_plus.migration.pets.yml. The module migrate_pets file structure is shown in Figure 5, and the full pet migration from config/install/migrate_plus.migration.pets.yml is shown in Listing 1.
Listing 1: Pet Migration
id: pets
label: "Friendly, Furry Pets"
migration_group: pets
source:
  plugin: pet_source
destination:
  plugin: "entity:node"
process:
  nid: pid
  title: name
  type:
    plugin: default_value
    default_value: pet
  uid:
    plugin: migration
    migration: pet_owners
    source: oid
  field_pet_type:
    plugin: cat_to_dog
  field_photo: picture
migration_dependencies:
  required:
     - pet_owners
dependencies:
  enforced:
    module:
      - migrate_pets

config/install.Like the group configuration, each migration has a machine id and a human-readable label. These are used in migration lists and will be included throughout the UI when available. This migration is part of the pets group, as specified by the migration_group key. The group is optional, and the migration will be part of a default group if it is omitted.
Source Plugins
The source key selects a plugin for loading source data. The Migrate Drupal module in Drupal core provides many default source plugins for Drupal 6 and 7, including d6_node, d7_user, and others. The best way to discover a source plugin is to look in the corresponding module source code. For example, the d6_node plugin is located in the core node module at /core/modules/node/Plugin/migrate/source/d6/Node.php. In this case, you use a custom source plugin to read from the pet database (pet_source):
source:
  plugin: pet_source
The source plugin is placed in the custom module at src/Plugin/migrate/source/PetSource.php and extends \Drupal\migrate\Plugin\migrate\source\SqlBase (for non-database sources, the plugin should extend \Drupal\migrate\Plugin\migrate\SourcePluginBase). The source plugin is exposed to Drupal using an @MigrateSource annotation. The annotation id field (pet_source) is referenced as the source plugin in the migration configuration:
/**
 * Pet source from database.
 *
 * @MigrateSource(
 *   id = "pet_source"
 * )
 */
class PetSource extends SQLBase {
At a minimum, source plugins must implement the MigrateSourceInterface::fields() and MigrateSourceInterface::getIds() methods. The fields() method returns an array of fields available for mapping (Listing 2).
Listing 2: @MigrateSource
/**
 * {@inheritdoc}
 */
public function fields() {
  return [
    'pid' => $this->t('Pet id'),
    'oid' => $this->t('Owner id'),
    'type' => $this->t('Pet type'),
    'name' => $this->t('Pet name'),
    'picture' => $this->t('Pet photo'),
  ];
}
/**
 * {@inheritdoc}
 */
public function getIds() {
  return ['pid' => ['type' => 'integer']];
}
Data ID fields are not necessarily migrated one-to-one in Drupal (pid from the source might not be the same pid in the destination). Instead, Drupal keeps a map of source IDs to destination IDs to track changes. The getIds() method returns the unique ID field and schema type for the source. In this example, each pet has a unique integer ID.
SQL sources like the pet database must implement the SqlBase::query() method to define a select query used to load a source row. Use $this->select() (Listing 3) to query the source database configured in the migration (remember the shared source[key] field in the group configuration).
Listing 3: Query the Source Database
/**
 * {@inheritdoc}
 */
public function query() {
  $query = $this->select('pet', 'p')
    ->fields('p', ['pid', 'oid', 'type', 'name',
      'picture'])
    ->condition('picture', 'IS NOT NULL');
  return $query;
}
You can optionally override MigrateSourceInterface::prepareRow() to make changes to row values before they are passed to field mappings. Most data manipulation should be done with process plugins in the field mapping, but prepareRow() is useful for lower-level manipulations, such as unserialize() or changing data types. In this example, we convert pet pictures to animations. Assume the PetSource::animate() method is implemented and converts a static image to an animated GIF. Row values are fetched using $row->getSourceProperty() and set with $row->setSourceProperty() (Listing 4).
Listing 4: Fetch and Set Row Values
/**
 * {@inheritdoc}
 */
public function prepareRow(Row $row) {
  if ($picture = $row->getSourceProperty('picture')) {
    $row->setSourceProperty('picture',
      $this->animate($picture));
  }
  return parent::prepareRow($row);
}
Destination Plugins
The next section of the migration defines a destination plugin, which tells Drupal where to save incoming data:
destination:
  plugin: "entity:node"
Each pet will be saved as a new node using the entity:node plugin. Drupal 8 provides most of the destination plugins you will need. Many contributed modules include destination plugins for their own entity types and configuration. You might need to create a custom destination if you want to migrate data into a custom table. For example, pretend that pets should be imported into a custom table instead of nodes:
destination:
  plugin: pet_dest
The destination plugin is placed in src/Plugin/migrate/destination/PetDestination.php and must extend \Drupal\migrate\Plugin\migrate\destination\DestinationBase. Destinations are defined using the @MigrateDestination annotation. Similar to source plugins, the annotation id key is referenced in the configuration:
/**
 * Pet destination.
 *
 * @MigrateDestination(
*   id = "pet_dest"
 * )
 */
class PetDestination extends   DestinationBase {
Destination plugins must also describe available fields by implementing MigrateDestinationInterface::fields() and MigrateDestinationInterface::getIds() (Listing 5). The plugin overrides MigrateDestinationInterface::import() to save data to a custom table.
Listing 5: Describe Available Fields
/**
 * {@inheritdoc}
 */
public function fields(MigrationInterface $migration = NULL) {
  return [
    'pid' => $this->t('Pet id'),
    'oid' => $this->t('Owner id'),
    'type' => $this->t('Pet type'),
    'name' => $this->t('Pet name'),
    'photo' => $this->t('Pet photo'),
  ];
}
/**
 * {@inheritdoc}
 */
public function getIds() {
  return [
    'pid' => ['type' => 'integer']
  ];
}
Assume $this->save() is defined and handles inserting a new row into the appropriate table. If something goes wrong, throw a MigrateException (Listing 6). When an exception is thrown, the source row is marked as failed and processing continues to the next row. You can review and fix failed rows after the migration is executed.
Listing 6: Mark Source Row as Failed
/**
 * {@inheritdoc}
 */
public function import(Row $row,
  array $old_destination_id_values = []) {
  $pet = $this->save($row);
  if (!$pet) {
    throw new MigrateException('Could not save pet');
  }
10 }
Migrations can be rolled back after testing in case of errors. Rolling back a migration deletes all imported data. The destination plugin is responsible for cleanly removing imported rows in MigrateDestinationInterface::rollback(). This method is called once for each imported row (Listing 7).
Listing 7: Remove Imported Rows Cleanly
/**
 * {@inheritdoc}
 */
public function rollback(array $destination_identifier) {
  $pet = $this->load(reset($destination_identifier));
  if ($pet) {
    $pet->delete();
  }
}
Process Plugins
The process key contains mappings from source fields (on the right) to destination fields (on the left). Each mapping is provided by a process plugin (Listing 8). Several process plugins are included in core [5] (see Table 1 for a list of common plugins). If no plugin is provided (e.g., nid: pid), then Drupal assumes the default get plugin, which copies source values without any modification. Be sure to include the source key if a plugin is specified.
Listing 8: Mappings
process:
  nid: pid
  title:
    plugin: callback
    callable: trim
    source: name
  type:
    plugin: default_value
    default_value: pet
  uid:
    plugin: migration
    migration: pet_owners
    source: oid
  field_pet_type:
    plugin: cat_to_dog
    source: type
  field_photo: picture
Tabelle 1: Common Process Plugins Included in Core
|
Process Plugin |
Function |
Example |
|---|---|---|
|
|
Copies a value verbatim. The example is the default plugin if none is specified. |
|
|
|
Passes source value through a callable function |
|
|
|
Ensure a field is unique. A numeric counter will be appended to the value until it is unique. |
|
|
|
Provide a default value if the source is null, zero, or an empty string. |
|
|
|
Resolve an ID field mapping from another migration. |
|
|
|
Skip the row if the source value is empty (empty string, FALSE, or 0). |
|
|
|
Define a custom mapping for source to destination values. |
|
Process plugins can have different configuration options. The callback plugin uses the callable option to pass values through a function. For example, you can trim whitespace from pet names using the callback plugin with the PHP trim() function:
title:
  plugin: callback
  callable: trim
  source: name
Several process plugins may be used for a single field. Simply provide a YAML array with multiple plugins and options. The field value will be passed through each plugin with the result from one passed as the input to the next. This is called a process pipeline. The following pipeline passes the source value through the trim() callback followed by substr to return the last 10 characters:
title:
  - plugin: callback
    callable: trim
    source: title
  - plugin: substr
    start: -1
    length: 10
Note that the source key is omitted for all but the first plugin definition. The source is assumed to be the output of the previous plugin.
The type field (field_pet_type) uses a custom process plugin (cat_to_dog):
field_pet_type:
    plugin: cat_to_dog
    source: type
Custom process plugins extend \ Drupal\migrate\ProcessPluginBase, implement MigrateProcessInterface::transform(), and are defined using the @MigrateProcessPlugin annotation. The cat_to_dog plugin changes pet type from "cat" to "dog" and is located in src/Plugin/migrate/process/CatToDog.php (Listing 9).
Listing 9: Custom Process Plugin
/**
 * Turn cats into dogs.
 *
 * @MigrateProcessPlugin(
 *   id = "cat_to_dog",
 * )
 */
class CatToDog extends ProcessPluginBase {
  /**
   * {@inheritdoc}
   */
  public function transform($value,
    MigrateExecutableInterface $migrate_executable,
    Row $row, $destination_property) {
    return ($value == 'cat') ? 'dog' : $value;
  }
}
Migration Dependencies
A migration might require others to be executed first (see the "Watch Out!" box). For example, the uid field mapping in Table 1 uses the migration process plugin to reference the pet_owners migration. Add the pet_owners migration as a required dependency to make sure it runs first. You can also specify optional dependencies thus,
migration_dependencies:
  required:
     - pet_owners
to help order migrations correctly.
Running Migrations
Now all the migrations are configured and ready to go. At this point, the only way to run a custom migration is with the drush command from Migrate Tools, which provides commands to run an individual migration or an entire migration group. You will need command-line access with drush to run the migrations.
The migrate-status (alias ms) command lists all available migrations, and the migrate-import (alias mi) command imports a single migration or an entire group. You can use the --group option to show only migrations in a specific group (Listing 10).
Listing 10: Status and Import Commands
$ drush ms --group=pets
Group: pets   Status  Total  Imported  Unprocessed  Last imported
pet_owners    Idle    50     0         N/A
pets          Idle    1455   0         N/A
$ drush mi pets
Processed 1455 items (1455 created, 0 updated,
  0 failed, 0 ignored) - done with 'pets'
You might want to test the migration by only importing a few nodes at first. The --limit flag can be used to import a specific number of items. For example, drush mi --limit=2 will import the first two items. Each time migrate_import runs, it will start where it left off from the previous import until all rows are imported.
The migrate-rollback (alias: mr) command can be used to remove all imported items. The --group option is also available to roll back all migration in a group:
$ drush mr pets
Rolled back 1455 items - done with 'pets'
A few other less common commands are:
-
migrate-stop– Cancel a running migration. -
migrate-reset-status– Reset a migration to Idle if it was cancelled and left hanging in the "importing" state. -
migrate-messages– View a list of messages associated with the migration.
Use drush help <command> to see all the available options.
How to Help
The Migrate API needs your help! Remember, it is still considered an experimental module, and contributors are needed to submit and patch issues. Mentoring is available during core office hours [6] to help you get started testing and writing patches. You can also follow @drupalmentoring on Twitter.
