Ubuntu 16.04 LTS as an ownCloud server
Secure Collaboration
Professionals and tradespeople routinely handle orders, reports, and shipments on mobile devices, often through cloud service providers such as Dropbox and Google, which can be a source of discomfort when it comes to exchanging data securely. If you take your privacy seriously, you can hardly avoid hosting your own dedicated server with the appropriate software. The good news: Linux and various open source products offer an inexhaustible tool kit, and whether you are looking for a mail server, a web server, or just a way to exchange files, you will find a suitable solution in this tool kit for virtually every usage scenario.
In this article, I show you how to set up a server based on Ubuntu 16.04 LTS and install the ownCloud file hosting software that now also offers a number of groupware functions. The program offers amazing versatility: Mobile clients are available for both Android and iOS, and desktop solutions include Linux, Windows, and OS X. If you combine Ubuntu with ownCloud on an always available server, you can remove the need for Dropbox.
Your Own or a Hosting Service?
If you run your own server, you have two options. Option 1 is to rent an appropriate server, either physical or virtual, from one of the many providers in the market. This option is recommended for companies without infrastructure of their own, either in-house or co-located in a data center. Option 2 is for those who have a server room or free data center capacity; you can simply buy a suitable computer and operate it there. The hardware requirements for an ownCloud setup, as shown in the example here, are manageable.
The question of disk space is important: If you are planning for a large number of employees, you will want several terabytes of capacity or to upgrade your VM accordingly. SSDs are not necessary: The limiting factor in accessing an ownCloud server is usually how the server is connected to the Internet, which typically suffers from significantly higher latency than current hard disk drives.
The Internet connection should thus offer sufficient bandwidth to avoid being fully utilized with a single file upload. If your ownCloud server sits in your server room, a constant connection to the Internet must exist, if employees need to access data from the outside. A static public IP address is important, too. In this example, I assume a rented server, but I will try to cover setups in an enterprise server room or in a rented rack at a data center.
Finding the Right Distro
If you want to operate ownCloud on Linux, many options are available: openSUSE, Fedora, Debian, or Ubuntu are just a few. However, of the systems mentioned, only Ubuntu LTS offers long-term support. The counterparts by Red Hat and SUSE – Red Enterprise Linux and SUSE Linux Enterprise Server – are sold as subscription models, so separate licenses would be required. Ubuntu 16.04 LTS is the most appropriate solution for the featured setup.
Updates for critical vulnerabilities or to remedy serious functionality problems are delivered for at least five years. For other releases, support often ends after two years, forcing you to update to a current release, because operating a public server without security patches would be irresponsible. Updates are sometimes a complicated process and often take out a server for a significant period of time. Additionally, changes to central components are often made between versions of a distribution, forcing a customized setup.
For the distribution provider, long-term support means considerable overhead, and the Ubuntu vendor, Canonical, only releases an LTS version every two years. Ubuntu 16.04 LTS became available in April 2016, so Canonical will support it until 2021.
Ubuntu LTS
It is beyond the scope of this article to cover all the installation details for the planned setup, because the individual steps depend to a large extent on your target system. Rented servers or virtual machines are delivered pre-installed by virtually all providers. In such setups, you have little opportunity to influence the installation; however, more and more providers of rental servers or virtual systems offer setup tools that let you at least implement basic settings to suit your own needs.
With self-hosted servers, all options are open to you, but you can still only use the Ubuntu command-line installer for server systems, at least if you use the "server" image. The text-based installation also provides sensible defaults that you can keep without risk in most cases.
For all scenarios – VM, rental server, private disk – you should have a separate partition for the ownCloud data, so the system does not collapse if the volume of data stored in your ownCloud becomes too large. If you had everything on the same system partition, central services would stop working if they could no longer write their logfiles to /var/log. The separate ownCloud partition ensures that this problem does not occur.
Getting Your Own System
After a manual installation or a "canned" version by the provider, you now have a pristine Ubuntu installation. Besides the basic services, you have no software. In most cases, these "essential services" are restricted to SSH, which allows logins via the remote shell. Your first task now awaits you: SSH login with an SSH key is far safer than using a password. The public part of an SSH key belongs in ~/.ssh/authorized_keys. You can find instructions online [1] for Linux, Windows, and OS X on how to create an SSH key.
The first round of updates then follow: The basic installation of a distribution is usually only revised every few months. Updates to individual packages are released many times in between. Run
apt-get update
apt-get -y dist-upgrade
to install the latest updates after the basic install. This process regularly installs a new operating system kernel on the system, which requires a reboot (with the reboot command). When the system comes back after the restart, you can start installing ownCloud, and ownCloud needs a web server.
Setting Up Apache
OwnCloud is a PHP application that only works sensibly in conjunction with a web server. Nginx is a possibility, but the combination of Apache and ownCloud is certainly more widespread. Apache in a current version is included in Ubuntu, so you just need to install the apache2 package. However, Apache on Ubuntu is not set up out the box to support SSL for secure connections, which is unacceptable: The transfer of corporate data should be always encrypted.
The good news is that Apache itself is easily extended to include SSL functionality. For this purpose, you need the SSL certificate issued by an SSL Certificate Authority along with the corresponding private key; you should install these files in the /etc/apache2/ssl that you create with mkdir, if it does not exist. For simplicity's sake, I am assuming in this example that the certificate is named owncloud.crt and that owncloud.key is the matching key. The command
sudo a2enmod ssl && sudo service apache2 restart
enables the SSL module for Apache.
Configuring the SSL Default Page
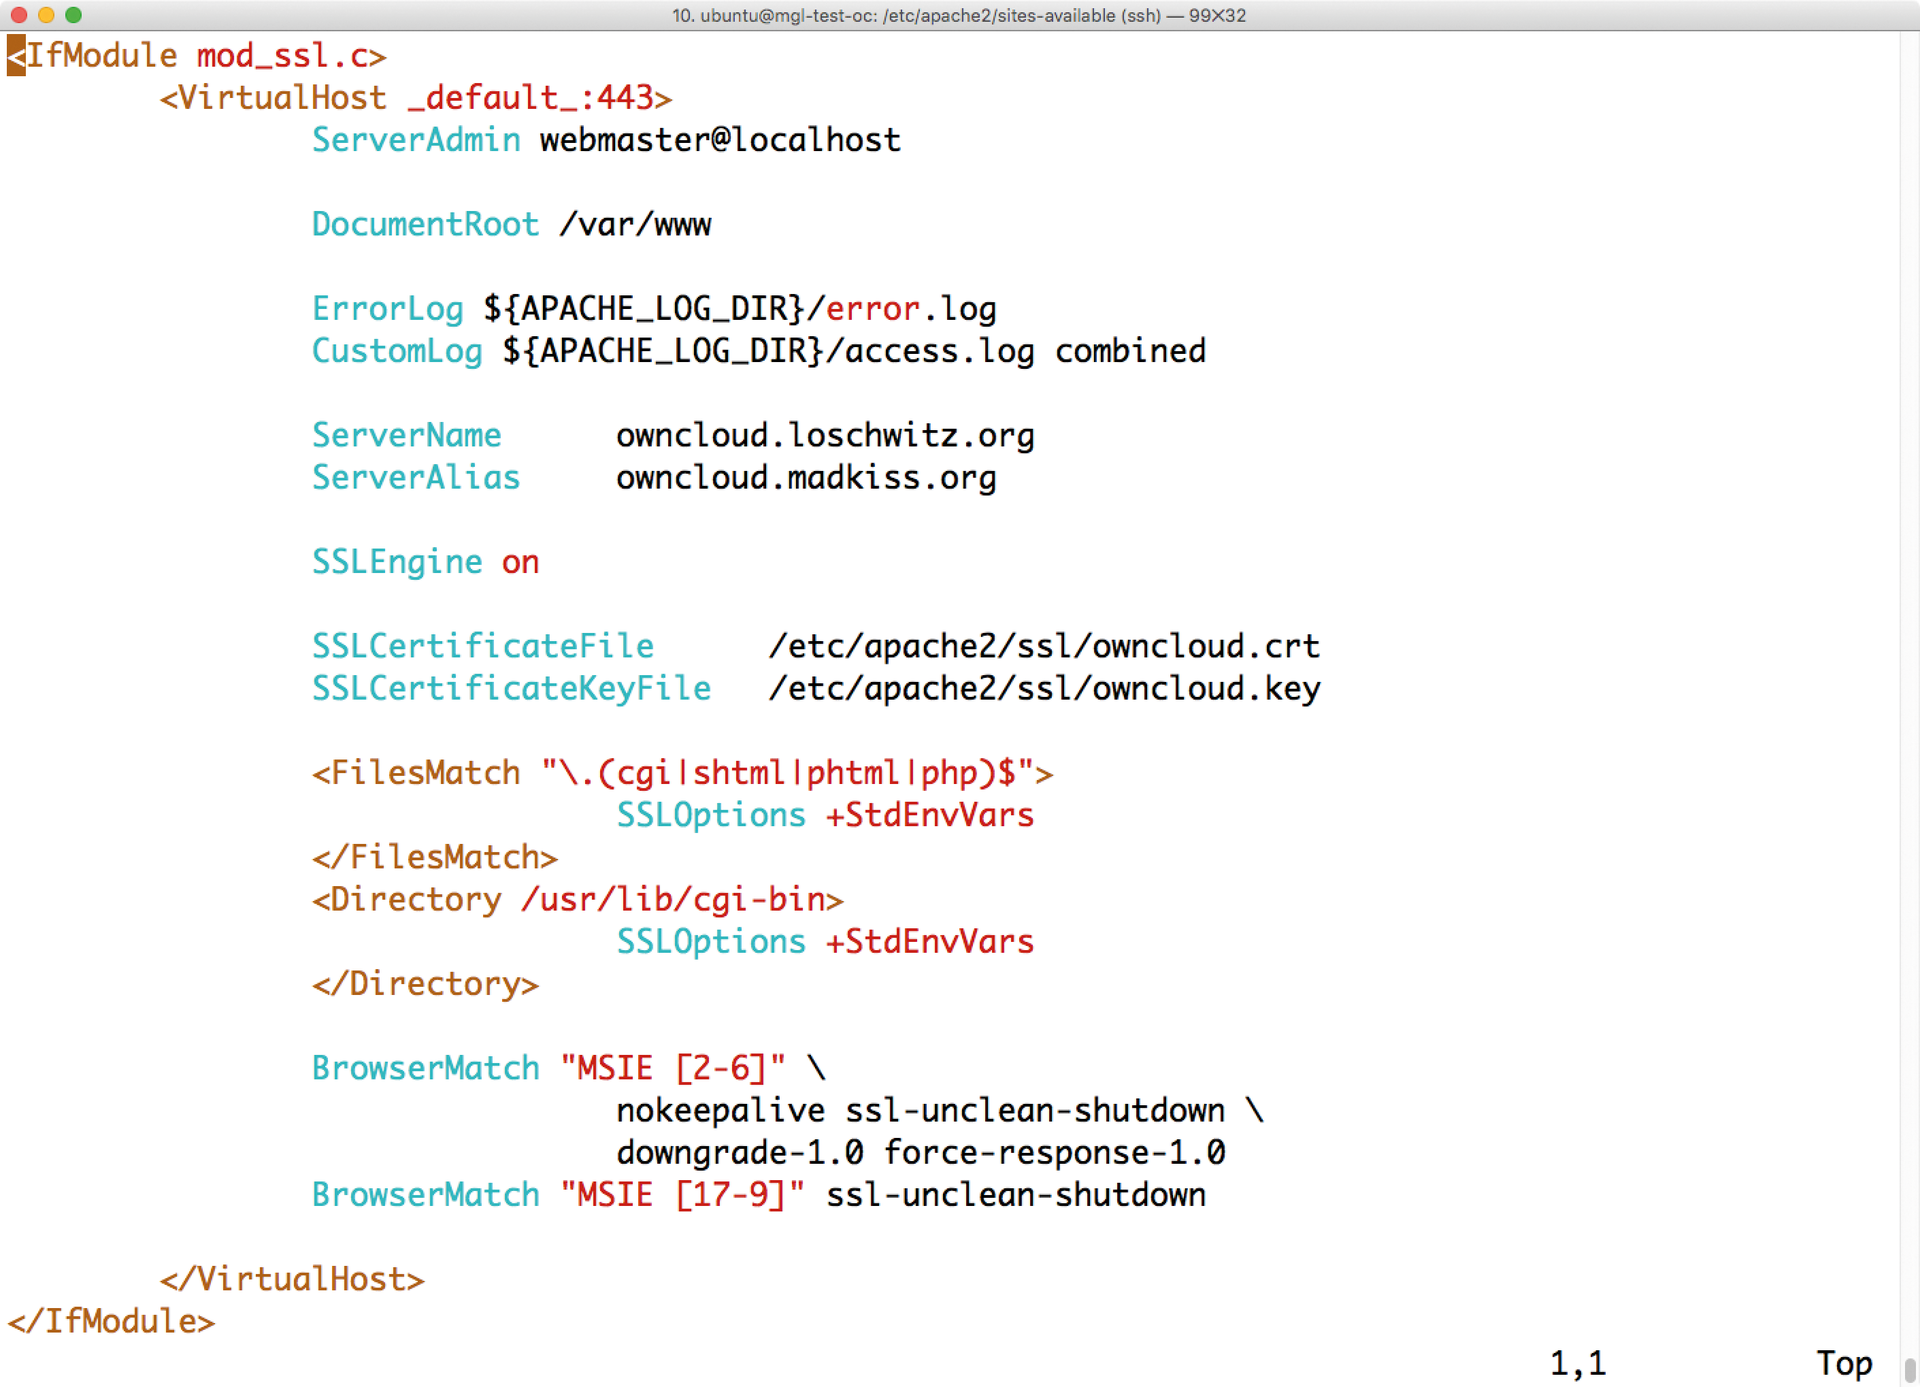
Next, focus your attention on the /etc/apache2/sites-available/default-ssl.conf file, where you will find two lines that start with SSLCertificateFile and SSLCertificateKeyFile (Figure 1). The entries /etc/apache2/ssl/owncloud.crt and /etc/apache2/ssl/owncloud.key are correct for this example. The line that begins with DocumentRoot needs the value /var/www. So that the web server knows its name, the ServerName keyword must be present and must have a correct value (e.g., owncloud.example.com). If you want the setup to be accessible under alias domains (e.g., storage.example.com), you need to add a ServerAlias record. The shared domain must match the SSL certificate you use, because users with SSL-based access will otherwise see a certificate warning. Also, the value for SSLEngine must be on. Finally, copy the text in Listing 1 to the file.
Listing 1: Apache Config Addition
<IfModule mod_headers.c>
Header always set Strict-Transport-Security "max-age=15768000; includeSubDomains; preload"
</IfModule>

For each of the keywords mentioned, you have to remove the # at the beginning of the line if the respective line is commented out; then, type
sudo a2ensite default-ssl.conf
sudo a2enmod headers
sudo service apache2 restart
to enable the default SSL page, enable the module that allows the modification of HTTP headers in Apache, and restart Apache.
That's it: Apache now has an SSL certificate. By the way, if you have never been through the process of issuing an SSL certificate, you will find instructions online [2]. The referenced article refers to Let's Encrypt, a service that issues free SSL/TLS certificates.
MySQL Database Dependency
OwnCloud manages its metadata in the form of a database. It is up to you whether you want to rely on SQLite or use a proper database. SQLite falls short in many ways, so the use of the full-fledged MySQL database is highly recommended. You can install this on Ubuntu using
apt-get install mysql-server
and the answer the root password prompt. Before installing ownCloud, you need some additional packages:
$ sudo apt-get install apache2 php5 php5-gd php-xml-parser php5-intl php5-sqlite php5-mysql smbclient curl libcurl3 php5-curl
The system is now ready for use by ownCloud.
Better Cooperation
The ownCloud installation is simple because the provider offers packages for Ubuntu. This article focuses on ownCloud version 9, which the ownCloud project officially released March 2016. OwnCloud 9 is characterized by several practical innovations. For example, you now can add comments and tags to files. The calendar and address book programs have been rewritten and integrated directly in the core of the application with CalDAV and CardDAV. The project also promises that ownCloud 9 is far more robust than its predecessor in terms of security.
Through the work of the CERN nuclear research center, ownCloud can now cope better than before with large numbers of users. Collabora and the ownCloud project integrated LibreOffice into version 9 as LibreOffice Online. The objective is to take on online services such as Office 365 and Google Drive, with which teams of people can collaborate on a document at the same time. Spreed, the video conferencing software, is also included in the ownCloud 9 package. All in all, ownCloud 9 is quite an impressive bundle.
Installing ownCloud
Before installing OwnCloud, you need to import the ownCloud key into your local database of trusted GPG keys so package source verification will work, and enable the ownCloud repositories on the system (Listing 2). Now you are ready to install ownCloud:
$ sudo apt-get update
$ sudo apt-get install owncloud
Listing 2: Import Key and Enable Repositories
$ wget -nvhttps://download.owncloud.org/download/repositories/stable/xUbuntu_16.04/Release.key -O -| sudo apt-key add -sh -c "echo 'deb http://download.owncloud.org/download/repositories/9.0/xUbuntu_16.04/ /' > /etc/apt/sources.list.d/owncloud.list"
Once the installation is finished, you can call ownCloud on https://server/owncloud, where server is the address of your ownCloud; in this example, that is owncloud.example.com. Out of the box, ownCloud still uses the underpowered SQLite database. To change OwnCloud to MySQL, you first need to set up a MySQL user for ownCloud:
$ sudo mysql -u root -p
The -p parameter ensures that mysql asks for the password of the root user. The password is the same one used during the installation of the MySQL package earlier. Now enter the text in Listing 3, replacing the password secret with a secure password (e.g., a password generated by pwgen at the command line).
Listing 3: Creating the ownCloud Database
↩
CREATE DATABASE owncloud;
CREATE USER 'owncloud'@'localhost' IDENTIFIED BY 'secret';
GRANT ALL ON owncloud.* TO 'owncloud'@'localhost';
FLUSH PRIVILEGES
Exit
Basic Setup
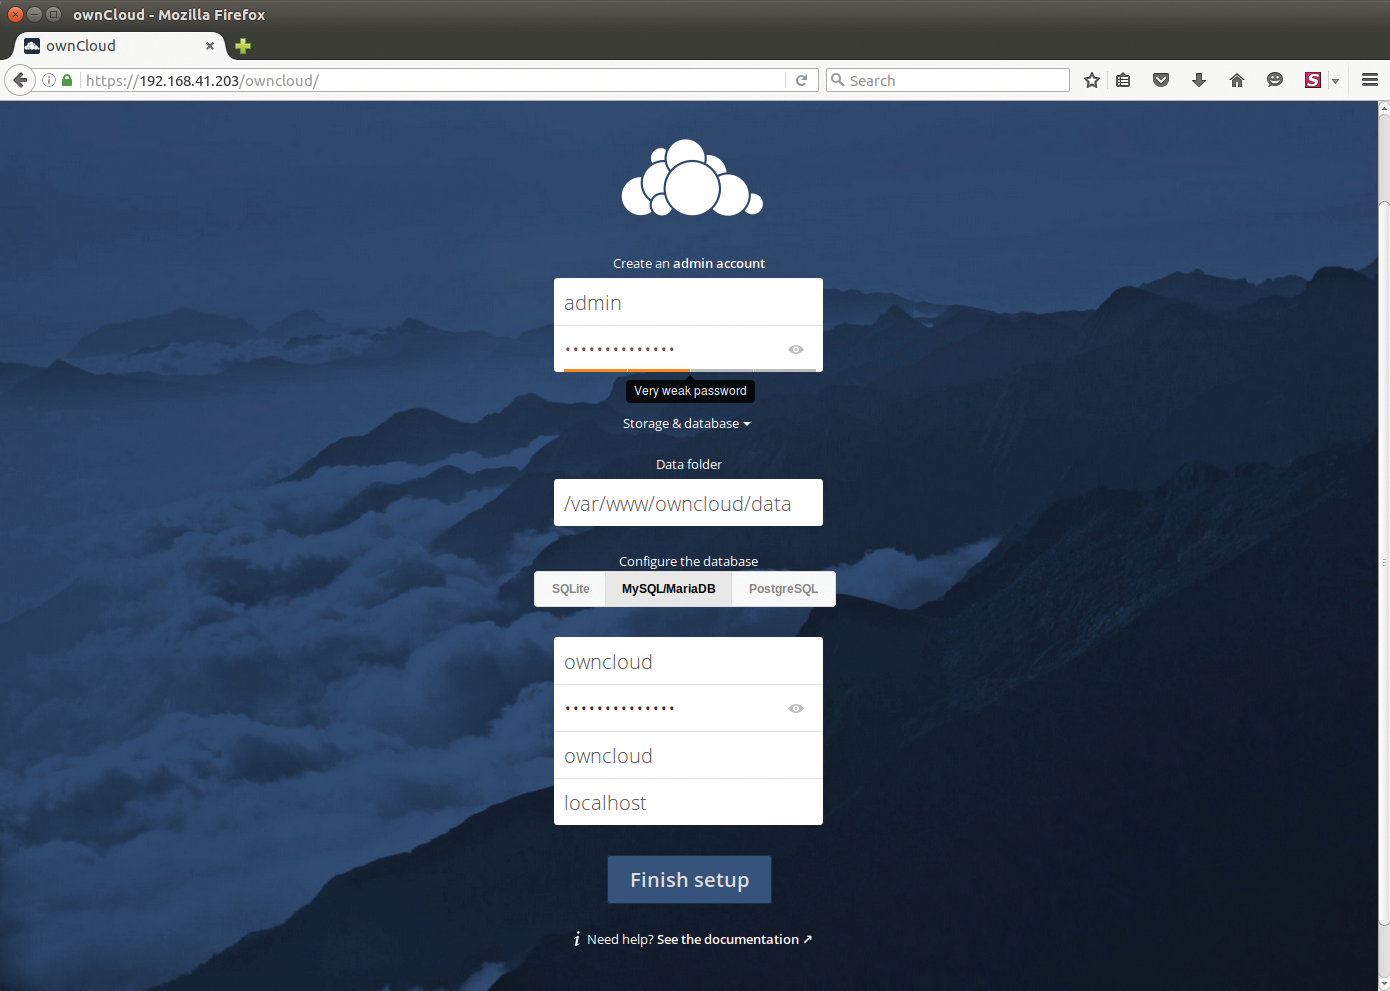
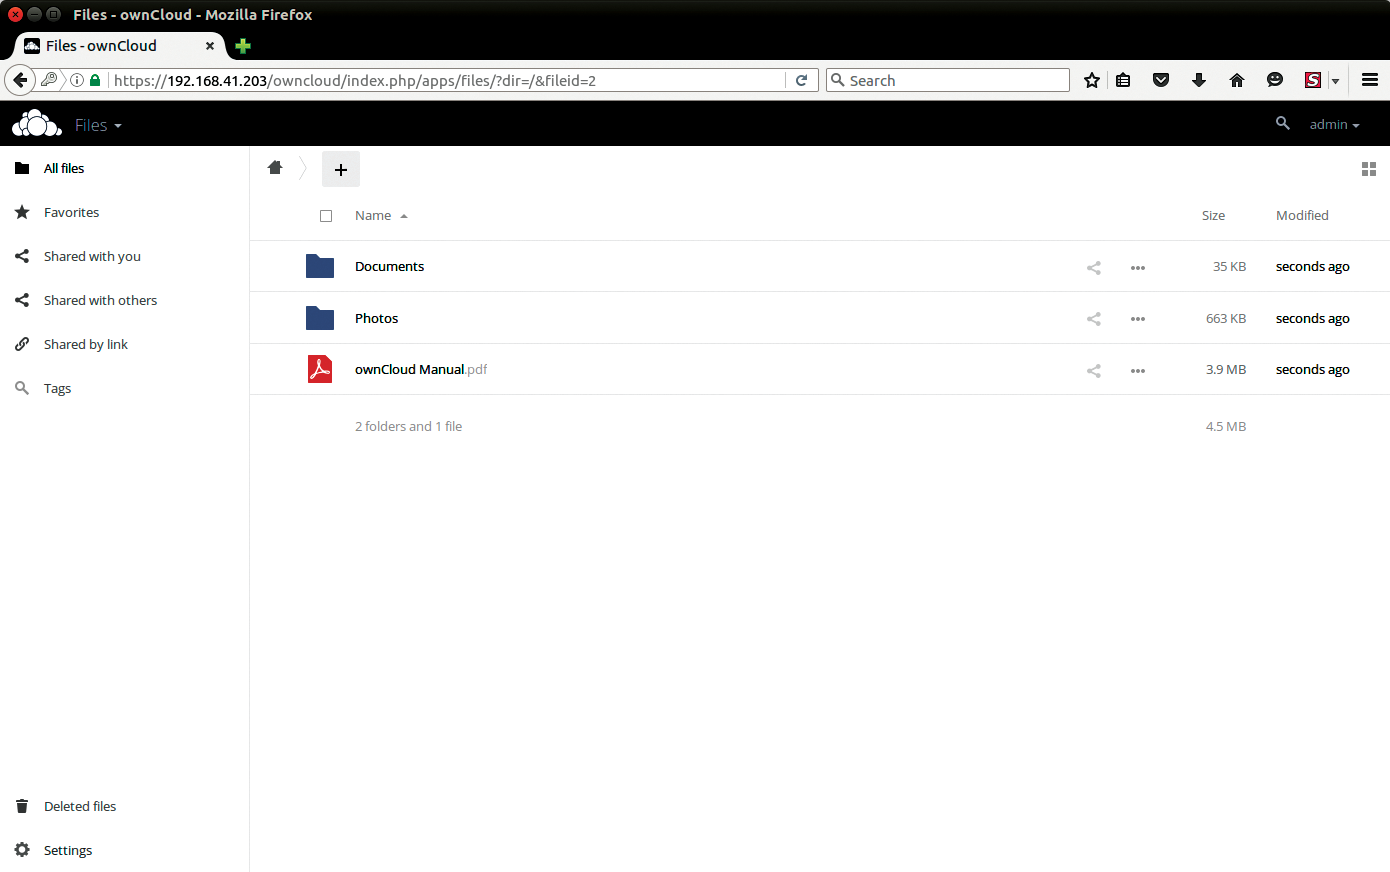
In the browser window, ownCloud prompts you to create an admin account and also lets you configure the desired database (Figure 2). The recommended admin username is admin. The password should be secure, of course, but it doesn't have to match the root user password in MySQL. To launch the MySQL configuration process, click MySQL/MariaDB under "Configure the database." The password is the password from the CREATE User command in Listing 3; owncloud is both the username and the database name, and localhost is fine as the host designation. Clicking Finish setup completes the installation. If everything worked, the ownCloud web interface should now appear for the first time (Figure 3). OwnCloud lets you know about the ownCloud clients for Android and iOS, but you can click to close the message without worrying about any negative consequences.


Additional Settings
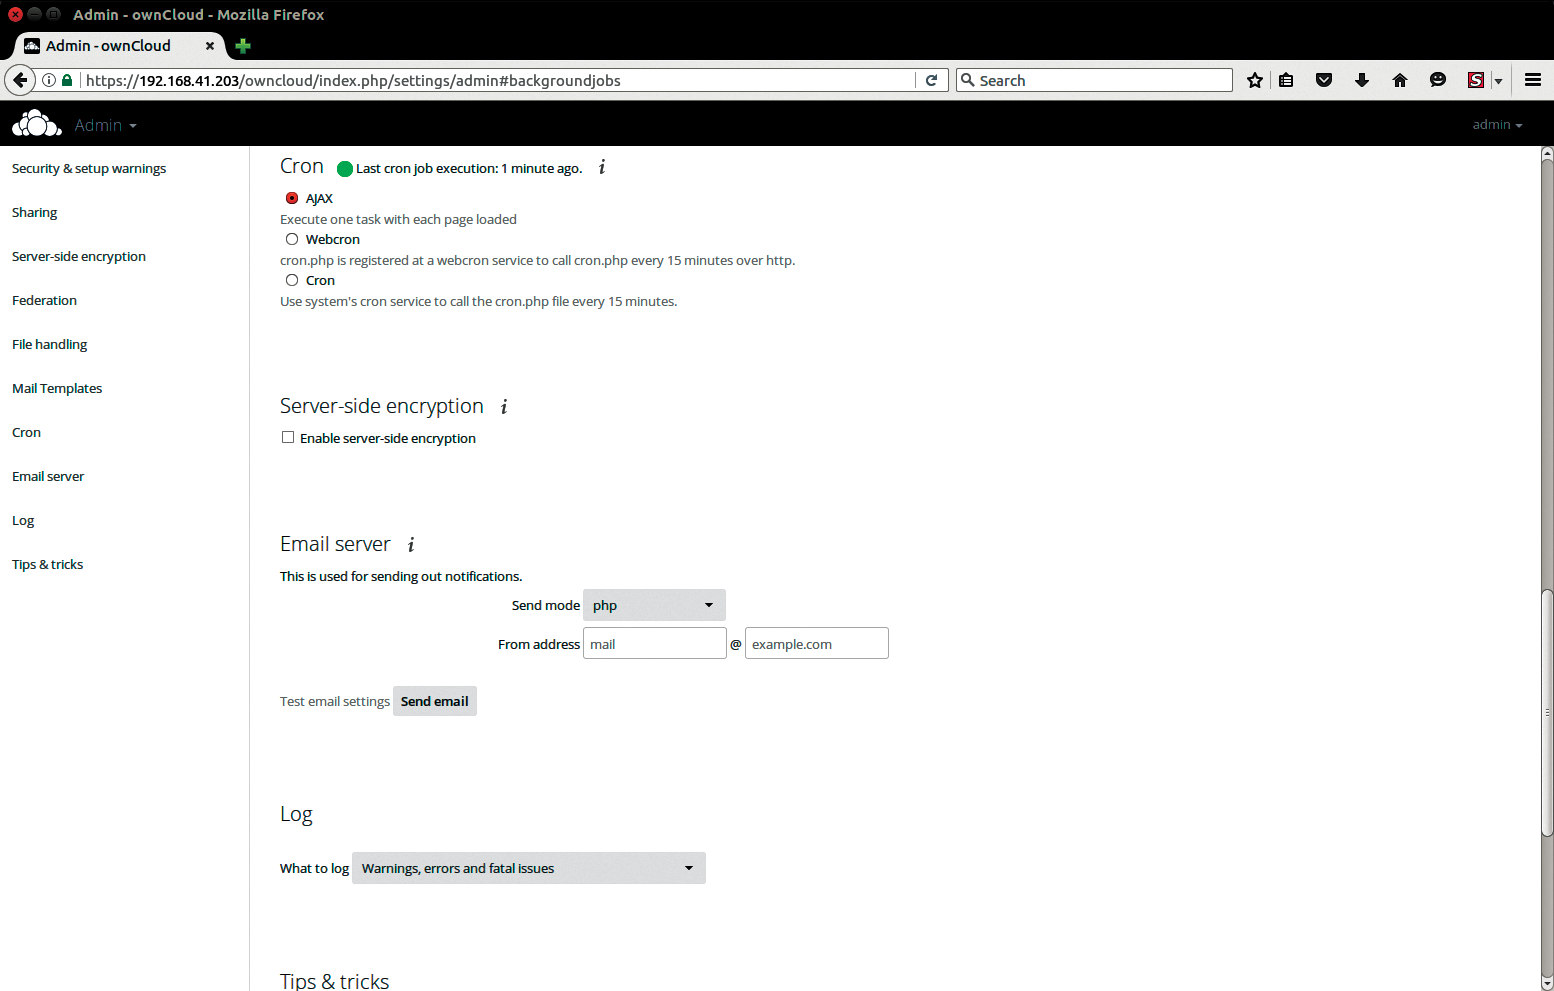
Although ownCloud generally works well as it is, various tweaks can improve the functionality of the environment. Clicking on the name assigned to the admin user at top right and pressing Administrator brings up the ownCloud configuration panel. In the menu on the left, clicking Cron takes you to the configuration window for running recurring tasks. ownCloud offers several options. Out of the box, it runs tasks every time the site is loaded. Although this ensures that the maintenance tasks are performed reliably, it also restricts performance. It is better to leave this task in the competent hands of the Linux cron command. Entering
$ sudo crontab -u www-data -e
*/15 * * * * php -f /var/www/owncloud/cron.php
opens the crontab of user www-data and makes sure maintenance tasks take place regularly. In the ownCloud cron configuration window (Figure 4), switch from Ajax to Cron.

A few changes are also useful outside of the ownCloud web interface. In the /etc/php5/apache2/php.ini file, you need to assign sensible defaults. A value of 2G for upload_max_filesize and post_max_size and of 200 for max_file_ uploads make sense for modern servers. Your installation is now ready for operation.
Conclusions
Cloud-based collaboration is on everyone's lips, but many companies shy away from putting their data in the hands of providers. A locally installed ownCloud offers an alternative. Version 9 comes with some useful features, such as CalDAV and CardDAV support, as well as improved security. On an Ubuntu 16.04 LTS server, you can quickly set up the cloud environment. The Ubuntu operating system is supported by Canonical updates for five years, so you can look forward to a stable and future-proof environment.
