SDS configuration and performance
Put to the Test
Frequently, technologies initially used in large data centers end up at some point in time in smaller companies' networks or even (as in the case of virtualization) on ordinary users' desktops. This process can be observed for software-defined storage (SDS), as well.
SDS basically converts hard drives from multiple servers into a large, redundant storage environment. The idea is that storage users have no need to worry about which specific hard drive their data is on. Equally, if individual components crash, users should be confident that the landscape has consistently saved the data so that it is always accessible.
This technology makes little sense in an environment with only one file server, but it is much more useful in large IT environments, where you can implement the scenario professionally with dedicated servers and combinations of SSDs and traditional hard drives. Usually, the components connect with each other and the clients over a 10Gb network.
However, SDS now also provides added value if several servers with idle disk space are waiting in small or medium-sized businesses. In this case, it can be interesting to combine this space using the distributed filesystems in a redundant array.
Candidate Lineup
Linux admins can immediately access several variants of such highly available, distributed filesystems. Well-known examples include GlusterFS [1] and Ceph [2], whereas LizardFS is relatively unknown [3]. In this article, I analyze the three systems and compare the read and write speeds in the test network in a benchmark.
Speed may be key for filesystems, but a number of other features are of interest, too. For example, depending on your use of the filesystem, sometimes sequential writing, sometimes creating new files quickly, or sometimes even random reading of different data is crucial. Benchmark results can provide information about a system's strengths and weaknesses.
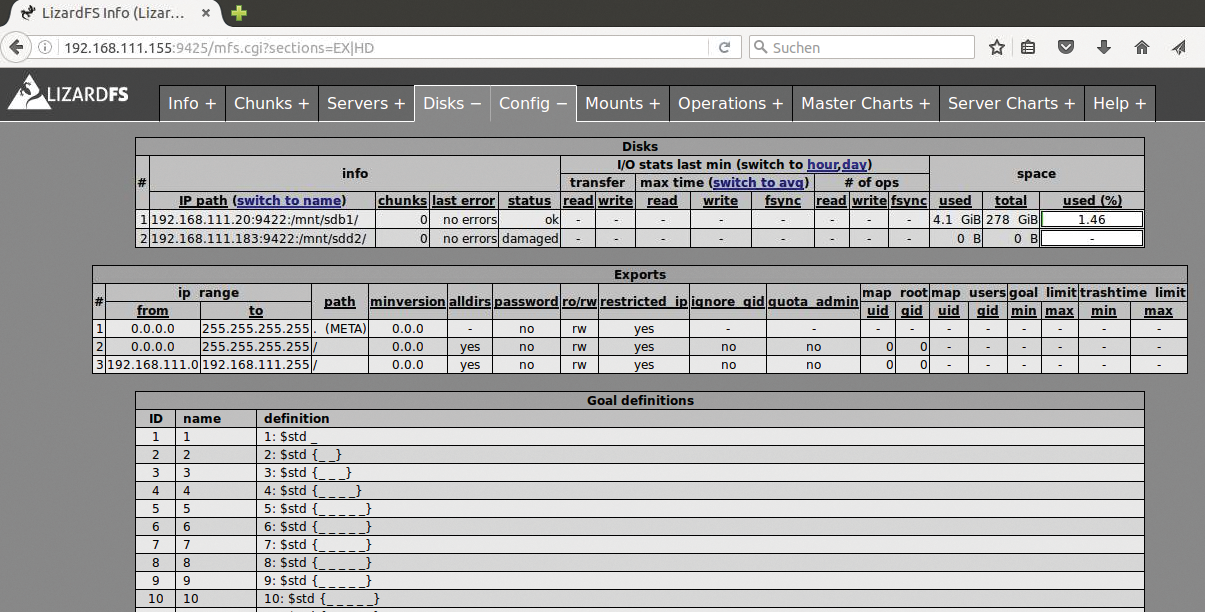
The three candidates in the test follow different approaches. Ceph is a distributed object store that can also be used as a filesystem in the form of CephFS [4]. GlusterFS and LizardFS, on the other hand, are designed as filesystems; however, although just two nodes are enough to operate a Gluster setup, LizardFS needs an additional control node, for which it has a web interface (Figure 1) that informs you about the state of the cluster.

First, I take a look at the overhead required to install and configure the filesystems. Second, I analyze data throughput measured with read/write tests.
The Test Setup
The lab setup consisted of a client with Ubuntu Linux 16.04 LTS connected to two storage servers with plenty of hard disks (Table 1). The operating system running on the file servers was CentOS 7, with Ubuntu 16.04 LTS on a fourth admin computer that served CephFS and LizardFS as a monitor or master server.
Tabelle 1: Test Hardware
|
Server |
CPU |
RAM |
Storage |
|---|---|---|---|
|
File server 1 |
Intel Xeon X5667 with 3GHz and 16 cores |
16GB |
Disk array T6100S with 10 Hitachi drives (7200rpm) configured as RAID 1 |
|
File server 2 |
Intel Core i3-530 with 2.9GHz and four cores |
16GB |
iSCSI array Thecus with two 320GB hard drives configured as RAID 1 |
|
Admin server |
Intel Core 2 E6700 with 2.66GHz and two cores |
2GB |
Not specified |
|
Client |
Intel Core 2 E6320 with 1.86GHz and two cores |
2GB |
Not specified |
File server 1 had a storage array connected via SCSI, whereas file server 2 was connected to another array via iSCSI. Communication between the servers was with Gigabit Ethernet, while the client and the admin server each only had a 100Mbps interface. This setup did not meet high-performance requirements, although it is not uncommon in smaller companies. The setup also allowed the candidates to test on equal terms. Version 1.97 of Bonnie++ [5] and IOzone 3.429 [6] were the test tools. To begin, I launched each tool on the client and then released them on the respective test candidate's mounted filesystem.
GlusterFS
GlusterFS was the easiest to install among the participants. I only needed to install the software on the Ubuntu client and the two storage servers. For the installation on CentOS, I added the EPEL repository [7] and called yum update.
Version 3.8.5 of the software then installed with the centos-release-gluster and glusterfs-server packages. To start the service, I enabled glusterd via systemctl. Once the service was started on both storage servers, I checked for signs of life using:
gluster peer probe <IP/Hostname_of_Peer>
peer probe: success.
The response in the second line indicates that everything is going according to plan. An error message would probably have indicated a lack of name resolution.
The tester generates the filesystem on the existing filesystems of the storage servers to activate it in the second step:
gluster volume create lmtest replica 2 transport tcp <Fileserver_1>:/<Mountpoint> <Fileserver_2>:/<Mountpoint>
gluster volume start lmtest
To use the created volume, I still need the glusterfs-client package, which provides the kernel drivers and tools needed to integrate a volume and is then executed with the command:
mount.glusterfs <Fileserver_1>:/lmtest /mnt/glusterfs
The filesystem is then available on the client for performance tests.
Fun with ceph-deploy
The quick-start documentation [8] helps you get going with Ceph, whereas the ceph-deploy tool takes over installation and configuration. Because it uses SSH connections for the managed systems, you should look through its Preflight section [9] first. The following are the essential steps:
- Create a ceph-deploy user on all systems.
- Enter this user in the sudoers list so that the user can execute all commands without entering a password.
- Enter an SSH key in this user's
~/.ssh/authorized_keysfile so that the admin system can use it to log on. - Configure
~/.ssh/configso that SSH uses this user and the right key file for thessh hostcommand.
You need to perform these steps on all four computers (i.e., on the storage servers, the client, and the admin server). You can supplement the EPEL repository [7] again and install Ceph 10.2.3 under CentOS on the storage servers. For Debian and Ubuntu systems (client and admin server), the Preflight section of the documentation provides instructions [9] that explain where on the Ceph website the repository for Ceph 10.2.2 is, which was used in the test.
The ceph-deploy tool collects data such as keys in the current directory. The documentation therefore recommends creating a separate directory for each Ceph cluster. The command
ceph-deploy new mon-node
starts the installation. Among other things, it generates the ceph.conf file in the current directory. For the test setup to work with two storage nodes (Ceph uses three by default so it has a majority), the configuration file needs the following line in the [global] section:
osd pool default size = 2
The installation of the software itself follows, which ceph-deploy also performs:
ceph-deploy install <admin-machine> <Fileserver_1> <Fileserver_2> <Client>
It expects a list of hosts as arguments on which ceph-deploy needs to install the software. The tool distributes the packages to the client and to the storage nodes, which are called OSDs (Object Storage Devices) in the Ceph world, as well as to the admin computer on which both the admin and monitor nodes run, with the latter having control.
Because ceph-deploy is also conveniently familiar with the various Linux distributions, it takes care of the installation details itself. To activate the first monitor node then, I use the command:
ceph-deploy mon create-initial
The command also collects the keys of the systems involved so that the internal Ceph communication works.
At this point, I generate the volume in two steps:
ceph-deploy osd prepare <Fileserver_1>:</directory> <Fileserver_2>:</directory>
ceph-deploy osd activate <Fileserver_1>:</directory> <Fileserver_2>:</directory>
These commands create the volumes on storage servers <Fileserver_1> and <Fileserver_2>. As with Gluster, the directories already exist and contain the filesystem where Ceph saves the data; then, I just need to activate the volume as an admin:
ceph-deploy admin <admin-machine> <Fileserver_1> <Fileserver_2> <Client>
The command distributes the keys to all systems. The argument is again the list of computers that need a key.
The still-missing metadata server is created with
ceph-deploy mds create mdsnode
The ceph health command checks at the end whether the cluster is working.
The Client
Three options are available for the Ceph client. In addition to the kernel space implementations of CephFS and Ceph RADOS, CephFS is available in a userspace version. The test fields Ceph RADOS and CephFS with a kernel space implementation.
To create and activate a new RADOS Block Device (RBD), I use:
rbd create lmtest --size 8192
rbd map lmtest --name client.admin
The device is then available under the path /dev/rbd/rbd/lmtest and can be equipped with a filesystem that the client can mount like a local hard disk.
However, the map command throws up an error message on the Ubuntu computer. To create the RADOS device, I need to deliver some arguments to disable features. The
rbd feature disable lmtest exclusive-lock object-map fast-diff deep-flatten
command produces the desired result after a few tests.
After that, a Ceph filesystem (CephFS) needs to be prepared. The first step is to create a pool for data and one for metadata:
ceph osd pool create datapool 1
ceph osd pool create metapool 2
The two numbers at the end refer to the placement group index. The cluster operator executes this command on the admin node running on the admin computer, and then generates the filesystem, which uses these two pools. The statement reads:
ceph fs new lmtest metapool datapool
The client now mounts the filesystem but then needs to authenticate it. The ceph-deploy command generates the password and distributes it to the client. There it ends up in the /etc/ceph/ceph.client.admin.keyring file.
The user name in the test is simply admin; the client passes this onto the filesystem using the command:
mount -t ceph mdsnode:6789:/ /mnt/cephfs/ -o name=admin,secret=<keyring-password>
The filesystem is then ready for the test.
LizardFS
LizardFS is similar to Ceph in terms of setup. The data ends up on chunk servers (which should also include the hard disks), and a master server coordinates everything. The difference is the web interface mentioned at the start of this article (Figure 1).
To install version 3.10.4 under CentOS, you need to add the http://packages.lizardfs.com/yum/el7/lizardfs.repo repository to the /etc/zum.repos.d directory. On the master server (the admin computer), you can then install the lizardfs-master package on the client lizardfs-client and on the chunk servers with the hard disks lizardfs-chunkserver.
The configuration can be found under /etc/mfs on all systems. On the master computer, you can convert the mfsgoals.cfg.dist, mfstopology.cfg.dist, mfsexports.cfg.dist, and mfsmaster.cfg.dist files into versions without the .dist suffix. The contents of all the files are then suitable for a test setup; only the mfsmaster.cfg files require the entries in Listing 1.
Listing 1: mfsmaster.cfg
PERSONALITY = master
ADMIN_PASSWORD = admin123
WORKING_USER = mfs
WORKING_GROUP = mfs
SYSLOG_IDENT = mfsmaster
EXPORTS_FILENAME = /etc/mfs/mfsexports.cfg
TOPOLOGY_FILENAME = /etc/mfs/mfstopology.cfg
CUSTOM_GOALS_FILENAME = /etc/mfs/mfsgoals.cfg
DATA_PATH = /var/lib/mfs
The configuration files are waiting in the /etc/mfs directory on the chunk servers. Only the MASTER_HOST entry, which must refer to the master, belongs in the mfschunkserver.cfg file. You can enter the directories where Lizard is to store data on the chunk server in the mfshdd.cfg file. Because the service is running under the mfs user ID, the operator needs to make sure this user has write rights to the directories used.
Finally, you can start the master and chunk server services on the respective computers:
systemctl start lizardfs-master
systemctl start lizardfs-chunkserver
Everything is therefore ready, so the client can mount and access the filesystem:
mfsmount -o mfsmaster=lizard-master <Mountpoint>
To use the web interface mentioned at the beginning, install the lizardfs-cgiserv package which, as a server, then accepts connections to port 9425.
Bonnie Voyage
The test uses Bonnie++ and IOzone (see the "Benchmarks" box). In the first run, Bonnie++ tests byte-by-byte and then block-by-block writes, for which it uses the putc() macro or the write(2) system call. The test overwrites the blocks by rewriting and measures the data throughput.
The test results showed that Bonnie++ maintained the CPU load during the test. With a fast network connection or local disks, this byte-by-byte writing was more a test of the client's CPU than the memory.
CephFS and Ceph RADOS wrote significantly more quickly at 391 and 386KBps than Gluster at 12KBps and Lizard at 19KBps (Figure 2). However, the client's CPU load for the two Ceph candidates was well over 90 percent, whereas Bonnie only measured 30 percent (Lizard) and 20 percent (Gluster).

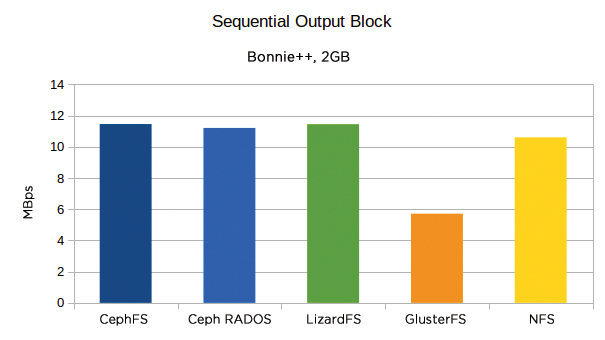
Here, an NFS mount between the client and <Fileserver_2> managed 530 KBps. The differences were less striking for block-by-block writing. Both Ceph variants and Lizard were very similar, whereas Gluster achieved about half of the performance (Figure 3): Ceph RADOS achieved 11.1MBps, CephFS 11.5MBps, Lizard 11.4MBps, and Gluster 5.7MBps. In comparison, the local NFS connection only managed 10.6MBps. Ceph and Lizard presumably achieved a higher throughput here thanks to distribution over multiple servers.

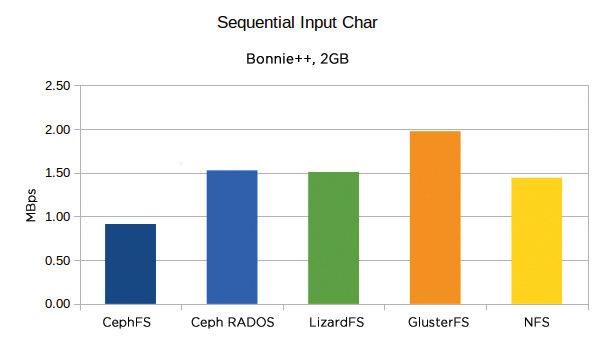
The results were farther apart again for overwriting files. CephFS (6.3MBps) was noticeably lighter than Ceph RADOS (5.6MBps). LizardFS (1.7MBps), on the other hand, was significantly less, and Gluster came in fourth place (311KBps). The field converged again for reading (Figure 4). For byte-by-byte reading, Gluster (2MBps), which has otherwise been running at the back of the field, was ahead of Ceph RADOS (1.5MBps), Lizard (1.5MBps), and the well-beaten CephFS (913KBps). NFS was around the middle at 1.4MBps. Noticeably, CephFS CPU usage was at 99 percent despite the low performance.

Bonnie++ also tests seek operations to determine the speed of the read heads and the creation and deletion of files.
The margin in the test was massive again for the seeks; Ceph RADOS was the clear winner with an average of 1,737 Input/Output Operations per Second (IOPS), followed by CephFS (1,035 IOPS) and then a big gap before Lizard finally dawdled in (169 IOPS), with Gluster (85 IOPS) behind. NFS ended up around the middle again with 739 IOPS.
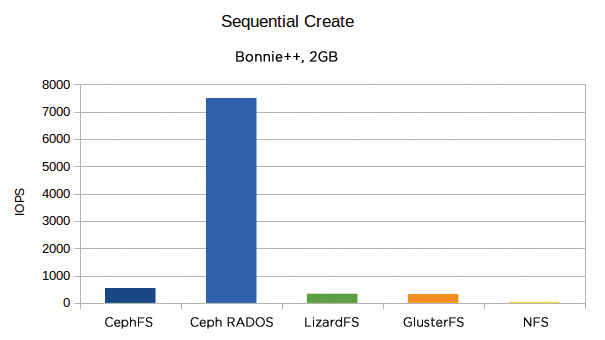
The last round of testing involved creating, reading (referring to the stat system call, which reads the a file's metadata, such as owner or production time), and deleting files. In certain applications (e.g., web cache) such performance data is more important than raw reading or writing of a file.
Ceph RADOS won the linear file creation test with a sizable advantage (Figure 5). This unusual outcome was presumably the result of Ceph RADOS running file operations on the ext4 filesystem of the block device, probably reporting back to Bonnie++ a much faster time than it took to create the file. The RADOS device managed 7,500 IOPS on average. CephFS still ended up in second place with around 540 IOPS, followed by Lizard with 340 IOPS and Gluster close behind with 320 IOPS. NFS lost this competition with just 41 IOPS. Barely any recordable differences were noticed with random creation, except for Ceph RADOS, which worked even faster.

Reading data structures did not provide any uniform result. With Ceph RADOS, Bonnie++ denied the result for linear and random reading. This was also the case with random reading for CephFS. POSIX compliance is probably not 100 percent for these filesystems.
Lizard won the linear read test with around 25,500 IOPS, followed by CephFS (16,400 IOPS) and Gluster (15,400 IOPS). For random reading, Lizard and Gluster values were just one order of magnitude lower (1,378 IOPS for Lizard and 1,285 IOPS for Gluster). NFS would have won the tests with around 25,900 IOPS (linear) and 5,200 IOPS (random).
Only deleting files remained. The clear winner here (and as with creating, probably unrivalled) was Ceph RADOS, with around 12,900 linear and 11,500 random IOPS, although the other three candidates handled random deletion better than linear deletion. A winner could not be determined between them, but CephFS was last: Lizard (669 IOPS linear, 1,378 IOPS random), Gluster (886 IOPS linear, 1,285 IOPS random), CephFS (567 IOPS linear, 621 IOPS random).
In the Zone
IOzone provided a large amount of test data. Figure 6 shows a sample. Unlike Bonnie++, the test tool is limited to reading and writing but does so in far more detail. It reads and writes files in different block and file sizes; writes are performed with write() and fwrite(), with forward and random writing as well as overwriting. IOzone also reads forward, backward, and randomly using operating system and library calls.

In the writing test, IOzone essentially confirmed the results from Bonnie++, but some readings put Ceph RADOS ahead, mostly in operations with small block sizes. For reading, Ceph RADOS was almost always at the front for small block sizes, and CephFS led the middle range. LizardFS did well in some tests with large file and block sizes.
One exception was the stride read test, in which IOzone linearly reads every umpteenth block (around 64 bytes from block 1024, and so on). Lizard also won with small files and small file sizes (Figure 6, yellow).
Conclusions
GlusterFS configuration was easiest, followed by LizardFS. Setting up Ceph required a lot more work.
In terms of performance, CephFS (POSIX mounts) and Ceph RADOS (block device provided with its own filesystem) cut fine figures in most of the tests in the lab. Ceph RADOS showed some upward outliers but, in reality, only benefited from caching on the client.
If you shy away from the complexity of Ceph, Lizard might mean only small declines in performance, but it would allow you to achieve your goal more quickly thanks to the ease of setup. GlusterFS remained in the shadow in most tests, but performed better in the byte-by-byte sequential reads.
LizardFS frequently had its nose in front in the IOzone read test, but not the write test. The more the block size and file size increased, the more often Lizard won the race – or at least one place behind CephFS, but ahead of Ceph RADOS.
NFS running as a traditional SDS alternative did well, but did not necessarily run away from the distributed filesystems.
