
Angular 2 client-side TypeScript framework
Second Brew
After no fewer than six years of development, the second major release of the Angular client-side JavaScript framework [1] was released in mid-September 2016. The good news: Angular 2 also relies on data bindings to place application data in a browser HTML document using directives (i.e., specifically defined HTML tags). The bad news: Angular 2 is not downwardly compatible, although not so much because of the codebase rewrite under TypeScript [2], but rather because of design decisions made by the Angular team.
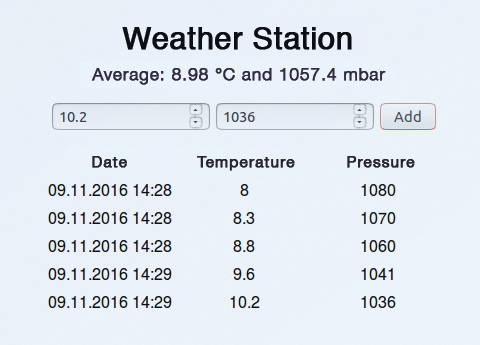
In this article, I refer to a sample application (Figure 1) to describe how developers can program apps in Angular 2 with TypeScript. The app is simple: Clicking on Add transfers the two measured values for temperature and pressure from the fields in the form to the table at the bottom of the output window. At the same time, the app calculates the average of the measured values in the line below the Weather Station label.
Quick Launch
First, install version 6 of the Node.js [3] server-side JavaScript implementation on a development machine with Debian 8:
curl -sL https://deb.nodesource.com/ setup_6.x | bash
apt install nodejs git
The first command expands the collection of repositories for Debian's package manager, adding a repository for the current version 6 of Node. Then Apt with root privileges installs Node.js and Git, which you need to install Angular 2.
A quick-start variant of Angular is easily installed on your hard disk with the commands:
git clone https://github.com/angular/ quickstart station
cd station
npm install
The first line uses Git to copy the popular quickstart module into the station project directory, before changing to that directory and installing quickstart using the npm [4] node package manager. The quickstart module provides a working, but quite rudimentary, Angular 2 application out of the box. The listings in this article extend this module to include a small sample app.
Test Run
Listing 1 is an initial overview of what it looks like in the project directory of the completed sample application. The corresponding files are in the v2 folder; you need to copy them to the station folder and overwrite the existing files. For example, the package.json file stores the names and version numbers of the Node.js packages, which the npm install command has already installed.
Listing 1: The station Project Directory
 - station
 |- app
  |- app.component.html
  |- app.component.ts
  |- app.module.ts
  |- weather.ts
  |- main.ts
  |- stack.service.ts
 |- index.html
 |- package.json
 |- systemjs.config.js
 |- node_modules
 |- styles.css
 |- tsconfig.json
 |- typings
 |- typings.json
The app directory primarily contains application-specific files. The app.module.ts file binds the application to an Angular engine, and the tsconfig.json file tells the TypeScript compiler how to produce JavaScript.
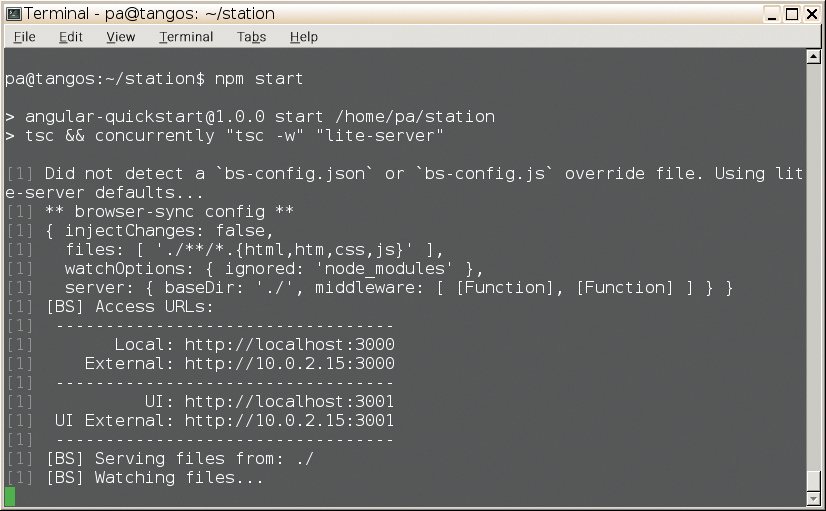
Now change to the station directory and launch the development environment with:
npm start
The compiler converts any file with the extension .ts to .js. In some cases, the typings.json [5] file in the directory of the same name contains information on library-specific extensions that the TypeScript compiler cannot find in the same directory.
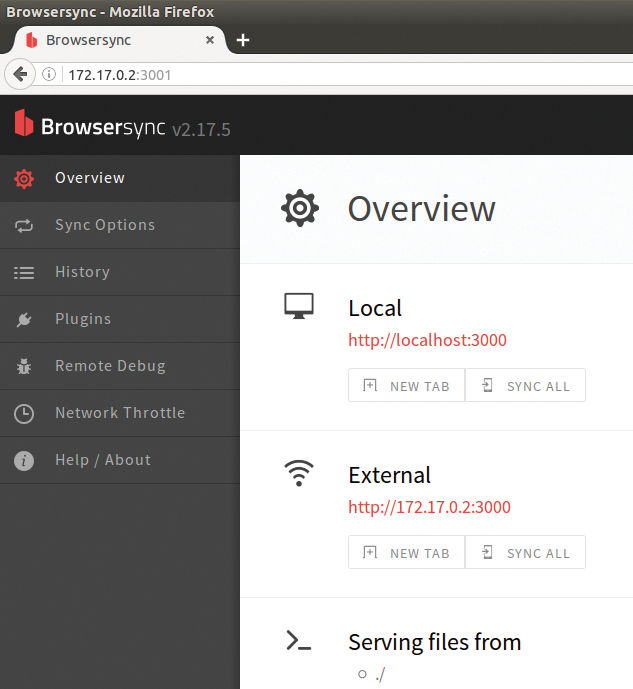
After the development environment has converted the files, it starts an HTTP server and displays the corresponding URLs at the command line. You can access the weather station by typing the URL localhost:3000 in the browser bar on the development machine (Figure 1). If Angular is running in a virtual machine (VM) or a container, it uses the VM's or container's IP address. The Browsersync test tool is running parallel to this on port 3001 (Figure 2); you can use this to test the web application if needed.
Ahead of Its Time
The web browser first uses index.html (Listing 2) to access the application. The systemjs.config.js file (line 8) defines additional packages for the application. Internally, Angular uses a compiler that converts the application code into an interactive DOM tree. It generates a so-called view source just in time (JiT) in the browser (Figure 3), although in principle, you can use its ahead of time (AoT) compiler [6] to create the view source on the web server. The use of AoT is not recommended for production environments.
Listing 2: index.html
01 <html>
02   <head>
03     <title>Weather Station</title>
04     <script src="node_modules/core-js/client/shim.min.js"></script>
05     <script src="node_modules/zone.js/dist/zone.js"></script>
06     <script src="node_modules/reflect-metadata/Reflect.js"></script>
07     <script src="node_modules/systemjs/dist/system.src.js"></script>
08     <script src="systemjs.config.js"></script>
09     <script>
10       System.import('app').catch(function(err){ console.error(err); });
11     </script>
12     <link rel="stylesheet" href="styles.css">
13   </head>
14   <body>
15     <myApp>Load ...</myApp>
16   </body>
17 </html>
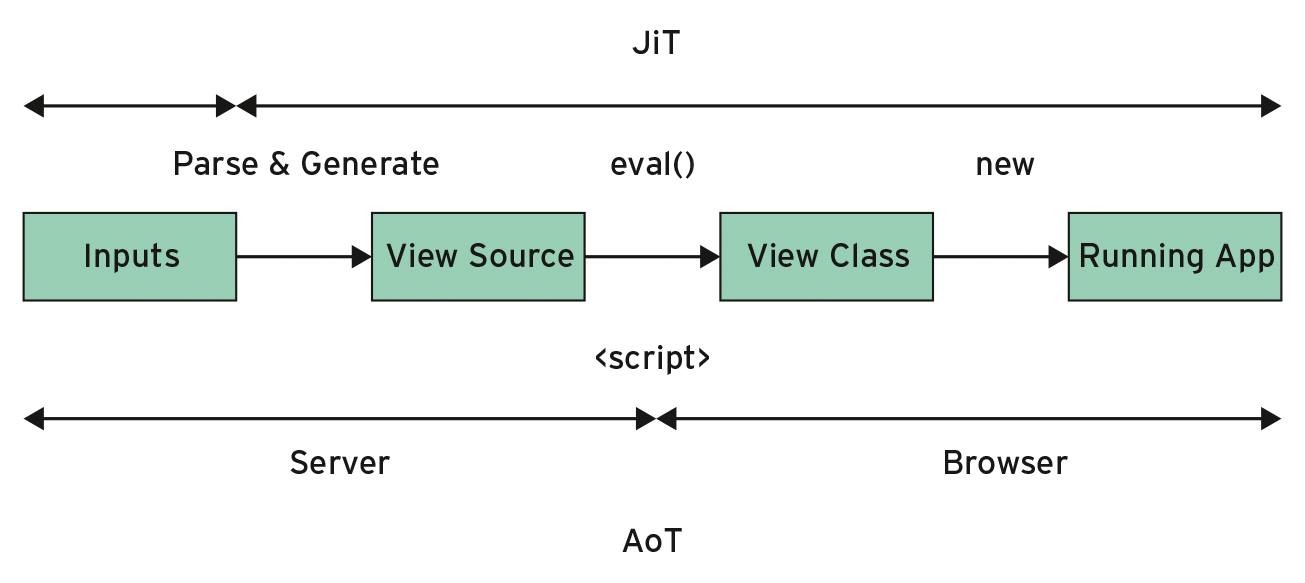
This method saves computing time in production operations in which users can retrieve the application from the web server multiple times. If you believe the creators of Angular 2, an application with the JiT compiler initializes almost four times faster than when using Angular 1 [7].
The embedded CSS file styles.css stores formatting information in CSS3. A watch process keeps an eye on the project directory, and – for every change – automatically compiles the .ts files and reloads the app in the browser.
Listing 2 shows the index.html file from the weather station project. The application uses the original version of the quickstart module almost unchanged. Lines 4 to 8 embed the required JavaScript resources, line 10 launches the app by calling the app/main.js file, and line 12 includes the style sheet. A handler discussed later handles the user-defined directive myApp in line 15. It replaces myApp with an HTML fragment from the template in Listing 3. The template resides in the app/app.component.html file and uses special tags (directives, e.g., as in line 3), to pull application data from the component.
Listing 3: app/app.component.html
01 <div id="station">
02   <h1>Weather Station</h1>
03   <div id="avg">Average: {{avg('temp')}} °C and {{avg('press')}} mbar</div>
04   <form>
05     <input type="number" [(ngModel)]="model.temp" name="temp" required step="0.1" size="30" placeholder="°C">
06     <input type="number" [(ngModel)]="model.press" name="press" required size="30" placeholder="mbar">
07     <button (click)="add()" value="add">Add</button>
08   </form>
09   <table>
10   <tr>
11     <th>Date</th>
12     <th>Temperature</th>
13     <th>Pressure</th>
14   </tr>
15   <tr *ngFor="let data of datas">
16     <td>{{data.date | date:'dd.MM.yyyy HH:mm'}}</td>
17     <td>{{data.temp}}</td>
18     <td>{{data.press}}</td>
19     </tr>
20   </table>
21 </div>
In the Darkness Bind Them
Figure 4 takes a closer look at the binding mechanisms in Angular 2. The Template area on the left lists the directives. They point to either the val variable or the callback function chg() from the Component area on the right.
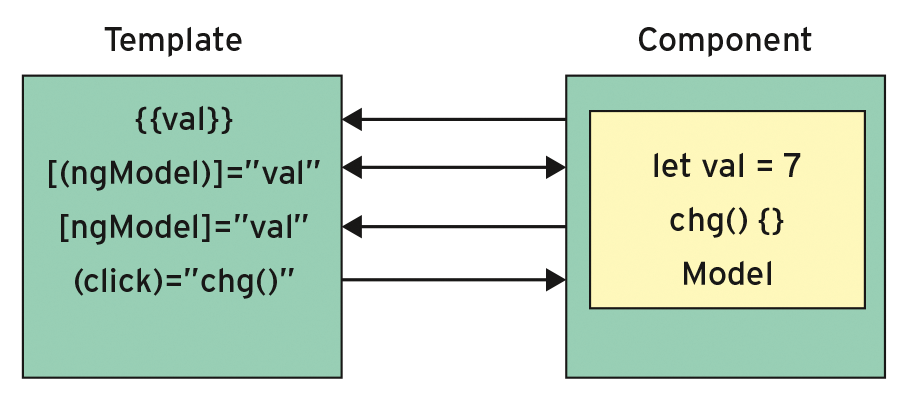
The arrows show the paths of changed values and states. For example, if the component saves a value of 3 in val, the expression {{val}} also changes to 3 in the template. The same is true for the text fields, which contain the attribute directives in the form [(ngModel)]="val" or [ngModel]="val".
Angular 2 also updates function return values, as shown in line 3 of Listing 3. It uses the avg() function to update the computed mean temperature and pressure values (Figure 1) as soon as the app saves another set of measurement values.
The new attribute directive ngModel – in contrast to its predecessor ng-model (note the hyphen) – offers one-way bindings in the form of [ngModel] and (ngModel). The [(ngModel)] combination arranges two-way bindings for the two form fields in lines 5 and 6, as in Angular 1. Perhaps the critical discussions on two-way bindings have convinced the makers of Angular to retrofit one-way bindings like competitor React [8].
Line 7 of Listing 3 uses parentheses to invoke the add() callback function in the component. The directive used in Angular 1 ng-submit is history, and ngFor (line 15) now takes over the work of ng-repeat. The star operator converts the selected tr element, along with its child elements, into a master template, which the app adds to the value of the control variable once only per list item.
In the value of the attribute directive ngFor, the let keyword declares the control variable data; the of operator iterates against the values in the datas list.
To extract the values from the control variable data, lines 16 to 18 use the interpolation operator ({{...}}). The first line passes the value of the component date through a pipe (|) to the date directive, formatting the date to reflect the locale.
Component Glue
Although Angular 2 was originally intended to support ECMA script 6, the current language standard for JavaScript, TypeScript, assumes this role; it is a superset of JavaScript created by Microsoft that complements the expressiveness and robustness of ECMA script with language elements and plausibility checks. Table 1 compares TypeScript with the relevant ECMA script standards and focuses on the language elements of Angular 2. It also shows how deep into the bag of tricks TypeScript needs to dip to convert an application to ECMA script 5.
Tabelle 1: Comparison of Language Resources
|
Resource |
ECMA Script 5 |
ECMA Script 6 |
ECMA Script 7 |
TypeScript |
|---|---|---|---|---|
|
Static Types |
– |
– |
– |
Yes |
|
Classes |
– |
Yes |
Yes |
Yes |
|
Interfaces |
– |
– |
– |
Yes |
|
Decorations |
– |
– |
Yes |
Yes |
|
Observables |
– |
– |
Yes |
Yes |
Because of the benefits offered by TypeScript, users would do well to use it in the future when they write new apps. Alternatively, you could turn to JavaScript or even Google's programming language Dart [9].
Listing 4 shows the handler from the app.component.ts file, which takes care of the myApp directive (Listing 2) and is implemented as a component. The second line imports the Component decorator and the OnInit interface from Angular's core package; the next line retrieves the StackService and Weather classes from the stack.service.ts (Listing 5) and weather.ts (Listing 6) files.
Listing 4: app/app.component.ts
01 // The component replaces the <myApp> directive with the actual application, </myApp>
02 import { Component, OnInit } from '@angular/core';
03 import { Weather }      from './weather';
04 import { StackService } from './stack.service';
05
06 @Component({
07   selector: 'myApp',
08   templateUrl: 'app/app.component.html',
09 })
10 export class AppComponent implements OnInit {
11   datas: Weather[] = [];
12   model: Weather = new Weather(8, 1080);
13   constructor(private stackService: StackService) {}
14   avg(field: string): number { return this.stackService.avg(field); };
15   add(): void { this.stackService.add(new Weather(this.model.temp, this.model.press)); };
16   ngOnInit(): void { this.datas = this.stackService.datas}
17 }
The code creates the component AppComponent as a class. To do so, the decorator @Component first provides the class definition (line 10) with the properties of a component; the two configuration objects are used for this purpose. In line 7, selector selects the user-defined myApp directive, which is also available in index.html (Listing 2) as the field of activity; templateUrl links the template with the HTML file from Listing 3 one line later.
In contrast to its predecessor, Angular 2 only allows templates in conjunction with components. The type declaration of a variable with TypeScript follows a colon (Listing 4, line 11). Thus, datas expects a list of user-defined weather types from the Weather class (discussed later) and stores all the sets of readings. The model variable, in comparison, is simply a weather type; it is used with the [(ngModel)] directive to read values from the form fields (Listing 3, lines 5 and 6). Incidentally, a simple (ngModel) is all you need for reading.
The component implements the OnInit interface at the same time. Classes that it implements leverage services like StackService. Conveniently, Angular can produce services as singletons [10]; it then distributes them (like components or pipes) via the directives' constructor function (line 13). The ngOnInit() handler then links the datas list with the component of the same name from the StackService type object. The avg() and add() methods wrap the methods of the same name from StackService.
Injection
Listing 5 shows the StackService class, a simple data store from the app/stack.service.ts file. Line 2 first imports the Injectable decorator, making the StackService class injectable. The datas list in line 6 stores the application data. The any data type guarantees a universally usable data store, because any accepts any type of data. The add() method acts as an interface for storing new elements.
Listing 5: app/stack.service.ts
01 // Service class for storing application data
02 import { Injectable } from '@angular/core';
03
04 @Injectable()
05 export class StackService {
06   public datas: any[] = [];
07   add(obj: any): void { this.datas.push(obj); };
08   avg(fld: string): number {
09     if (this.datas.length > 0) {
10       return this.rnd(this.datas.reduce((s, o) => s + parseFloat(o[fld]), 0)/this.datas.length);
11     };
12     return 0;
13   };
14   rnd(val: number, digits: number = 2) {
15     let pre = Math.pow(10, digits);
16     return Math.round(val*pre)/pre;
17   };
18 }
Line 10 computes the arithmetic mean of all stored objects for the component handed over in the fld call parameter. If the list is not empty, method reduce() uses the component to compute the sum of all stored objects. The sum is then divided by the length of the list. Then, rnd() rounds the calculated mean value to two decimal places. For an empty list, avg returns 0 here for demonstration purposes.
In line 14, the rnd() helper method grabs the number to be rounded as val and the number of decimal places in digits. The line below this generates the value of 10 to the power digits. Line 16 saves the desired decimal places by multiplying first before rounding, to then put them back behind the decimal point with division.
Fine Tuning
Listing 6 shows the Weather class from the app/weather.ts file, which stores the measured temperature and pressure values (lines 4 and 5). Weather can be use as a data type like number or any. The constructor function (lines 6 to 10) binds the parameter handed over to it to attributes of the same name in the instance. The question mark behind (date) makes input optional; without it, line 9 generates the current timestamp.
Listing 6: app/weather.ts
01 // Weather can also be used as a data type in a type declaration
02 export class Weather {
03   date: string;
04   temp: number;
05   press: number;
06   constructor(temp: number, press: number, date?: string) {
07     this.temp = temp;
08     this.press = press;
09     this.date = (date)?date:(new Date()).toISOString();
10   }
11 };
Before the final practical test, the finished application needs to be converted to an Angular module. The app.module.ts file (Listing 7) takes care of this job by first importing the NgModule decorator, the directives from BrowserModule and FormsModule, and the classes from Listings 4 and 5.
Listing 7: app/app.module.ts
01 // Combine the app in an Angular module
02 import { NgModule } from '@angular/core';
03 import { BrowserModule } from '@angular/platform-browser';
04 import { FormsModule } from '@angular/forms';
05 import { AppComponent } from './app.component';
06 import { StackService } from './stack.service';
07
08 @NgModule({
09   imports:      [ BrowserModule, FormsModule],
10   declarations: [ AppComponent ],
11   bootstrap:    [ AppComponent ],
12   providers:    [ StackService]
13 })
14 export class AppModule { }
Starting in line 8, the NgModule decorator creates a matching Angular module in line 14 from the initially empty class definition. On this occasion, the decorator module also inherits all the built-in directives at the same time.
The code in line 9 imports more directives into the app. For example, BrowserModule delivers the directives ngFor and ngIf, whereas FormsModule picks up the ngModel directive. One line below, declarations collects all user-defined directives, which include components, pipes, and so on.
Line 11 uses bootstrap to set AppComponent as the root component, which calls the app at startup. Finally, providers instantiates and distributes the services: in this case, StackService through user-defined directives. If you store the last listing automatically, the application updates directly in the browser (Figure 5).
Conclusions
Angular 2 impresses with more flexible data bindings and focuses more than ever on components. At the same time, the new compiler accelerates the framework with the help of JiT or AoT. TypeScript converts the code from the framework and the applications to a modern state-of-the-art programming style; in contrast, the native implementation of common language resources in browsers often lags years behind. In the present, modern form, Angular 2 is likely to find many new friends; the only thing now keeping programmers from coding heaven is a comprehensive collection of UI widgets, such as that offered by Ext JS [11].
