Deploying OpenStack in the cloud and the data center
Build, Build, Build
Admins dealing with OpenStack for the first time can be quickly overwhelmed by the shear mass of components and their interactions. The first part of this series on practical OpenStack applications [1] likely raised new questions for some readers. It is one thing to know about the most important OpenStack components and to have heard about the concepts that underlie them, and a totally different matter to set up your own OpenStack environment – even if you only want to gain some experience with the free cloud computing environment.
In this article, therefore, I specifically deal with the first practical steps en route to becoming an OpenStack admin. The aim is a basic installation that runs on virtual machines (VMs) and can thus be set up easily with standard VMs. In terms of deployment, the choices were Ubuntu's metal as a service (generically, MaaS, but MAAS when referring to Ubuntu's implementation) [2], Juju [3], and Autopilot [4]. With this tool mix, even newcomers can quickly establish a functional OpenStack environment.
Before heading down to the construction site, though, you first need to finish off a few homework assignments. Although the Canonical framework removes the need for budding OpenStack admins to handle most of the tasks, you should nevertheless have a clear idea of what MAAS, Juju, and Autopilot do in the background. Only then will you later be able to draw conclusions about the way OpenStack works and reproduce the setup under real-world conditions and on real hardware.
Under the Hood
Canonical's deployment concept for OpenStack is quite remarkable because it was not intended in its present form. MAAS is a good example of this. Originally, Canonical sought to confront MAAS competitors like Red Hat Satellite. The goal was to be present during the complete life cycle of a server – from the moment in which the admin adds it to the rack to the point when the admin removes and scraps it.
To achieve this goal, MAAS usually teams up with Landscape [5] by implementing all parts of the setup that are responsible for collecting and managing hardware nodes: For example, a new computer receives a response from a MAAS server when it sends a PXE request after first starting up its network interface. On top of this, the MAAS server runs a DHCP daemon that provides all computers with IP addresses. On request, MAAS will also configure the system's out-of-band interfaces and initiate the installation of the operating system, so that after a few minutes, you can have Ubuntu LTS running on a bare metal server.
Canonical supplements MAAS and Landscape with Juju to run maintenance tasks on the hosts. The Juju service modeling tool is based on the same ideas as Puppet, Chef, or Ansible; however, it never shed the reputation of being suitable only for Ubuntu. Whereas the other automation specialists are found on a variety of operating systems, Juju setups are almost always based on Ubuntu. This says nothing about the quality of Juju: It rolls out services to servers as reliably as comparable solutions.
Neither MAAS, Landscape, nor Juju are in any way specific to OpenStack. The three tools are happy to let you roll out a web server, a mail server, or OpenStack if you want. Because several solutions exist on the market that automatically roll out OpenStack and combine several components in the process, Canonical apparently did not want to be seen lacking in this respect.
The result is Autopilot. Essentially, it is a collection of Juju charms integrated into a uniform interface in Landscape that help roll out OpenStack services. The combination of MAAS, Landscape, Juju, and the Juju-based Autopilot offers a competitive range of functions: Fresh servers are equipped with a complete OpenStack installation in minutes.
Caution, Pitfalls!
For the sake of completeness, I should point out that the team of Landscape, MAAS, Juju, and Autopilot does not always thrill admins. The license model is messy: Without a valid license, Landscape only manages 10 nodes. For an OpenStack production cloud, this is just not enough.
However, SUSE and Red Hat also aggravate potential clients in a comparable way. In this example, I would not have improved the situation by using Red Hat or SUSE instead of Ubuntu. However, admins need to bear in mind that additional costs can occur later.
Preparations
Five servers are necessary for an OpenStack setup with MAAS and Autopilot. The first server is the MAAS node: It runs the DHCP and TFTP servers and responds to incoming PXE requests. The second machine takes care of all tasks that fall within the scope of Autopilot. The rest of the servers are used in the OpenStack installation itself: a controller, a network node, and a Compute server.
OpenStack stipulates special equipment requirements for these servers: The server that acts as a network node requires at least two network cards, and because Autopilot also has Ceph [6] on board as an all-inclusive package for storage services, all three OpenStack nodes should be equipped with at least two hard drives.
Nothing keeps you from implementing the servers for your own cloud in the form of VMs, which can reside in a public cloud hosted by Amazon or Google, as long as you adhere to the specs described in this article. Although such a setup is fine for getting started, the conclusions you can draw about a production setup from this kind of cloud are obviously limited.
One problem with public clouds is that they usually do not support nested virtualization. Although the Compute node can use Qemu to run VMs, these machines are fully virtualized and come without support for the various features of the host CPU. You will have more leeway if you can run the appropriate VMs on your own desktop. Nested virtualization is now part of the repertoire of VMware and similar virtualization solutions.
The three OpenStack nodes, at least, need a fair amount of power under the hood, so this setup will only be successful on workstations with really powerful hardware, as is also true with regard to the storage devices you use. Because Autopilot in this sample setup rolls out a full-blown Ceph cluster, the host's block device will experience significant load, which is definitely not much fun with a normal hard drive; you will want a fast SSD, at least.
Of course, the best way of exploring OpenStack is on physical machines. If you have a couple of older servers left over and fancy building a suitable environment in your own data center, go ahead. However, it is important that the MAAS management network does not contain any other DHCP or TFTP server, because they would conflict with MAAS. The requirements for a network with at least two OpenStack nodes and for the Ceph disk need to be observed in such a construct.
The following example assumes that five VMs are available in a private virtualization environment. The MAAS and Autopilot nodes have a network interface. The three OpenStack nodes each have a disk for Ceph, in addition to the system disk, as well as four CPU cores and 16GB of virtual memory. All three use a network adapter to connect to the same virtual network as the node for MAAS and Autopilot. The designated network node, which has a second network interface controller (NIC), is also connected to the same network.
Network Topologies
Admins make a basic distinction between private and public networks in clouds. The private network primarily ensures secure communication between physical hosts, whereas the public network provides the public IP addresses the VMs in OpenStack use to connect with the outside world. Therefore, MAAS natively supports two methods to configure the network in OpenStack.
The approach presented here assumes that the single physical network is available for communication between the hosts in the cloud and as the external link for the OpenStack server, primarily because I want the setup presented in this article to be as simple as possible. MAAS naturally lets you set up a second physical network, but this requires far more configuration work.
The MAAS Server
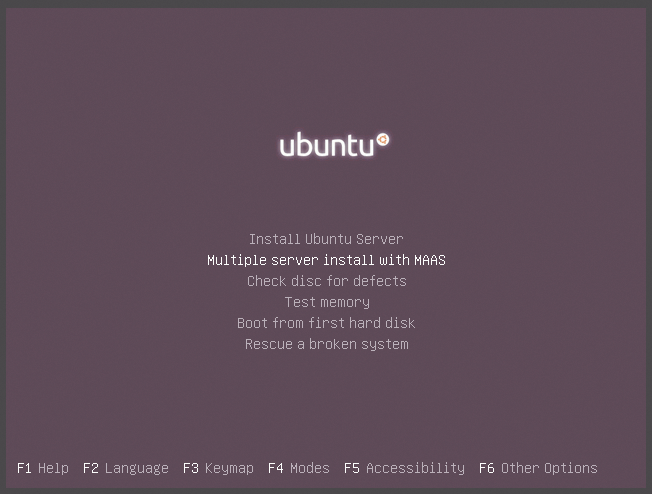
MAAS is basically the nucleus for a Ubuntu setup that includes Landscape and Autopilot (Figure 1). The node that provides the MAAS services requires only a bit of manual installation. Strangely, Canonical currently still insists on Ubuntu 14.04 for the MAAS node – at least according to the documentation – even though this version is almost three years old. If you want to follow this setup on physical machines with the latest servers, you can still at least pick up a current kernel for Ubuntu 14.04 that is capable of supporting the newer hardware.

The first step from an admin's perspective is to install Ubuntu 14.04 on the designated MAAS node and install all the available updates. As soon as the basic operating system installation is complete, the MAAS installation follows. Canonical provides the required packages in a separate repository:
sudo apt-get install python-software-properties
sudo add-apt-repository ppa:cloud-installer/stable
sudo apt-get update
sudo apt-get install maas
After entering the first three commands, the MAAS repository is active on the system, and the last line starts the MAAS installation. Downloading and rolling out the corresponding packages may take some time to complete, after which, you are almost done with the installation.
MAAS is organized internally according to regions, which is Canonical's way of making sure that servers in different data centers can still be managed by a central MAAS instance. The MAAS packages even create a default region themselves but do not set a password for the admin user in it. You can correct this by typing
sudo maas-region-admin createadmin
at the MAAS server command line, after which you will see the MAAS login screen when you go to http://<IP>/MAAS/ (replace <IP> with your MAAS IP address).
Setting Up MAAS
For the smooth running of MAAS in OpenStack environments, a few configuration parameters need to be adapted after the install. In the Settings tab, the download URL for Boot images must be defined as http://images.maas.io/ephemeral-v2/daily/ instead of the default value. If the MAAS server resides behind a firewall, you also need to ensure that it can reach the specified URL. Again in Settings, you need to enter a DNS server, which the OpenStack node will use later.
In the Images tab, click to import images for Ubuntu 14.04 LTS and 16.04 LTS. Finally, enter a valid SSH key in your account settings. MAAS later automatically dumps this on the rolled-out nodes so that you can log in easily via SSH. The menu is accessible via the button in the top-right corner of the MAAS GUI.
Your Own Cluster
What the MAAS developers mean when they say "cluster" does not necessarily match what admins usually mean. This is not about a cluster of multiple MAAS nodes, but of all the hardware nodes that belong to a MAAS setup (i.e., what the MAAS server in question manages). For MAAS to be able to roll out OpenStack, you need to define the basic properties of the MAAS server for the MAAS cluster. The tasks include, in particular, the server's network configuration and enabling DHCP and DNS.
Clicking on Clusters and choosing Cluster master in the Cluster field takes you directly to the appropriate MAAS server configuration. If the MAAS server has only one NIC, such as the example here, it is the only one shown. If you now mouse over this box, an editing symbol appears that allows you to edit the entry. You need to configure the MAAS server so it provides DHCP for the private network and sends DNS entries. You also need to enter the default gateway in the Router IP field, which MAAS and the individual cloud server can use to reach the Internet.
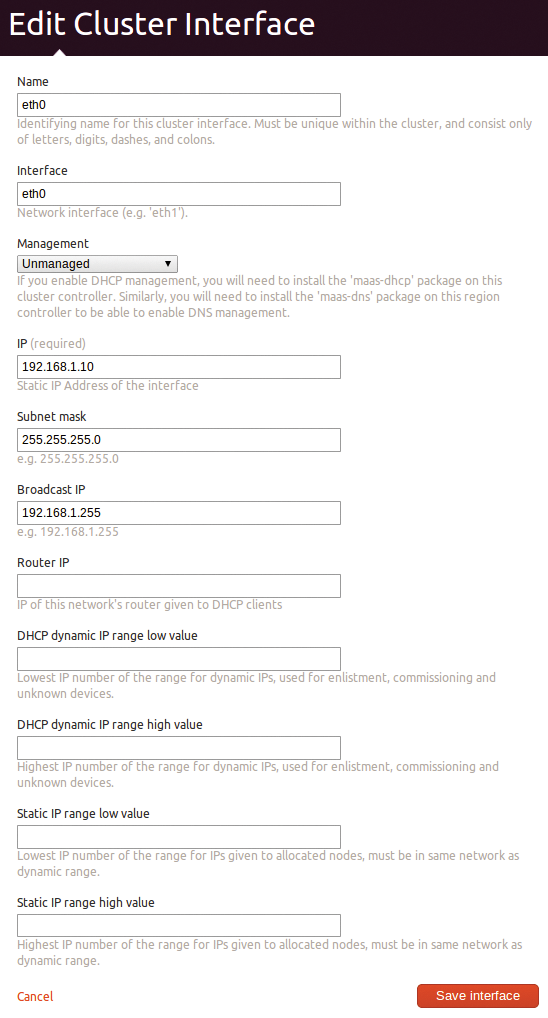
Further down, you also need to configure the IP network that MAAS will use to allocate IP addresses to the hardware nodes (Figure 2). Note that:
- MAAS uses dynamic range as a pool of IPs to which new nodes are dynamically allocated when first inventoried. You need at least 60 addresses in a new setup, in addition to the number of nodes reserved in total from the outset.
- The static range is the range of IP addresses to which nodes are permanently allocated after installation. The documentation recommends specifying at least 20 IP addresses, which is slightly oversized for the current example.
- The floating range is not a MAAS parameter; it should nevertheless be specified. MAAS later takes the IP addresses that it uses for public IP addresses in OpenStack from this range. By defining them at this point, you can make sure that the addresses are not accidentally used in node management as part of the two other pools.
A final click on Save stores the settings. After completing the download of the Ubuntu image (Images tab), MAAS is now ready for use.

Introductions
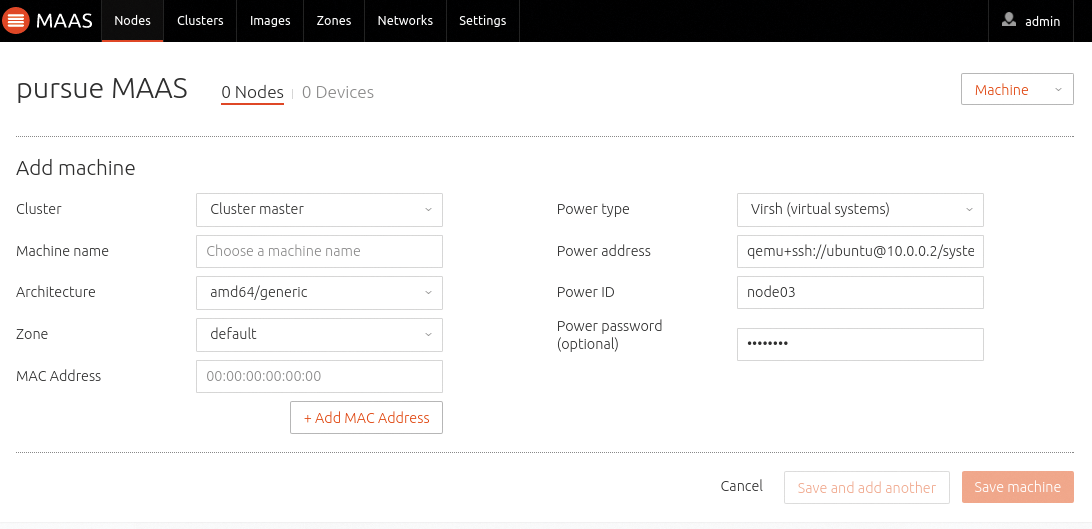
In the next step, you need to introduce your other computers to the now-configured instance of MAAS. Each node except for MAAS itself should be configured so that it automatically boots via PXE (Figure 3). After making sure that this is the case, start up the nodes individually (i.e., the other VMs in this example). They gradually boot to an inventorying image specially offered by MAAS and then appear in the MAAS node list (Nodes tab).

For the four servers now listed in MAAS, you then individually define what kind of systems they are. MAAS needs this information to take control of the server (e.g., to reboot it via IPMI).
The Power Type drop-down for each server allows this configuration. Depending on the selected value, fields for different parameters that you need to fill out for each server now appear below the drop-down menus. In this specific example, where the MAAS servers exist as VMs on a Linux system and are managed by Virsh, the type would be Virsh (virtual systems).
In the Power Address field, the entry could then be qemu+ssh://ubuntu @10.42.0.2/system; the value for Power ID would be openstack01, and the Power password would be the password for the ubuntu user on the virtualization host. If you are using physical systems instead of VMs, you need to tell MAAS how to dock with their out-of-band management interfaces (Figure 3).
Back in the Nodes tab, select all the nodes listed in the next step and then select Take action | Commission in the drop-down menu at top right. Once all the machines have a Ready Status, it is time for the hard work. For each node, you need to check whether the network configuration of the system is working. The first NIC in the server should appear on the Details page for the node; it should be connected with the private network, and the value in the IP Address field should be Auto assign. The system with two NICs should also display the second NIC as connected to the private network, but the IP address entry should read Unconfigured.
Firing Up Autopilot
The next step takes you back to the MAAS server command line. The commands
sudo apt-get install openstack
sudo JUJU_BOOTSTRAP_TO=<Autopilot-Host> openstack-install
send the packages required for OpenStack to the MAAS server and ensure that OpenStack Autopilot is automatically rolled out to the intended host, so <Autopilot-Host> should be adapted accordingly.
During setup, openstack-install asks you which mode you want to use for the OpenStack installation. Landscape OpenStack Autopilot is the correct answer. Your responses to the questions posed by the installer are determined by your local environment. At the end, the program asks for the MAAS server IP address and the user-specific API key for MAAS – this can be found in the user settings, which are accessible from the top-right button in MAAS.
As soon as the action is completed successfully, openstack-install shows you a link, which you should open in your browser; you are then treated for the first time to a view of a finished Landscape with OpenStack integrated (Figure 4).

Installing OpenStack
Strange as it sounds, the rest of the OpenStack installation, including Ceph, is very much a manual, but painless, operation from here on out. The setup shown in this example is the typical showcase for Canonical Autopilot – that is, the smallest possible standard setup according to current information. On the Landscape website, first press Setup. For Compute, select KVM, with Open vSwitch as the Network and Ceph for both Object Storage and Block Storage.
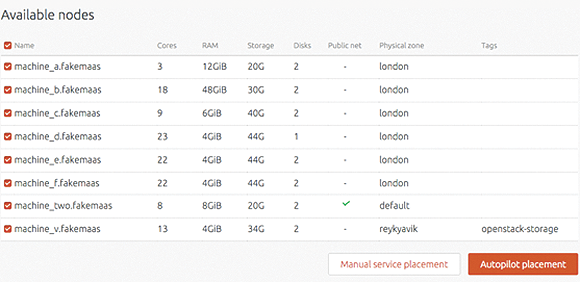
Clicking on Configure & Install takes you to a selection of nodes available for the new OpenStack setup. After selecting the three OpenStack servers, Autopilot placement (Figure 5) ensures that Autopilot optimally distributes the OpenStack services across the available nodes – and the installation starts. At the end of the process, Autopilot offers the option of creating an OpenStack user, who then has access to the OpenStack dashboard. Once this point is reached, congratulations are the order of the day: You have completed the journey to your first OpenStack installation.

Discover the Possibilities
At the end of the Autopilot setup, you have an OpenStack cloud, in which all the services discussed in the first article of this series [1] are available. The IP you use to call the dashboard at the end of the Autopilot installation is also the IP under which the Keystone authentication component is accessible. Horizon offers an Access & Security menu item with an openrc file you can integrate directly with the local environment by using the source command at the command line.
You can then use all the OpenStack command-line clients like the dashboard. If you just want to familiarize yourself with the dashboard instead, you can create virtual networks and start, stop, and remove VMs.
If you want to look at the setup on each host, the configuration files for the services are always located in a folder named after the respective service under /etc. If you have not had any dealings with Ceph so far, you can change this in the test setup: In addition to OpenStack, Autopilot has also rolled out a complete Ceph and configured it such that OpenStack accesses it and uses it for the Glance image service and the Cinder volume service.
Expanding the Setup
Within the constraints of the aforementioned limitation to 10 hosts, you can still extend the setup. If you enjoyed the solution after your first contact with OpenStack, you can first use MAAS to provision additional nodes and then assign them a task in the OpenStack setup using Autopilot.
Future
An OpenStack cloud setup using Autopilot is perfect for your initial steps, but if you are looking to deploy OpenStack in the data center, you need to invest more brain power: Various dependencies and various challenges – high availability and security, to mention just two – require careful planning. The next article in this series therefore investigates these building blocks.
